
I remember one particular autumn afternoon, the sky was that soft, hazy gray and a cool breeze was rustling the last of the leaves off the trees. I was feeling a little melancholy, a little homesick for a place I couldn't quite name. On a whim, I pulled out the ingredients for these enchiladas. The process itself became a meditation—shredding the chicken, stirring the creamy sauce, carefully rolling each tortilla. The kitchen slowly filled with the aroma of roasted chiles and warming spices. By the time I pulled the bubbling, golden-brown dish from the oven, the whole house felt warmer, safer. That meal, eaten quietly at my kitchen table, was more than just food; it was a reminder that comfort can be created, that we can build our own sense of home, one delicious, cheesy bite at a time. It’s a feeling I come back to every time I make this dish, a simple and profound comfort.
Why This Recipe Feels Like a Hug
-
Incredibly Comforting: There's something about the combination of tender shredded chicken, mild green chiles, and oh-so-much melted cheese that is just pure comfort. Each bite is warm, savory, and feels like it was made with love. It's my go-to when I need a little culinary pick-me-up.
-
Surprisingly Quick: For a dish that tastes so layered and slow-cooked, it comes together in a flash. Using pre-cooked chicken makes it a perfect weeknight meal when you're short on time but still craving something substantial and delicious. It feels like a little kitchen secret.
-
Rich, Creamy Flavor: The sauce is the star here—it's creamy without being heavy, with a gentle warmth from the green chiles. It coats every single bit of the chicken and tortillas, ensuring that every bite is packed with flavor. It’s so much more nuanced than a typical red sauce.
-
Endlessly Adaptable: This recipe is a wonderful starting point. You can add corn, black beans, or different cheeses. Sometimes if I want a spicier kick, I'll make a spicy weeknight meal variation by adding fresh jalapeños. It’s easy to make it your own.
Honestly, this is the most comforting and flavorful enchilada recipe I've ever made. It’s a weeknight game-changer!
Essential Ingredient Guide
- Green Chile Enchilada Sauce: This is really the heart of the recipe. While you can make your own, a good quality canned green chile sauce is a fantastic time-saver. Look for one that has a nice, roasted flavor and isn't too watery. I prefer the medium heat level because it gives a gentle warmth that builds without being overwhelming. The chiles provide a slightly sweet, earthy, and smoky flavor that defines the entire dish.
- Shredded Chicken: Using a rotisserie chicken is my favorite shortcut here; it’s just so easy and the meat is always perfectly moist and flavorful. You can also poach or bake a couple of chicken breasts and shred them yourself. The key is to have tender, bite-sized pieces that will soak up all that wonderful sauce. It’s a great way to use up leftover chicken, too.
- Monterey Jack Cheese: Please, please, please grate your own cheese if you can! The pre-shredded kind has anti-caking agents that prevent it from melting as beautifully. Monterey Jack is perfect for this because it's mild, creamy, and melts into a glorious, gooey blanket over the enchiladas. A little bit of sharp cheddar mixed in can add a nice tang, but Jack cheese is the classic choice for that perfect cheese pull.
 Dinner
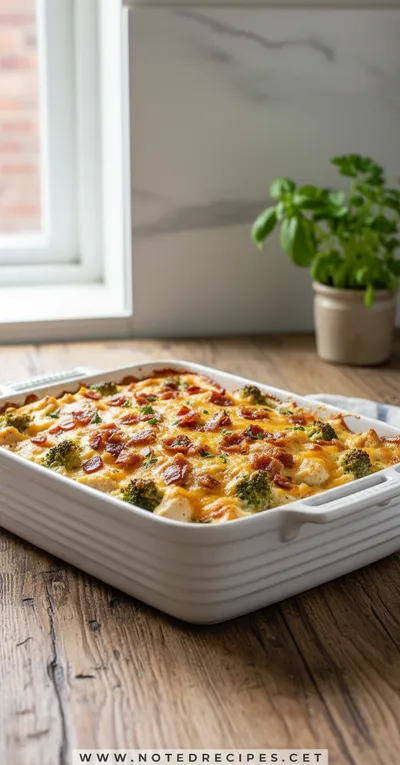
Creamy Low Carb Chicken Casserole
Low‑carb, creamy chicken casserole that feels indulgent without the noodles.
Complete Cooking Process
-
Creating the Filling:
The first step is all about building that flavorful core. We'll gently combine the tender shredded chicken with a portion of the green chile sauce and a generous handful of that lovely Monterey Jack cheese. This isn't just mixing; it's about making sure every piece of chicken is coated and ready to become the heart of our enchiladas. You want the filling to be moist and cheesy from the get-go, so that when it bakes, it becomes impossibly rich and decadent inside the soft tortilla.
-
Assembling the Enchiladas:
Now comes the calming, rhythmic part of rolling. We'll warm the corn tortillas just enough to make them pliable and prevent them from cracking—a crucial little step! Then, you'll spoon that delicious chicken mixture down the center of each one and roll it up snugly, like a little blanket. You'll arrange them seam-side down in your baking dish, nestled right up against each other. It’s a satisfying process that feels so hands-on and traditional.
-
Baking to Perfection:
This is the final, magical transformation. You'll pour the remaining green chile sauce over the rolled enchiladas, making sure to cover them completely. Then, the grand finale: a generous blanket of the remaining cheese over the top. As it bakes, the sauce will bubble up, the cheese will melt and turn golden brown in spots, and your kitchen will fill with the most incredible, mouth-watering aroma. This is when the anticipation really builds, and dang, it's worth it.
Frequently Asked Questions
→ Can I make these enchiladas ahead of time?
Absolutely! This is one of my favorite things about this recipe. You can assemble the entire dish, cover it tightly with foil, and refrigerate it for up to 24 hours before baking. You may need to add about 10-15 minutes to the baking time to ensure they're heated all the way through. It makes it a perfect dish for entertaining or for a busy day when you want a home-cooked meal ready to go.
→ My corn tortillas always crack when I roll them. What am I doing wrong?
Ugh, that is the most frustrating thing, isn't it? The key is to warm them up properly to make them soft and pliable. My favorite method is to wrap a stack of them in a damp paper towel and microwave them for about 45-60 seconds. You can also quickly fry them in a little bit of hot oil for a few seconds per side, which also adds a lovely layer of flavor, similar to what you'd do for an easy chimichanga.
→ What kind of chicken is best for this recipe?
Honestly, whatever is easiest for you! A store-bought rotisserie chicken is a fantastic shortcut and always yields moist, flavorful meat. You can also boil or bake two chicken breasts until cooked through, then shred them with two forks. Even leftover grilled chicken would be delicious here! The saucy, cheesy goodness is very forgiving and will make any cooked chicken taste amazing.
→ Can I use flour tortillas instead of corn?
You certainly can, but it will change the texture and flavor. Flour tortillas will result in a much softer, almost dumpling-like texture, whereas corn tortillas hold their shape a bit better and offer a distinct, earthy corn flavor that is traditional for enchiladas. If you prefer flour, go for it! Just know it will be a different, albeit still delicious, experience. I find the texture more similar to a crockpot casserole when using flour tortillas.
→ How can I make this dish spicier?
Oh, I love a good kick of heat! The easiest way is to choose a 'hot' green chile enchilada sauce instead of mild or medium. You can also add a finely diced jalapeño or serrano pepper to the chicken mixture. Another great option is to add a pinch of cayenne pepper to the sauce before you pour it over the enchiladas. A drizzle of your favorite hot sauce on top before serving also works wonders!
→ What are the best toppings for these enchiladas?
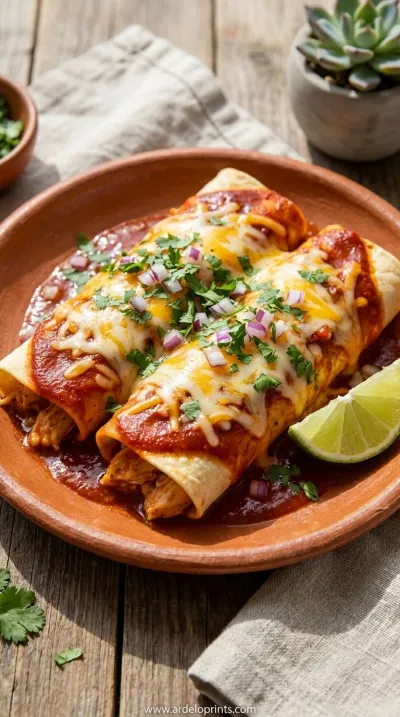
Toppings are where you can really have fun and add fresh textures! I love a dollop of sour cream or Mexican crema, some chopped fresh cilantro, and maybe some sliced green onions. Sliced avocado or a scoop of guacamole is also heavenly. If you want a little crunch, some crushed tortilla chips or toasted pepitas on top are wonderful.
→ Can I freeze these enchiladas?
Yes, they freeze quite well. Assemble them in a freezer-safe baking dish, but don't bake them. Cover tightly with a layer of plastic wrap and then a layer of foil. They can be frozen for up to 3 months. When you're ready to eat, let them thaw in the refrigerator overnight and then bake as directed. The texture of the tortillas might be slightly softer after freezing, but they will still be delicious.
Nutrition Facts
per serving
450
Calories
30g
Protein
28g
Carbs
25g
Fat
Taste Profile
Savory, creamy, and mildly tangy with a gentle warmth from the green chiles and a rich, cheesy finish.
Ingredient Substitutions
Don't have an ingredient? Try these alternatives
You want good melting cheeses here. Avoid hard, dry cheeses. The goal is that wonderful, gooey texture.
If using flour tortillas, you won't need to warm them as extensively. The final texture will be much softer, more like a savory bake.
Recipe Variations
Try these delicious twists on the original
Black Bean and Corn Version
Make it vegetarian-friendly by omitting the chicken and adding 1 (15-ounce) can of black beans (rinsed and drained) and 1 cup of frozen corn to the cheese and sauce mixture. It's hearty and so delicious.
Smoky Red Chile Version
Swap the green chile enchilada sauce for a red enchilada sauce. For an extra layer of flavor, add 1/2 teaspoon of smoked paprika or a teaspoon of adobo sauce from a can of chipotle peppers to the filling.
Common Mistakes to Avoid
Learn from others' mistakes for perfect results
- Not warming the tortillas, which causes them to crack and fall apart during rolling.
- Overstuffing the enchiladas, making them difficult to roll and causing the filling to spill out.
- Not using enough sauce, which can result in dry enchiladas. Be generous and make sure they are well-covered!
- Using pre-shredded cheese, which doesn't melt as smoothly due to added starches.
Meal Prep & Storage
Make Ahead Tips
This is a fantastic make-ahead meal. You can assemble the entire casserole up to 24 hours in advance. Just cover it tightly and keep it in the refrigerator. When you're ready, just pop it into the oven, adding about 10-15 minutes to the baking time since it will be starting from cold. It’s a lifesaver for busy evenings or when you have guests coming over.
Leftover Ideas
Leftover enchiladas are a true gift! Store them in an airtight container in the fridge for up to 4 days. They reheat wonderfully in the microwave or oven. I honestly love them for lunch the next day. Sometimes I'll even chop them up and use them as a filling for a quick quesadilla or as a topping for nachos. It's almost as versatile as a good taco recipe.
Perfect Pairings
Serve this with...
Cooking Timeline
Preheat oven to 375°F. Mix chicken, 2 cups cheese, diced chiles, spices, and 1 cup of sauce in a bowl.
Warm tortillas. Fill and roll each tortilla, placing them seam-side down in a 9x13-inch baking dish.
Pour remaining enchilada sauce over the top and sprinkle with the final cup of cheese.
Bake for 20-25 minutes until bubbly and golden.
Let rest for a few minutes, then garnish and serve.
 Dinner
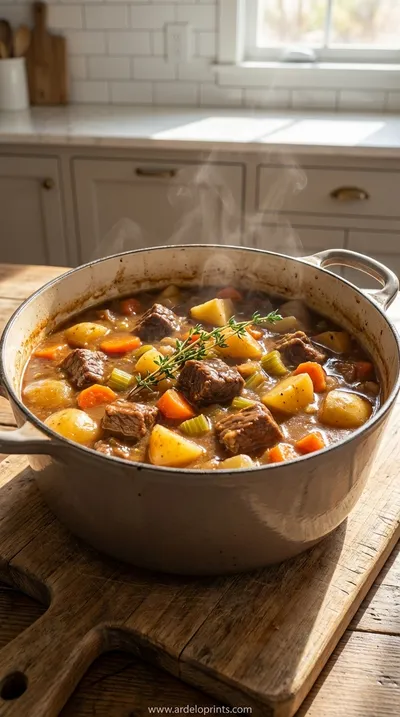
One-Pot Autumn Beef Stew: Cozy Fall Dinner Recipe
Hearty beef stew with fall vegetables creates comforting nourishment.
Cheesy Chicken Chile Enchiladas Recipe
Make cheesy chicken chile enchiladas with this quick and easy recipe. Ready in 25 minutes, perfect for a flavorful meal!
Timing
Prep Time
15 Minutes
Cook Time
25 Minutes
Total Time
40 Minutes
Recipe Details
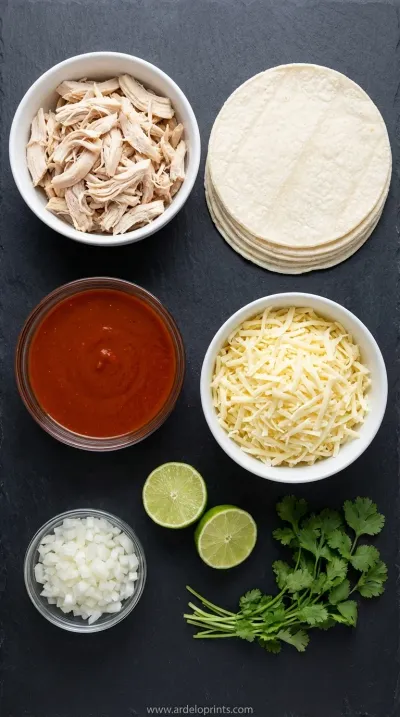
Ingredients
For the Enchiladas
-
01
3 cups shredded cooked chicken (rotisserie chicken works perfectly)
-
02
3 cups shredded Monterey Jack cheese, divided
-
03
1 (28-ounce) can green chile enchilada sauce, divided
-
04
1 (4-ounce) can diced green chiles, drained
-
05
1/2 teaspoon ground cumin
-
06
1/4 teaspoon garlic powder
-
07
Salt and freshly ground black pepper to taste
-
08
12 corn tortillas
Optional for Garnish
-
01
Sour cream or Mexican crema
-
02
Chopped fresh cilantro
-
03
Sliced green onions
-
04
Diced avocado
Instructions
First, let’s get the oven preheating to 375°F (190°C). Grab a 9x13-inch baking dish and set it aside; it’s about to become home to all this cheesy goodness. In a medium bowl, we're going to create our filling. Gently combine the shredded chicken, 2 cups of the Monterey Jack cheese, the can of diced green chiles, the cumin, and the garlic powder. Then, pour in about 1 cup of the enchilada sauce, just enough to moisten everything and bring it together. Give it a gentle stir and season with a little salt and pepper. Just look at that, it already smells amazing.
Now for the tortillas. We need to make them soft and rollable so they don't tear. My favorite no-fuss method is to wrap the stack of 12 tortillas in a damp paper towel and pop them in the microwave for about a minute. They should come out warm and steamy. Working with one tortilla at a time, spoon about 1/4 cup of the chicken mixture down the center. Don't overfill it! Then, roll it up snugly and place it seam-side down in your prepared baking dish. Continue with the rest of the tortillas, arranging them in a single, cozy layer.
This is the best part, I think. Pour the rest of that beautiful green chile enchilada sauce evenly over the top of all the rolled tortillas. I like to use a spatula to make sure every nook and cranny is covered in sauce. You want them to be completely smothered. Then, sprinkle the remaining 1 cup of Monterey Jack cheese all over the top. Be generous! Let it cover everything in what will soon be a glorious, melted blanket of cheese.
Carefully place your dish into the preheated oven and bake, uncovered, for about 20-25 minutes. You’ll know it’s ready when the sauce is bubbly around the edges and the cheese is completely melted and just beginning to turn a beautiful golden brown in spots. Let it rest for about 5 minutes before serving—I know, it's torture, but it helps everything set up. Garnish with your favorite toppings like cilantro and sour cream, and just enjoy that moment. This is what comfort tastes like.
Notes & Tips
-
1
If you want a bit more texture in your filling, feel free to add 1/2 cup of black beans or corn to the chicken mixture. It adds a lovely little pop of sweetness and earthiness.
-
2
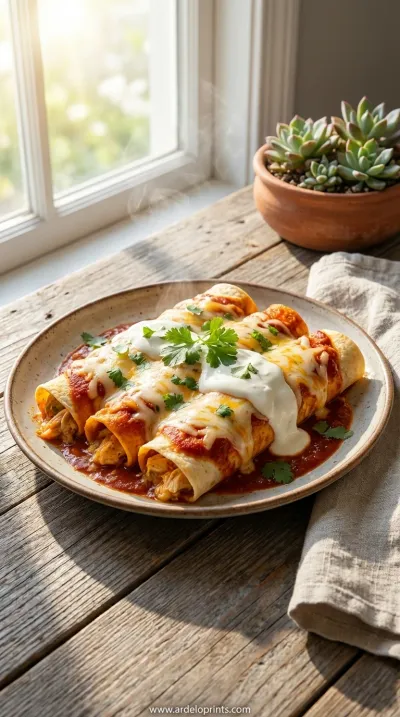
For a creamier sauce, you can stir 1/2 cup of sour cream or full-fat Greek yogurt into the enchilada sauce before pouring it over the tortillas. This creates a really luscious, rich finish, similar to my favorite white chicken enchiladas.
-
3
Don't be afraid to mix up the cheeses! A blend of Monterey Jack and sharp cheddar is delicious, or try adding some queso asadero or a sprinkle of cotija cheese on top after baking for a salty finish.
 Dinner
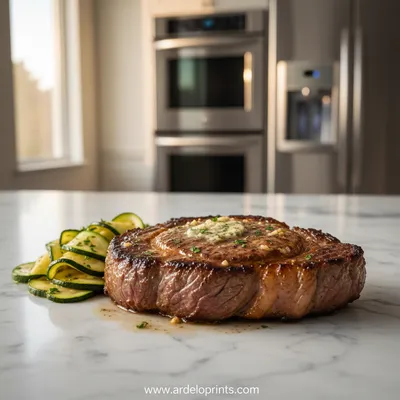
Garlic Butter Steak and Zucchini Delight
Savory steak and zucchini in a garlic‑butter glaze for a fast, satisfying dinner.
Tools You'll Need
-
9x13-inch Baking Dish: A classic ceramic or glass casserole dish is perfect. It holds the heat evenly, ensuring your enchiladas bake up bubbly and golden all the way through. The weight of it feels so sturdy and reliable in your hands.
-
Mixing Bowl: You'll need a medium to large bowl to mix the chicken filling. I love using my simple glass bowl because I can see all the ingredients coming together, the green chiles and cheese speckling the chicken.
-
Spatula: A silicone or rubber spatula is so helpful for spreading the sauce over the enchiladas, making sure every single one is perfectly coated. It’s also great for scraping every last bit of that delicious filling out of the bowl.

Recipe by
Sofia Marin“Dinner is where stories are shared and flavors shine. I craft comforting recipes perfect for family nights.” 🍷🍲
Get Delicious Recipes Weekly
Join 25,000+ home cooks getting our best recipes straight to their inbox.
Free forever • No spam • Unsubscribe anytime