Why You'll Love These Spooktacular Brownies
- Rich, fudgy chocolate brownies that everyone adores, especially for Halloween.
- A perfect, moist canvas for all your spooky decorating ideas and creativity.
- Fun and easy to make with kids, creating wonderful family memories in the kitchen.
- Ready for any Halloween party, school event, or cozy autumn night in with a treat.
- Simple ingredients come together for a decadent, crowd-pleasing dessert.
- They just bring a little bit of festive magic and fun to the season, honestly!
Oh my goodness, these brownies are a dream! So incredibly moist and chocolatey. My kids absolutely loved decorating them for our Halloween party. They were the first thing gone from the dessert table! Such a fun and delicious recipe!
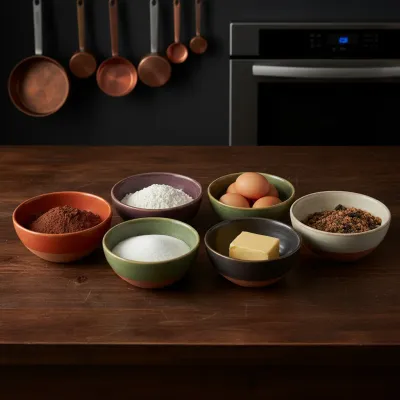
Essential Ingredient Guide
- Unsweetened Cocoa Powder: This is where all that deep, dark chocolate flavor comes from. Don't skimp on quality here; it really makes a difference. Dutch-processed is lovely for a rich, darker brownie, which is perfect for Halloween!
- Good Quality Butter: Use unsalted butter, softened. It adds richness and helps create that glorious fudgy texture. And honestly, butter just makes everything better, right? It's the base for that decadent taste.
- Eggs: Room temperature eggs are key for a smooth batter that emulsifies beautifully. They give your brownies that wonderful chewy texture we all crave. Just plan ahead a little!
- Granulated Sugar & Brown Sugar: A thoughtful mix of both gives the perfect balance of sweetness and moisture. Brown sugar adds a lovely depth and chewiness that you just can't get with only white sugar. It's a little secret for that perfect texture.
- Pure Vanilla Extract: A good splash of pure vanilla extract always brightens up chocolate flavors, making them pop. It’s like a little secret handshake for your taste buds, truly enhancing the whole experience.
Complete Cooking Process
-
Preparing Your Brownie Base:
- Preheat your oven and line your baking pan – this makes cleanup so much easier, trust me!
- Gently melt the butter, then whisk in both sugars until creamy. This is the foundation of that lovely fudgy texture.
- Add the room-temperature eggs one at a time, along with the vanilla. Mix until it's light and glossy.
- In a separate bowl, combine your dry ingredients: flour, cocoa, baking powder, and salt. Make sure to whisk them well.
- Carefully fold the dry into the wet until just combined. Less mixing means more fudgy brownies, so be gentle!
- Pour into the pan and bake until a toothpick comes out with moist crumbs. Don't overbake, honey!
-
Cooling and Cutting:
- Let your brownies cool completely in the pan on a wire rack. I know, I know, it's hard to wait!
- Once perfectly cool, use the parchment paper to lift them out. This step is a lifesaver for clean cuts.
- Use a sharp, warm knife to cut your brownies into desired shapes. Wipe the knife between cuts for neat edges.
-
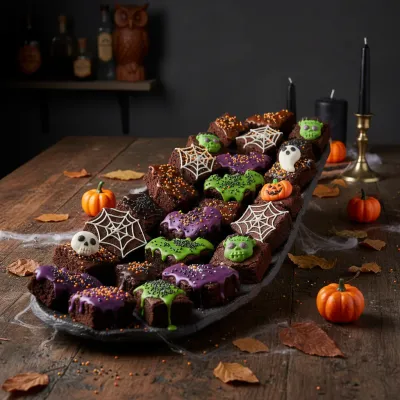
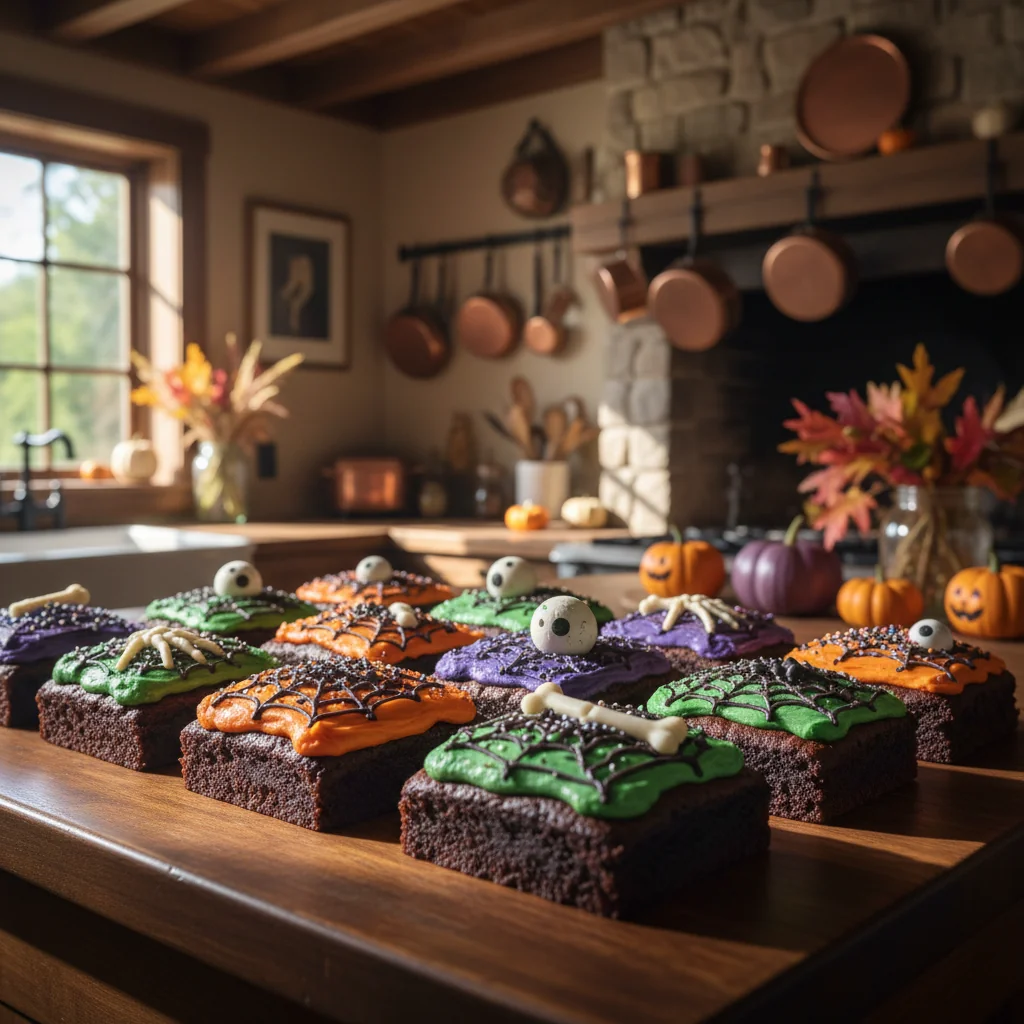
Getting Creative with Halloween Decor:
- Prepare your chosen frosting or ganache. You can color separate batches for a vibrant Halloween palette.
- Spread a base layer of frosting on your cooled brownies. Smooth it out for an even canvas.
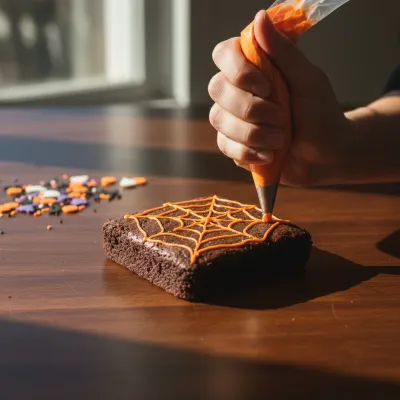
- Now for the fun part: unleash your inner artist! Create ghostly swirls with white frosting, or draw spiderwebs with melted white chocolate.
- Use candy eyes to bring your spooky characters to life. Little mummies, Frankenstein monsters, or even just silly faces!
- Crush some Oreo cookies for a 'dirt' effect and add gummy worms for a creepy-crawly garden.
- Pipe black gel icing for spider bodies or use edible markers for intricate designs. Don't forget those Halloween sprinkles for extra sparkle!
Frequently Asked Questions About Halloween Brownies
→ How do I get super fudgy brownies?
The secret to super fudgy brownies is two-fold: don't overbake them! Pull them from the oven when a toothpick comes out with moist crumbs, not liquid batter. Also, use a good balance of butter and sugar, like in this recipe. Cooling completely before cutting helps too!
→ Can I make these brownies ahead of time?
Absolutely! Brownies are fantastic for making in advance. You can bake the brownies up to 2-3 days ahead, store them unfrosted in an airtight container at room temperature, then decorate on the day you plan to serve them. It saves so much time!
→ What are some easy decorating ideas for kids?
For kids, simple is best and often the most fun! Think ghost swirls (white frosting, then draw eyes/mouth with black gel), mummy brownies (white frosting strips over the brownie, add candy eyes), or 'graveyard' brownies (crushed Oreos as dirt, a cookie or candy corn as a tombstone, and maybe a gummy worm!).
→ Can I add mix-ins to the brownie batter?
Oh, totally! I love adding a cup of chocolate chips – milk, dark, or white – for extra pockets of melty goodness. You could also stir in chopped nuts like walnuts or pecans for a little crunch. Just fold them in with the dry ingredients.
→ How should I store leftover decorated brownies?
Store any leftover decorated brownies in an airtight container at room temperature for up to 3-4 days. If your frosting is cream cheese-based, it's best to store them in the refrigerator, but let them come to room temperature before serving for the best texture.
Chef's Tips
Feel free to experiment with different types of chocolate chips in the batter, like white chocolate or peanut butter chips.,For an extra festive touch, consider adding a few drops of orange or green food coloring to your brownie batter for a subtle tint!,If you're short on time, store-bought frosting works perfectly for decorating; just jazz it up with food coloring and sprinkles.,These brownies also freeze wonderfully! Wrap unfrosted cooled brownies tightly in plastic wrap, then foil, and freeze for up to 2-3 months. Thaw at room temperature before decorating.,Have fun with the decorating! There's no right or wrong way to make them spooky and unique.
Halloween Brownies: Spooktacular Recipe Ideas
Make spooktacular Halloween brownies! These decadent chocolate squares are transformed with fun, creepy decorations perfect for any haunted party.
Timing
Prep Time
20 minutes
Cook Time
25-30 minutes
Total Time
45-50 minutes (plus cooling)
Recipe Details
Ingredients
For the Fudgy Brownies
- 01 1 cup (2 sticks) unsalted butter
- 02 1 cup granulated sugar
- 03 1 cup packed light brown sugar
- 04 4 large eggs, room temperature
- 05 1 teaspoon pure vanilla extract
- 06 1 cup all-purpose flour
- 07 1 cup unsweetened cocoa powder (Dutch-processed for darker brownies)
- 08 1/2 teaspoon baking powder
- 09 1/4 teaspoon salt
- 10 Optional: 1 cup chocolate chips or chopped nuts
For Halloween Decorating (Suggestions)
- 01 1 batch vanilla buttercream frosting or chocolate ganache
- 02 Food coloring (orange, green, black)
- 03 Candy eyes
- 04 Oreo cookies, crushed (for 'dirt')
- 05 Gummy worms or spiders
- 06 White chocolate (melted, for spiderwebs/ghosts)
- 07 Black gel icing or edible markers
- 08 Halloween sprinkles
Instructions
Preheat your oven to 350°F (175°C). Line a 9x13 inch baking pan with parchment paper, leaving an overhang on the sides for easy removal. Lightly grease if needed.
In a large microwave-safe bowl or a saucepan over low heat, melt the unsalted butter. Once melted, remove from heat and stir in the granulated sugar and brown sugar until well combined. It might look a little grainy, and that's okay, hon.
Whisk in the eggs one at a time, until fully incorporated and the mixture is smooth and glossy. Stir in the vanilla extract. Don't be shy here, really get it all mixed in!
In a separate medium bowl, whisk together the flour, cocoa powder, baking powder, and salt. Make sure there are no lumps!
Gradually add the dry ingredients to the wet ingredients, mixing gently with a spatula until just combined. Be careful not to overmix; overmixing can lead to tough brownies. If using, fold in chocolate chips or nuts now.
Pour the batter into the prepared baking pan and spread evenly. Pop it into the preheated oven and bake for 25-30 minutes, or until a toothpick inserted into the center comes out with moist crumbs, not wet batter. Remember, slightly underbaked is better for fudgy brownies!
Remove the pan from the oven and let the brownies cool completely in the pan on a wire rack. This is crucial for fudgy, neat brownies. Seriously, patience is a virtue here!
Once cooled, lift the brownies out of the pan using the parchment paper overhang. Now for the fun part: decorating! Frost with buttercream or ganache. Divide frosting and color with food coloring for different designs (orange, green, black). Get creative with candy eyes, crushed Oreos, gummy worms for spooky effects. Drizzle melted white chocolate in concentric circles and drag a toothpick from the center outwards for spiderwebs. Use black gel icing for spider bodies or mummy wrappings. Have fun with it, don't worry about perfection!
Cut into squares and serve your spooktacular Halloween brownies! They're ready to delight all your ghoulish guests.
Notes & Tips
- 1 Feel free to experiment with different types of chocolate chips in the batter, like white chocolate or peanut butter chips.
- 2 For an extra festive touch, consider adding a few drops of orange or green food coloring to your brownie batter for a subtle tint!
- 3 If you're short on time, store-bought frosting works perfectly for decorating; just jazz it up with food coloring and sprinkles.
- 4 These brownies also freeze wonderfully! Wrap unfrosted cooled brownies tightly in plastic wrap, then foil, and freeze for up to 2-3 months. Thaw at room temperature before decorating.
- 5 Have fun with the decorating! There's no right or wrong way to make them spooky and unique.
Tools You'll Need
-
9x13 inch baking pan
-
Parchment paper
-
Large mixing bowls
-
Whisk
-
Rubber spatula
-
Measuring cups and spoons
-
Wire cooling rack
-
Sharp knife
-
Piping bags and tips (for decorating, optional)
Must-Know Tips
- Don't overmix your brownie batter; it can make them tough, and we want fudgy!
- Always line your baking pan with parchment paper, leaving an overhang. It's a lifesaver for easy removal.
- Let your brownies cool completely before attempting to cut or decorate them. Warm brownies will crumble and squish.
- For extra fudgy results, a tiny bit of underbaking is your friend.
- Use a warm, clean knife for cutting brownies to get neat, precise squares.
Professional Secrets
- A pinch of espresso powder (about 1/2 teaspoon) added to the batter deepens the chocolate flavor without making it taste like coffee. It's my little secret!
- To get really clean cuts, chill your cooled brownies in the fridge for about 30 minutes before slicing. Use a sharp knife dipped in hot water and wiped clean between each cut.
- A sprinkle of flaky sea salt on top of your frosted brownies can surprisingly enhance the chocolate flavor and cut through the sweetness. It’s a lovely touch.
- For extra rich flavor, toast your cocoa powder lightly in a dry pan for a minute or two before adding it to the batter. Just be careful not to burn it!
- When decorating with royal icing or white chocolate for spiderwebs, use a small piping bag with a tiny hole for delicate lines. Practice on parchment paper first!

Recipe by
Mason Cole“Sweet cravings are my specialty! I turn sugar, chocolate, and imagination into pure dessert magic.” 🍰✨
Get Delicious Recipes Weekly
Join 25,000+ home cooks getting our best recipes straight to their inbox.
Free forever • No spam • Unsubscribe anytime