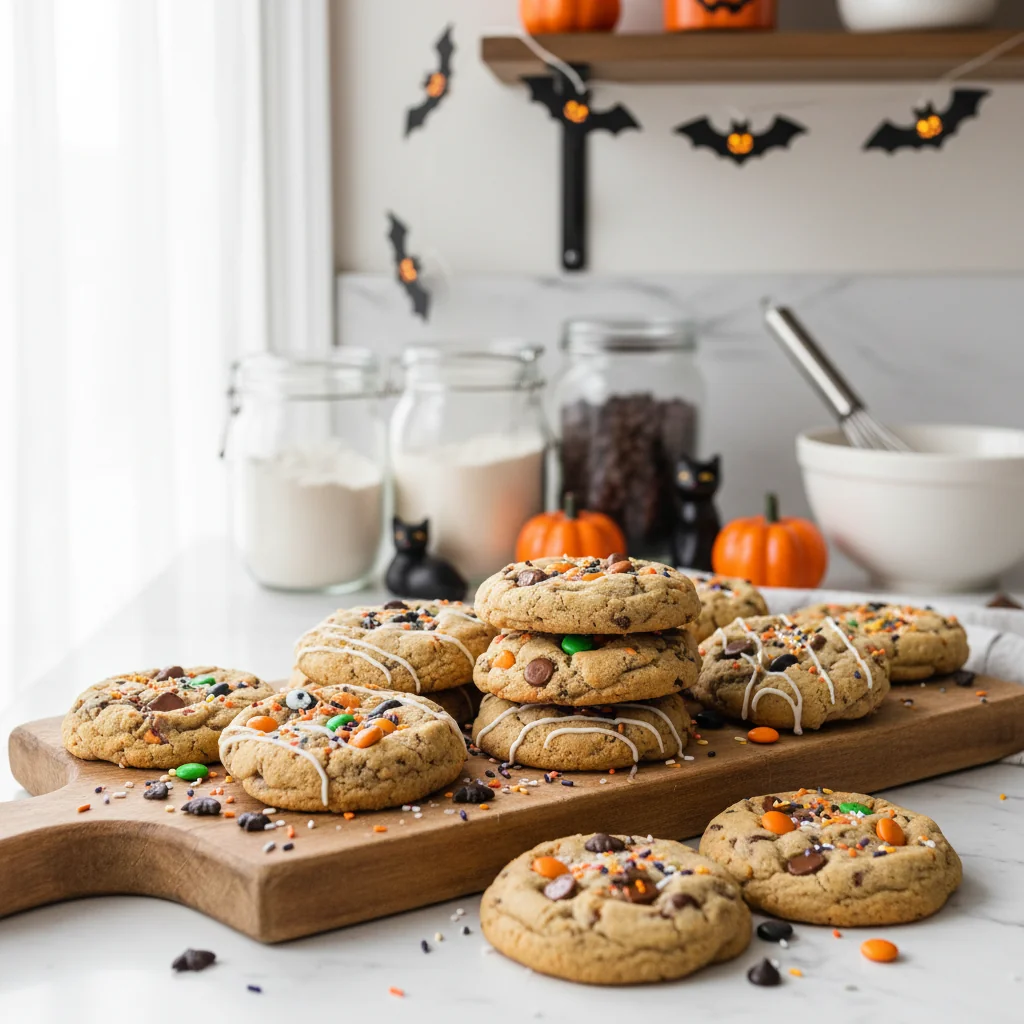
I remember the first time I made these. My daughter, Lily, was maybe five, and she was insistent that our cookies needed to be 'spooky.' I mean, how do you make a classic chocolate chip cookie spooky? That’s when the idea of candy eyes hit me. We got out all the orange, purple, and black sprinkles we could find. It was a beautiful mess, flour everywhere, sprinkles sticking to everything, but her giggles? Pure joy. Now, every year, it’s our little tradition. The cookies aren't perfect, but they’re always full of love and a little bit of Halloween spirit. It’s those small, sweet moments in the kitchen, you know?
Why You'll Adore These Halloween Cookies
-
Super easy to make, even for beginner bakers!
-
Only 10 minutes of active prep time, seriously!
-
A wonderfully fun and festive activity for kids and adults alike.
-
Classic chocolate chip taste, all dressed up for the holiday season.
-
Perfect for Halloween parties, trick-or-treaters, or just a cozy night in.
-
The candy eyes make them irresistibly cute (and a little bit spooky!) for everyone.
This recipe is my new Halloween tradition! So easy, and my kids absolutely loved decorating them. The dough is perfect, and they baked up wonderfully soft. A total hit at our school party, everyone asked for the recipe!
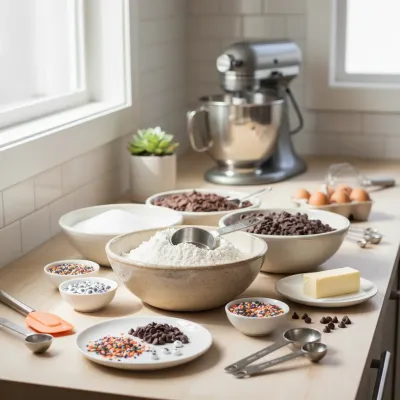
Essential Ingredient Guide
- Butter: Unsalted and softened! This makes all the difference in creaming and getting that perfect, tender cookie texture. Take it out of the fridge about an hour before you start baking.
- Brown Sugar: Don't skip this one! It’s what gives chocolate chip cookies that lovely chewy texture and a deeper, molasses-like flavor. Make sure it's packed firmly when measuring.
- Eggs: Use large eggs, please! They bind everything together and add moisture. Room temperature eggs blend more smoothly into the butter mixture, too.
- Halloween Sprinkles: Get creative! Orange, black, purple, ghost shapes, bat shapes—whatever makes you smile. They add that instant festive touch and so much color.
- Candy Eyes: These are a must for the 'spooky' factor! You can find them in most baking aisles or craft stores around Halloween. They really bring the cookies to life, literally!
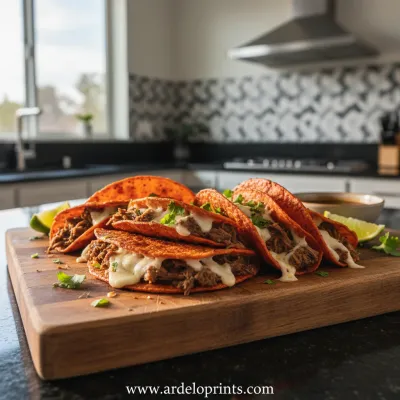
Birria Tacos: Easy & Flavorful Recipe
Tender, slow-braised beef tacos pan-fried to perfection with a rich, savory consomé for dipping.
Complete Cooking Process
-
Getting Started (The Fun Begins!):
-
Preheat your oven and get those baking sheets lined with parchment paper. This always feels like the official start to baking!
-
Whisk together your dry ingredients in a bowl. Just a quick mix, you know, to make sure everything's evenly distributed.
-
Remember, softened butter is key here. Let it sit out a bit; it makes creaming so much easier and dreamier.
-
-
Mixing the Magic:
-
Cream together the butter and sugars until they’re light and fluffy. This is where the air gets incorporated, making for a beautifully tender cookie. Don't rush this part, it’s important!
-
Add the vanilla and then the eggs, one at a time. It’s like painting, adding layers to your delicious masterpiece.
-
Gently combine the dry ingredients into the wet. Seriously, stop mixing the second the flour disappears. Overmixing makes tough cookies, and we want soft, chewy ones!
-
-
Adding the Spooky Touch:
-
Fold in your chocolate chips. The more the merrier, right? Use a mix of your favorites!
-
Scoop out your dough. I like using a cookie scoop for even sizes, it just makes everything look so nice.
-
Now for the best part: sprinkles! Press them onto the top of each cookie. And those candy eyes? Just two per cookie, giving them their little spooky personalities. So cute!
-
-
Bake & Enjoy!:
-
Pop them in the oven. Keep an eye on them; every oven is different, so baking times can vary slightly.
-
They'll look a little soft in the middle when you pull them out, and that's totally okay. They'll finish baking on the hot sheet as they cool.
-
Cool them down, and then, oh my goodness, time to taste your hard work! Pure Halloween joy.
-
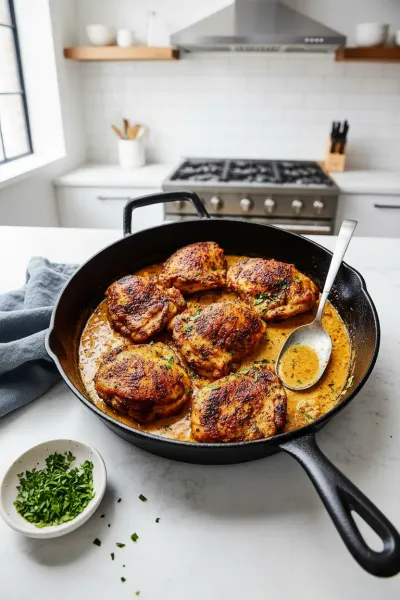
Easy Skillet Chicken Thighs Recipe
Garlic cream sauce skillet chicken thighs for a delicious and simple weeknight dinner.

Frequently Asked Questions About Halloween Cookies
→ Can I make the cookie dough ahead of time?
Yes, absolutely! You can store the unbaked cookie dough in an airtight container in the refrigerator for up to 3 days. This can even deepen the flavors! Just let it come to room temperature slightly before scooping and baking.
→ What if I don't have candy eyes?
No worries at all! You can totally get creative. Try using mini chocolate chips or even small dots of icing to make eyes. Or just stick to a generous amount of festive sprinkles for a colorful cookie!
→ My cookies spread too much! What happened?
This usually means your butter was too soft (or even melted), or your oven wasn't quite hot enough. Make sure your butter is just softened, not melted. Chilling the dough for 30 minutes before baking can also work wonders to prevent spreading and keep them nice and thick.
→ Can I freeze these Halloween cookies?
You sure can! You can freeze baked cookies in an airtight container for up to 2 months. Or, you can freeze the raw dough balls on a baking sheet, then transfer them to a freezer bag. Bake from frozen, adding a couple of minutes to the baking time.
→ What kind of sprinkles should I use?
Any Halloween-themed sprinkles work wonderfully! Look for jimmies, nonpareils, or even fun shapes like bats or ghosts. A mix of different types and colors always looks extra festive and fun.
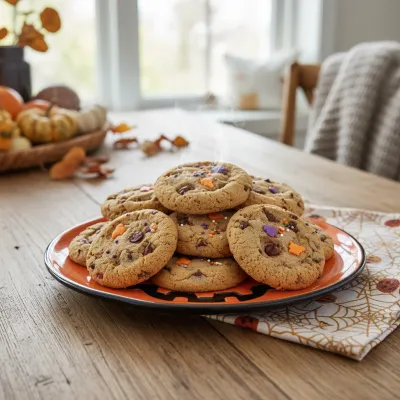

Halloween Chocolate Chip Cookies Recipe
Easy Halloween chocolate chip cookies recipe with only 10 minutes prep! Use sprinkles and candy eyes for a fun, simple Halloween treat.
Timing
Prep Time
10 minutes
Cook Time
10-12 minutes
Total Time
20-22 minutes
Recipe Details
Ingredients
Dry Ingredients
-
01
2 ¼ cups all-purpose flour
-
02
1 teaspoon baking soda
-
03
1 teaspoon salt
Wet Ingredients
-
01
1 cup (2 sticks) unsalted butter, softened
-
02
¾ cup granulated sugar
-
03
¾ cup packed light brown sugar
-
04
1 teaspoon vanilla extract
-
05
2 large eggs
Mix-ins & Decoration
-
01
1 ½ cups chocolate chips (milk, semi-sweet, or a mix)
-
02
½ cup Halloween sprinkles (orange, black, purple, etc.)
-
03
24-48 candy eyes (small or medium size)
Instructions
Preheat your oven to 375°F (190°C). Line baking sheets with parchment paper. In a medium bowl, whisk together the flour, baking soda, and salt. Set aside.
In a large bowl, using an electric mixer, cream together the softened butter, granulated sugar, and brown sugar until light and fluffy, about 2-3 minutes.
Beat in the vanilla extract, then add the eggs one at a time, mixing well after each addition until fully incorporated.
Gradually add the dry ingredient mixture to the wet ingredients, mixing on low speed until just combined. Be careful not to overmix!
Gently fold in the chocolate chips with a spatula until evenly distributed.
Drop rounded tablespoons of dough onto the prepared baking sheets, leaving about 2 inches between cookies. Immediately press a few Halloween sprinkles onto each cookie dough ball. Add 2 candy eyes to each cookie, pressing them gently into the dough.
Bake for 10-12 minutes, or until the edges are golden brown and the centers are just set. They might look a little underdone in the middle, but they'll firm up as they cool.
Let the cookies cool on the baking sheet for 5 minutes before transferring them to a wire rack to cool completely. Enjoy your spooky treats!
Notes & Tips
-
1
If you don't have parchment paper, lightly grease your baking sheets to prevent sticking.
-
2
Feel free to mix up the chocolate chips—dark, milk, or white chocolate all work wonderfully in this recipe!
-
3
You can adjust the amount of sprinkles and candy eyes to your liking; more is always more fun for Halloween, right?
Easy Slow Cooker Pot Roast
The ultimate set-it-and-forget-it meal. Tender beef and hearty vegetables simmered to perfection in the slow cooker.
Tools You'll Need
-
Large mixing bowl
-
Electric mixer (handheld or stand mixer)
-
Whisk
-
Rubber spatula
-
Measuring cups and spoons
-
Baking sheets
-
Parchment paper
-
Cookie scoop (optional, but very helpful for even sizes)
-
Wire cooling rack
Must-Know Tips
-
Use softened butter, not melted, for the best cookie texture and to prevent spreading.
-
Don't overmix the dough once the flour is added; this can make cookies tough.
-
For perfectly uniform cookies, use a cookie scoop—it’s a game-changer!
-
Press the candy eyes and sprinkles before baking so they adhere well to the dough.
-
Let cookies cool on the baking sheet for a few minutes; they continue to set and firm up during this time.
Professional Secrets
-
A tiny pinch of cinnamon or a dash of nutmeg can add a wonderful warmth and subtle depth to classic chocolate chip cookies.
-
For an extra chewy cookie, you can use slightly less flour, or add an extra egg yolk to the dough mixture.
-
If you want perfectly thick cookies that don't spread too much, chill the dough for at least 30 minutes (or even overnight!). It really makes a difference in flavor too!
-
A sprinkle of flaky sea salt on top of the warm cookies when they come out of the oven enhances the chocolate flavor beautifully and adds a lovely contrast.
-
Rotate your baking sheets halfway through baking to ensure all your cookies brown evenly. It’s a small step that makes a big visual difference!

Recipe by
Emma Fields“Mornings are my magic hour! I create easy, energizing breakfasts that turn sleepy starts into sunshine moments.” ☀️🥞
Get Delicious Recipes Weekly
Join 25,000+ home cooks getting our best recipes straight to their inbox.
Free forever • No spam • Unsubscribe anytime