Why You'll Adore These Halloween Mini Pizzas
- They're incredibly quick to make, perfect for last-minute party prep.
- So much fun for kids to decorate — a great activity!
- Super customizable with all sorts of spooky toppings.
- An easy way to add a festive touch to any Halloween snack board or gathering.
- Everyone, from little goblins to grown-up ghouls, loves pizza!
- They taste just like your favorite pizza, but with a fun, festive twist.
These mini pizzas are a Halloween lifesaver! My kids thought they were the coolest things ever, especially the olive spiders. It was so easy to put together, and they vanished from the snack board in minutes. Definitely making these again next year!
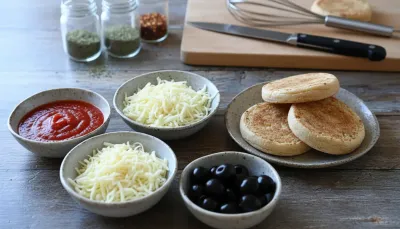
Essential Ingredient Guide
- Mini Pizza Bases: English muffins, mini pita breads, or pre-made mini pizza crusts work wonderfully. You want something sturdy enough to hold the toppings but small enough for a quick snack. Honestly, English muffins get delightfully crispy on the edges!
- Pizza Sauce: Your favorite jarred pizza sauce is perfect here. No need to make it from scratch unless you're feeling extra ambitious! A good quality sauce makes all the difference.
- Mozzarella Cheese: Shredded mozzarella is great for the base. For the mummy strips, a block of low-moisture, part-skim mozzarella that you slice yourself is ideal. It melts beautifully and holds its shape for those spooky wrappings.
- Black Olives: These are your secret weapon for spiders! Sliced black olives are fantastic for the body, and a few careful cuts can make convincing legs. Don't be shy with them; they add that perfect pop of color.
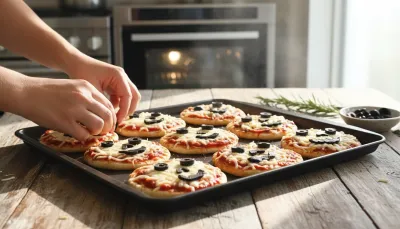
Complete Cooking Process
-
Gather & Preheat:
- Preheat your oven and prepare a baking sheet with parchment paper.
- Lay out all your mini pizza bases on the sheet.
-
Sauce & Cheese Base:
- Spread pizza sauce on each base, leaving a little 'crust' edge.
- Sprinkle a generous layer of shredded mozzarella over the sauce.
-
Spooky Decorating Time!:
- **For Mummies:** Tear or cut mozzarella into thin strips. Arrange them criss-cross over the pizza, leaving a small space at the top for eyes.
- **For Spiders:** Halve a black olive for the body. Cut thin strips from another olive for the legs (four on each side), arranging them around the body.
- Get creative with other toppings like mini pepperoni ghosts or sliced turkey ham bats!
-
Bake to Perfection:
- Bake the pizzas until the cheese is melted and bubbly, and the edges are lightly golden, about 10-12 minutes.
- Keep a close eye on them, as mini pizzas can cook quickly.
-
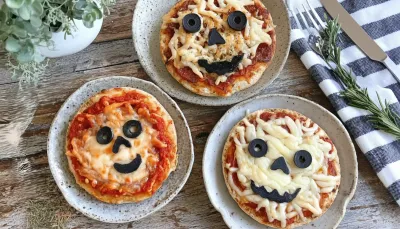
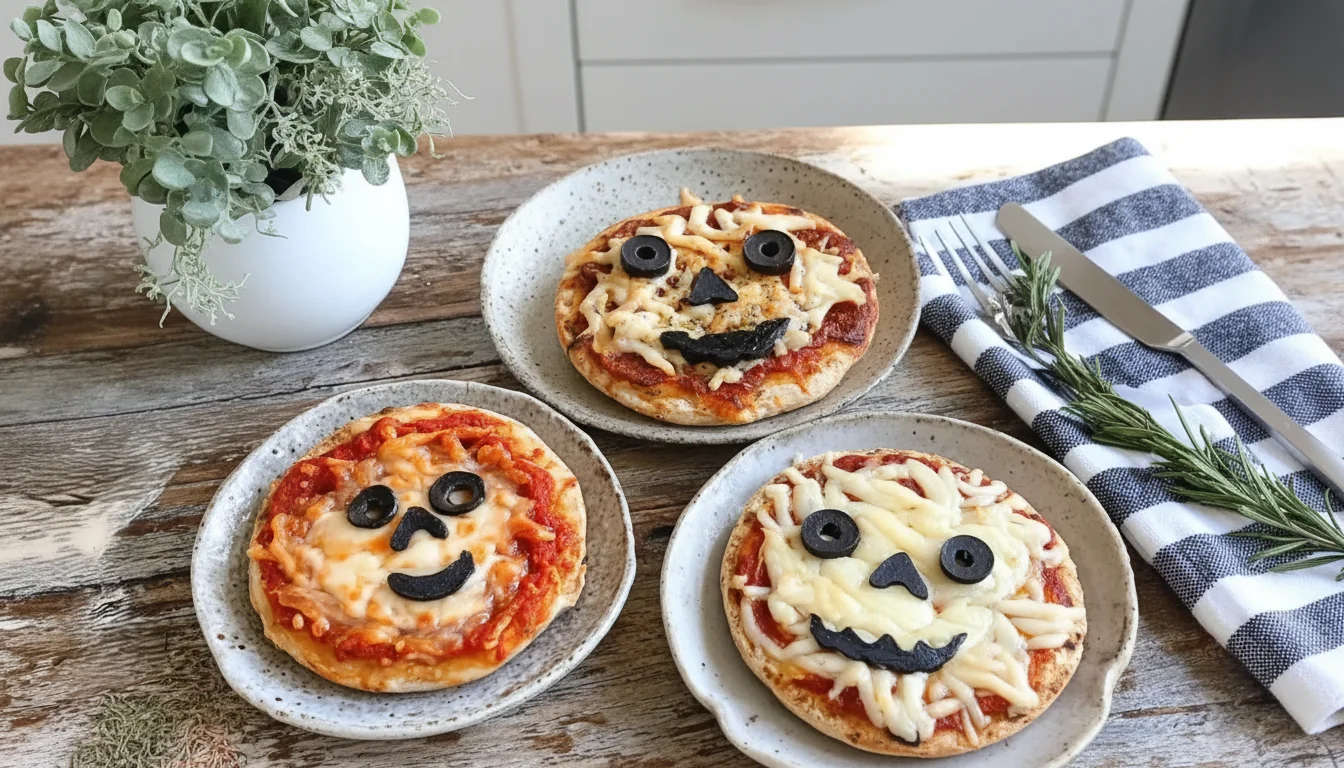
Final Touches & Serve:
- Once out of the oven, add the 'eyes' to your mummies (small olive pieces or candy eyes).
- Place tiny dots of sauce for spider eyes, if not using candy eyes.
- Let them cool for just a couple of minutes before serving them warm, or arrange them on a fun Halloween snack board!
Spooky Snack FAQs
→ Can I make these ahead of time?
You absolutely can! Assemble the pizzas up to the point of baking, then cover them loosely and refrigerate for a few hours. When you're ready to serve, just pop them into the preheated oven. They might take a minute or two longer to bake from cold.
→ What kind of bases work best?
Mini pita breads, English muffins (split and lightly toasted first!), or small pre-made flatbreads are my go-to. You could even use rounds of puff pastry or crescent roll dough for a flakier crust, but they'll bake faster.
→ What other Halloween-themed toppings can I use?
Oh, so many! You could cut bell peppers or turkey ham into pumpkin shapes, use a tiny ghost cookie cutter for provolone cheese, or even drizzle a bit of pesto in a swirl to look like a spiderweb. Get creative, hon!
→ How do I make the olive spiders look realistic?
It's all about the cuts! Use one whole olive half for the body. For the legs, slice another olive into thin slivers lengthwise. Arrange four 'legs' on each side of the body. You can even add tiny dots of sauce for eyes once baked, or use edible candy eyes.
Chef's Tips
You can use any pizza topping you like for the base, then add the spooky decorations.,If you don't have fresh mozzarella, sliced provolone or even string cheese sticks work well for mummy wraps.,A pinch of garlic powder in the sauce can elevate the flavor.,Consider adding a sprinkle of fresh basil after baking for a pop of green color.
Halloween Mini Pizzas: Spooky Snack Board Ideas
Make adorable Halloween mini pizzas for spooky snack boards and parties! Quick, easy, and fun to decorate with olive spiders and mozzarella mummies.
Timing
Prep Time
15 minutes
Cook Time
10-12 minutes
Total Time
25-30 minutes
Recipe Details
Ingredients
For the Mini Pizzas
- 01 6 mini pita breads, English muffins, or pre-made mini pizza crusts
- 02 1/2 cup pizza sauce
- 03 1 cup shredded mozzarella cheese
- 04 1/2 cup sliced black olives, drained
- 05 Optional: 1/4 cup mini pepperoni or thinly sliced turkey ham
For Decorating
- 01 Extra mozzarella cheese (sliced into strips or small circles)
- 02 Additional black olives, halved
- 03 Edible candy eyes (optional, but so cute!)
Instructions
Preheat your oven to 400°F (200°C). Line a large baking sheet with parchment paper for easy cleanup. Arrange your mini pizza bases on the sheet.
Spread about 1-2 tablespoons of pizza sauce evenly over each mini pizza base, leaving a small border for the crust.
Sprinkle each pizza with shredded mozzarella cheese. This will be the base for our spooky designs.
Time to decorate! For mummy pizzas, tear or cut slices of mozzarella into thin strips and arrange them diagonally across the pizza, leaving a small gap at the top for the 'eyes'. For spider pizzas, place a halved black olive in the center for the spider's body, then cut another black olive into thin strips for the legs (4 on each side).
If using mini pepperoni or turkey ham, you can make 'ghost' shapes with a small cookie cutter (or kitchen shears) and place them on top of the cheese before baking.
Bake for 10-12 minutes, or until the cheese is bubbly and lightly golden brown, and the crusts are crispy. Keep an eye on them so they don't burn, yeah?
Carefully remove the pizzas from the oven. If you made mummy pizzas, place two small pieces of olive (or edible candy eyes) in the gap you left for the eyes. For spider pizzas, add two tiny dots of sauce or cream cheese for the eyes, or use candy eyes.
Let them cool for a few minutes before serving. They're best warm, but still delightful at room temperature. Arrange them on a spooky snack board and watch them disappear!
Notes & Tips
- 1 You can use any pizza topping you like for the base, then add the spooky decorations.
- 2 If you don't have fresh mozzarella, sliced provolone or even string cheese sticks work well for mummy wraps.
- 3 A pinch of garlic powder in the sauce can elevate the flavor.
- 4 Consider adding a sprinkle of fresh basil after baking for a pop of green color.
Tools You'll Need
-
Baking sheet
-
Parchment paper
-
Small spoon or spreading knife
-
Sharp knife (for olive legs and cheese strips)
-
Small cookie cutters (optional, for fun shapes)
-
Cutting board
Must-Know Tips
- Don't overload your mini pizzas; too many toppings can make them soggy.
- Lightly toast English muffin bases before adding toppings for extra crispness.
- Use a pizza cutter for quick slicing once they've cooled a bit.
- Let kids help! This recipe is perfect for little hands to get involved in decorating.
- Keep an eye on the oven; mini pizzas cook faster than large ones.
Professional Secrets
- For extra-crispy crusts, bake the bases plain for 3-5 minutes before adding sauce and toppings.
- A tiny drop of balsamic glaze can be used to draw fine spiderwebs or spooky details onto the finished pizzas.
- Use a small round cutter for perfect 'eye' shapes from black olives for the mummies.
- Dust the cooked pizzas with a tiny bit of dried oregano for an authentic Italian aroma.
- To make cheese 'ghosts,' use a small ghost cookie cutter on slices of provolone or white cheddar cheese before baking.

Recipe by
Sofia Marin“Dinner is where stories are shared and flavors shine. I craft comforting recipes perfect for family nights.” 🍷🍲
Get Delicious Recipes Weekly
Join 25,000+ home cooks getting our best recipes straight to their inbox.
Free forever • No spam • Unsubscribe anytime