I remember making these with my daughter for her first big Halloween party. She was so excited about the candy eyes, carefully placing each one. It was messy, sure, but so full of joy. We used a simple chocolate cookie base, because, well, chocolate is always a good idea. Then, piping the 'bandages' felt like a little art project – a playful design challenge! It brought back memories of staying up late, crafting for school events. These cookies aren't just a treat; they're a little memory in the making. They remind me that sometimes the simplest, slightly imperfect things are the most heartfelt.
Why You'll Fall for These Spooky Sweets
-
They are unbelievably fun to make with kids – hello, family activity!
-
The fudgy chocolate cookie base is utterly delicious, not just a vehicle for frosting.
-
Decorating is easy and forgiving; no need for perfection!
-
They're a total crowd-pleaser for Halloween parties and school events.
-
The combination of rich chocolate and sweet vanilla buttercream is just heavenly.
-
They're cute, spooky, and perfectly festive for the season.
Seriously, these mummy cookies are a blast! My kids loved helping, and they turned out so cute. The chocolate cookie is so rich, and the buttercream is just sweet enough. Everyone at our Halloween gathering raved about them! We'll definitely be making these every year.
Essential Ingredient Guide
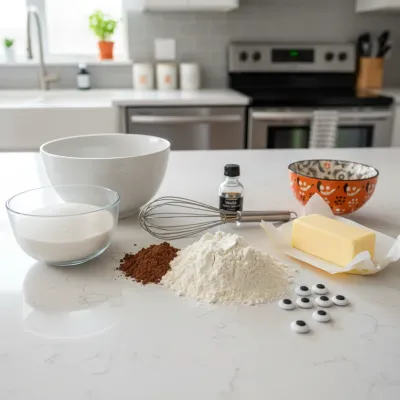
- Unsweetened Cocoa Powder: For that deep, dark chocolate color and flavor, I love using Dutch-processed cocoa powder. It gives a smoother, less acidic taste, perfect for these fudgy cookies. Don't skimp on the quality here; it really makes a difference!
- Unsalted Butter: Always use unsalted butter for baking so you can control the salt content yourself. Make sure it's softened to room temperature for both the cookies and the buttercream – it helps everything combine smoothly. Just leave it out on the counter for an hour or so before you start.
- Powdered Sugar: Sifting your powdered sugar for the buttercream is a game-changer. It prevents lumps and gives you that silky-smooth frosting texture. Honestly, it's worth the extra minute!
- Candy Eyes: These are the star of the mummy look! You can find them in most baking aisles or craft stores, especially around Halloween. They come in different sizes, so pick ones that fit your cookie size for the best effect. They just add so much personality, don't they?
- Vanilla Extract: Use good quality pure vanilla extract. It enhances the chocolate in the cookies and gives a lovely warmth to the buttercream. It's a small thing, but it truly elevates the flavor.
Birria Tacos: Easy & Flavorful Recipe
Tender, slow-braised beef tacos pan-fried to perfection with a rich, savory consomé for dipping.
Complete Cooking Process
-
Making the Fudgy Chocolate Cookie Base:
-
Combine Dry Ingredients: Whisk flour, cocoa, baking soda, and salt. Easy peasy.
-
Cream Wet Ingredients: Beat softened butter with both sugars until light and fluffy. This takes a few minutes, so be patient!
-
Add Eggs & Vanilla: Mix in eggs one at a time, then the vanilla. Watch it become lovely and smooth.
-
Combine & Chill: Slowly add the dry mixture to the wet. Mix until just combined. Don't forget to chill that dough – it’s crucial for good cookies, I mean it!
-
-
Baking Your Mummy Forms:
-
Preheat & Prep: Get your oven to 350°F and line baking sheets. Parchment paper is your friend here.
-
Shape the Cookies: Roll the chilled dough into 1-inch balls, then gently flatten them a bit. They don't need to be perfect spheres.
-
Bake: Pop them in the oven for 10-12 minutes. They'll look slightly soft in the middle, and that's okay. They finish cooking as they cool.
-
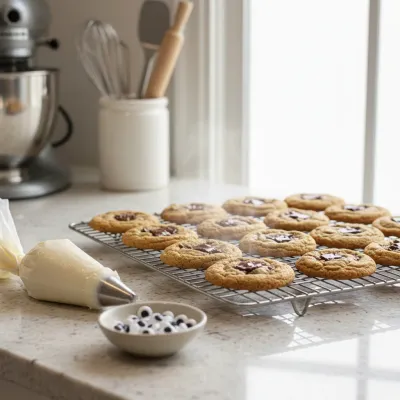
Cool Completely: Let them rest on the baking sheet for a few minutes, then move them to a wire rack. Don't rush this part – warm cookies + frosting = a melty mess, oops!
-
-
Whipping Up the Vanilla Buttercream:
-
Cream Butter: Beat softened butter until it's smooth and creamy. Start slow.
-
Add Sugar & Liquid: Gradually add sifted powdered sugar, alternating with cream or milk. This helps avoid a sugar cloud in your kitchen! Add vanilla and salt.
-
Beat Until Fluffy: Keep beating until it's light, fluffy, and spreadable. Adjust consistency as needed – a little more sugar for thick, a little more liquid for thin.
-
-
Decorating Your Spooky-Cute Mummies:
-
Load Piping Bag: Spoon your beautiful buttercream into a piping bag with a small round tip. If you don't have one, a Ziploc bag with a snipped corner works wonders.
-
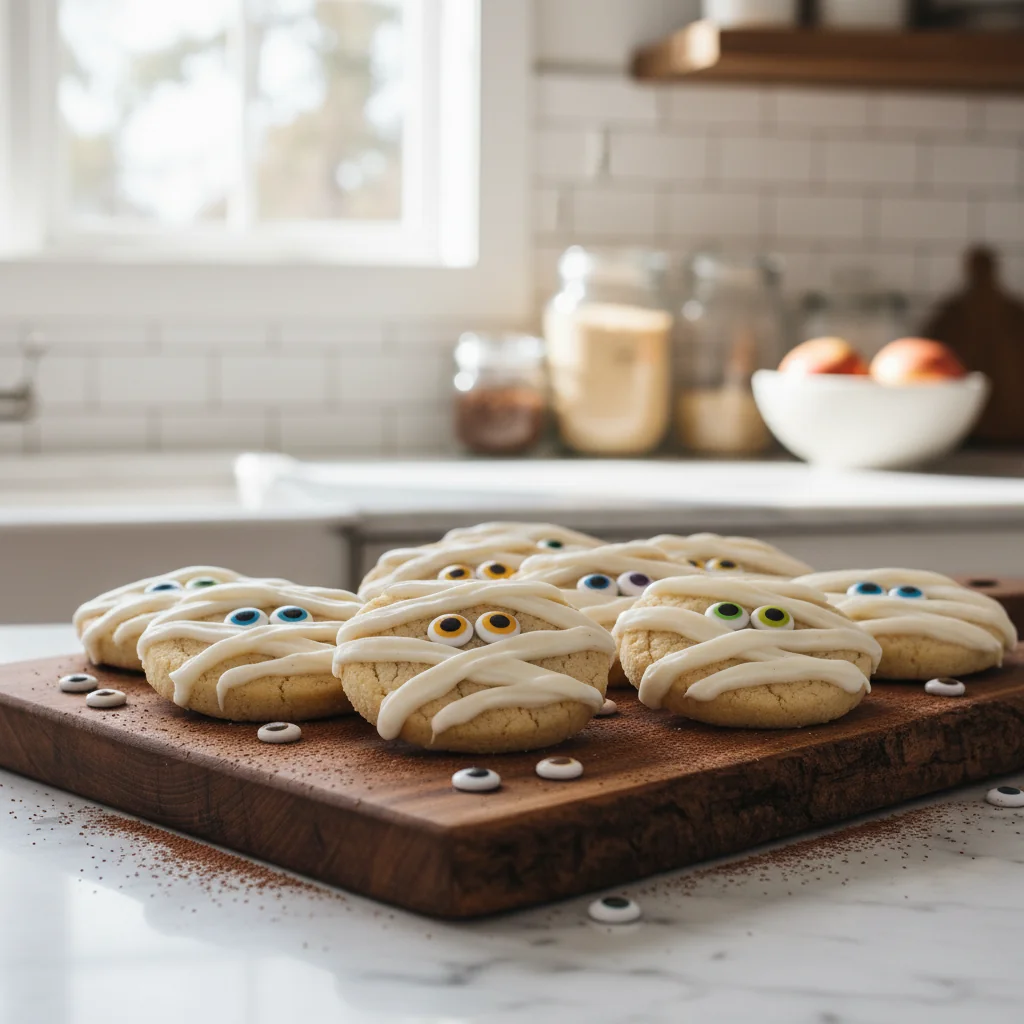
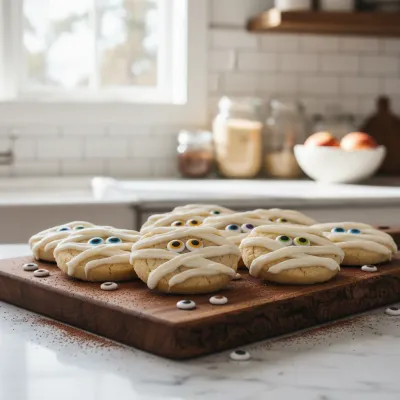
Pipe Bandages: Starting at one edge, pipe horizontal or diagonal lines across each cool cookie, leaving a small space near the top for the eyes. Don’t worry about perfection; rustic bandages are charming!
-
Add Candy Eyes: Gently press two candy eyes into the clear space on each cookie. This is where they really come to life! My favorite part, honestly.
-
Let Set: Allow the frosting to set for a little while before you stack them. Then, they’re ready for their big debut!
-

Easy Skillet Chicken Thighs Recipe
Garlic cream sauce skillet chicken thighs for a delicious and simple weeknight dinner.
Frequently Asked Questions About Mummy Cookies
→ Can I make the cookie dough ahead of time?
Absolutely! The cookie dough can be made up to 2-3 days in advance and stored in an airtight container in the refrigerator. You can even freeze the dough for up to a month. Just let it thaw in the fridge before rolling and baking.
→ What if my buttercream is too stiff or too runny?
No worries! If your buttercream is too stiff, add a tiny bit more heavy cream or milk, a teaspoon at a time, until it reaches the right consistency. If it's too runny, slowly add more sifted powdered sugar until it thickens up. It's all about finding that perfect balance.
→ Can I use store-bought cookies or frosting?
Of course! If you're really short on time or just want to focus on the decorating fun, using store-bought chocolate cookies and canned vanilla frosting is totally fine. No judgment here! Just make sure the cookies are flat-ish, and you might need to adjust the frosting consistency a bit.
→ How do I store the finished mummy cookies?
Store your decorated mummy cookies in an airtight container at room temperature for up to 3-4 days. If it's warm in your house, or if you prefer, you can keep them in the refrigerator, but let them come to room temperature before serving for the best flavor and texture.
→ Can I make these gluten-free?
Yes, you can! Substitute the all-purpose flour with your favorite 1:1 gluten-free baking flour blend. Make sure your blend contains xanthan gum, or add 1/2 teaspoon yourself. The texture might be slightly different, but they'll still be delicious!
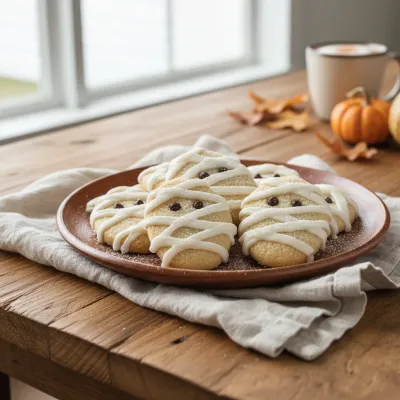
Halloween Mummy Cookies: Spooky & Cute!
Make cute and spooky Halloween mummy cookies! Fudgy chocolate cookies decorated with vanilla buttercream and candy eyes. These are so fun to bake with kids and perfect for any Halloween party or treat bag. Simple ingredients, maximum spook-tacular fun!
Timing
Prep Time
30 minutes
Cook Time
10-12 minutes
Total Time
1 hour 30 minutes (includes chilling & decorating)
Recipe Details
Ingredients
For the Chocolate Cookies
-
01
1 1/2 cups all-purpose flour
-
02
1/2 cup unsweetened cocoa powder (Dutch-processed for darker color)
-
03
1 teaspoon baking soda
-
04
1/2 teaspoon salt
-
05
1 cup (2 sticks) unsalted butter, softened
-
06
1 cup granulated sugar
-
07
1/2 cup packed light brown sugar
-
08
2 large eggs
-
09
1 teaspoon vanilla extract
For the Vanilla Buttercream & Decoration
-
01
1 cup (2 sticks) unsalted butter, softened
-
02
3-4 cups powdered sugar, sifted
-
03
1/4 cup heavy cream or milk
-
04
1 teaspoon vanilla extract
-
05
Pinch of salt
-
06
Candy eyes (various sizes)
-
07
Optional: Black gel food coloring (for pupils if desired)
Instructions
In a medium bowl, whisk together the flour, cocoa powder, baking soda, and salt. Set aside. This is our dry mix, ready to go!
In a large bowl, using an electric mixer, cream together the softened butter, granulated sugar, and brown sugar until light and fluffy. This usually takes about 2-3 minutes. Scrape down the sides of the bowl, yeah?
Beat in the eggs, one at a time, until well combined. Then, stir in the vanilla extract. It's starting to smell good already, I promise!
Gradually add the dry ingredients to the wet ingredients, mixing on low speed until just combined. Be careful not to overmix, hon, or your cookies might get tough. Cover the dough and chill in the refrigerator for at least 30 minutes (or up to 2 hours). This makes them much easier to work with.
Preheat your oven to 350°F (175°C). Line baking sheets with parchment paper. Roll the chilled dough into 1-inch balls and place them about 2 inches apart on the prepared baking sheets. Gently flatten each ball slightly with the palm of your hand.
Bake for 10-12 minutes, or until the edges are set and the centers look slightly soft. They might look a little underdone, but they'll firm up as they cool. Let them cool on the baking sheets for 5 minutes before transferring them to a wire rack to cool completely. Patience, darling, it's worth it!
While the cookies cool, make the vanilla buttercream. In a large bowl, cream the softened butter with an electric mixer until smooth. Gradually add the sifted powdered sugar, alternating with splashes of heavy cream or milk, beating until smooth and fluffy. Stir in the vanilla extract and salt. If it's too thick, add more cream; too thin, add more sugar. We want a nice, pipeable consistency.
Once the cookies are completely cool, transfer the buttercream to a piping bag fitted with a small, round tip (or just snip a tiny corner off a Ziploc bag). Pipe horizontal or diagonal lines across each cookie, leaving a small gap near the top for the candy eyes. These are the 'mummy bandages' – imperfect is perfect here!
Gently press two candy eyes into the undecorated gap on each cookie. If you want, you can use a tiny dot of black gel food coloring to draw pupils, but honestly, they’re cute either way! Let the frosting set for a bit before stacking or storing. Now, stand back and admire your spooky-cute masterpieces!
Notes & Tips
-
1
You can add a touch of orange or green food coloring to a portion of the buttercream for even more festive variations.
-
2
Sprinkle a few Halloween-themed sprinkles on the cookies before the frosting sets for extra sparkle.
-
3
For a more intense chocolate flavor in the cookies, try using dark cocoa powder.
-
4
This recipe is easily doubled if you're making a big batch for a large party.

Easy Slow Cooker Pot Roast
The ultimate set-it-and-forget-it meal. Tender beef and hearty vegetables simmered to perfection in the slow cooker.
Tools You'll Need
-
Large mixing bowls (2)
-
Electric mixer (stand or hand-held)
-
Whisk
-
Spatula
-
Measuring cups and spoons
-
Parchment paper
-
Baking sheets
-
Wire cooling racks
-
Piping bag with small round tip (or Ziploc bag)
Must-Know Tips
-
Don't overmix your cookie dough; it can lead to tough cookies.
-
Chilling the dough is essential for easier handling and prevents spreading.
-
Let cookies cool completely before frosting, or the buttercream will melt!
-
Use a piping bag (or a Ziploc with a snipped corner) for neat mummy 'bandages'.
-
Have fun with the decorating; imperfect lines just add to the mummy charm!
Professional Secrets
-
For an even fudgier cookie, slightly underbake them – they'll continue to cook a bit on the hot pan.
-
Use high-quality vanilla extract in both the cookies and the frosting for a truly gourmet flavor.
-
A tiny pinch of espresso powder (about 1/4 teaspoon) in the cookie dough will deepen the chocolate flavor without making it taste like coffee.
-
If you want super white 'bandages', use a tiny bit of white gel food coloring in your buttercream.
-
For extra fun, use different sized candy eyes on the same cookie for a truly kooky mummy!

Recipe by
Mason Cole“Sweet cravings are my specialty! I turn sugar, chocolate, and imagination into pure dessert magic.” 🍰✨
Get Delicious Recipes Weekly
Join 25,000+ home cooks getting our best recipes straight to their inbox.
Free forever • No spam • Unsubscribe anytime