The concept of edible cookie dough has been around for decades, but the modern health-conscious version emerged in the early 2000s as people sought alternatives to raw flour and eggs. These bars represent a beautiful evolution of that idea - taking the nostalgic joy of cookie dough and making it safe, nutritious, and accessible to everyone regardless of dietary restrictions. They've become particularly popular as a quick fix for sweet cravings without the guilt.
Why You'll Love It
-
No baking required - just mix, press, and chill
-
Naturally gluten-free and vegan-friendly
-
Ready in under 30 minutes from start to finish
-
Perfect for satisfying cookie dough cravings safely
-
Great for meal prep and lunchboxes
-
Kids absolutely adore these treats
"My kids can't tell these aren't real cookie dough! They're perfect for after-school snacks and even better than the unhealthy version."
Essential Ingredient Guide
- Almond flour: This gives the bars their cookie dough texture without raw flour. Make sure it's fine-ground for the best results - I like to sift mine to avoid any lumps.
- Maple syrup: The natural sweetness that binds everything together. Use the real stuff, not pancake syrup - you'll taste the difference. Grade A amber has the perfect balance of flavor.
- Coconut oil: Helps everything hold together and adds that buttery mouthfeel. Make sure it's softened but not melted completely - you want it pliable but not liquid.
- Vanilla extract: That classic cookie flavor that makes it taste like the real deal. Use pure vanilla if you can - the imitation stuff just doesn't have the same warmth.
- Chocolate chips: The little pockets of joy that make these special. Look for dairy-free mini chips - they distribute better throughout the dough.
- Salt: Just a pinch balances the sweetness and makes all the flavors pop. I use sea salt for that subtle mineral note.
 Desserts
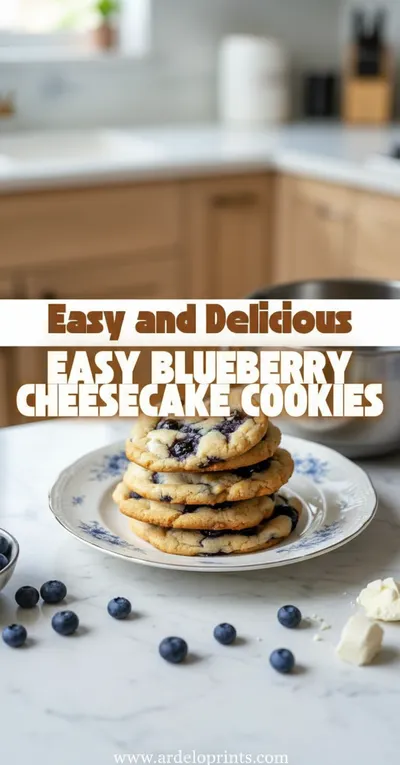
Blueberry Cheesecake Cookies
Buttery cookies with a tender blueberry cheesecake centre, ideal for a cozy treat.
Complete Cooking Process
-
Ingredient Readiness:
All your ingredients should be at room temperature before you start. The coconut oil needs to be soft but not melted, and the maple syrup should flow easily. I like to measure everything out first - it makes the process so much smoother.
-
Flavor Development:
The magic happens when you mix the vanilla with the maple syrup and coconut oil. That's when the kitchen starts to smell like proper cookie dough. The salt gets sprinkled in here too, waking up all the other flavors.
-
Texture Control:
Adding the almond flour gradually is key. You want it to come together like a pliable dough - not too crumbly, not too wet. When you press it between your fingers, it should hold its shape nicely.
-
Finishing Touches:
Folding in the chocolate chips gently ensures they're evenly distributed without smashing. Then pressing into the pan firmly creates those clean edges when you cut them later.
-
Serving Timing:
These are best after chilling for at least 2 hours. The flavors settle and the texture firms up perfectly. They're wonderful straight from the fridge with a glass of cold almond milk.
-
Line your pan with parchment paper - it makes removal so much easier
-
Use a flat-bottomed cup to press the dough evenly in the pan
-
Score the top before chilling for cleaner cuts later
-
Store between layers of parchment to prevent sticking
Pro Tips
I've made these so many times for potlucks and family gatherings, and honestly? They're always the first thing to disappear. People can't believe they're actually good for you. The texture is spot-on - that slightly gritty, creamy feel of real cookie dough that melts in your mouth.
What I love most is how versatile they are. You can add chopped nuts, dried fruit, or even a sprinkle of cinnamon for variation. They're perfect for when you want to make something special but don't have hours to spend in the kitchen. Just simple, honest ingredients coming together to create something truly comforting.
The essence of the dish:
These bars capture the pure joy of eating cookie dough without any of the guilt. They're naturally sweetened, packed with protein from the almond flour, and have that familiar texture we all crave. It's comfort food that actually comforts your body too.
A fun fact or historical angle:
The fear of raw flour is relatively modern - our grandmothers ate cookie dough without a second thought. These bars honor that tradition while adapting to contemporary food safety awareness.
Flavor or sensory focus:
You'll notice the rich almond flavor first, followed by the maple sweetness and the bursts of chocolate. The texture is surprisingly authentic - creamy with just the right amount of graininess.
You Must Know
-
Don't skip the chilling time - it's essential for the right texture
-
Use high-quality almond flour for best results
-
These freeze beautifully for up to 3 months
-
They soften at room temperature, so keep chilled until serving
Frequently Asked Questions
→ Can I use a different flour?
You can substitute oat flour, but almond flour gives the best texture. If using oat flour, you might need slightly less as it absorbs moisture differently.
→ How long do these keep in the fridge?
They'll stay perfect for about a week in an airtight container. The chocolate might develop a slight bloom but they're still perfectly safe to eat.
→ Can I make these nut-free?
Yes! Use sunflower seed flour instead of almond flour. Just know the color will be darker and the flavor slightly different but still delicious.
→ My dough is too crumbly - what did I do wrong?
Probably need a bit more coconut oil or maple syrup. Add one teaspoon at a time until it comes together like play dough.
→ Can I add other mix-ins?
Absolutely! Dried cranberries, chopped pecans, or even a swirl of peanut butter would be lovely. Just keep the total add-ins to about 1/2 cup.
→ Are these suitable for school lunches?
Yes, they travel well in lunchboxes with an ice pack. They're much healthier than most store-bought treats and kids love them.
Nutrition Facts
per serving
180
Calories
4g
Protein
12g
Carbs
14g
Fat
Taste Profile
Sweet with nutty undertones and chocolate bursts
Ingredient Substitutions
Don't have an ingredient? Try these alternatives
Adjust liquid slightly as different flours absorb moisture differently
Flavor will be slightly different but still delicious
Recipe Variations
Try these delicious twists on the original
Peanut Butter Version
Add 2 tablespoons of natural peanut butter and use peanut butter chips instead of chocolate
Coconut Lover's
Use coconut flour instead of almond flour and add shredded coconut for tropical flavor
Common Mistakes to Avoid
Learn from others' mistakes for perfect results
- Using melted coconut oil instead of softened - creates oily bars
- Not pressing dough firmly enough - results in crumbly bars
- Skipping the chilling time - bars won't hold their shape
- Overmixing after adding chocolate chips - smashes the chips
Meal Prep & Storage
Make Ahead Tips
You can prepare the dough up to 3 days in advance and keep it chilled in the pan until ready to serve. These are perfect for holiday preparation when you're busy.
Leftover Ideas
Store leftover bars in the refrigerator. They might soften slightly but are still delicious. You can also crumble them over yogurt or ice cream.
Perfect Pairings
Serve this with...
Cooking Timeline
Prepare pan with parchment paper and gather all ingredients
Mix dry ingredients and wet ingredients separately
Combine wet and dry, fold in chocolate chips, press into pan
Chill in refrigerator until firm (minimum 2 hours)
Remove from pan, cut into bars, and serve
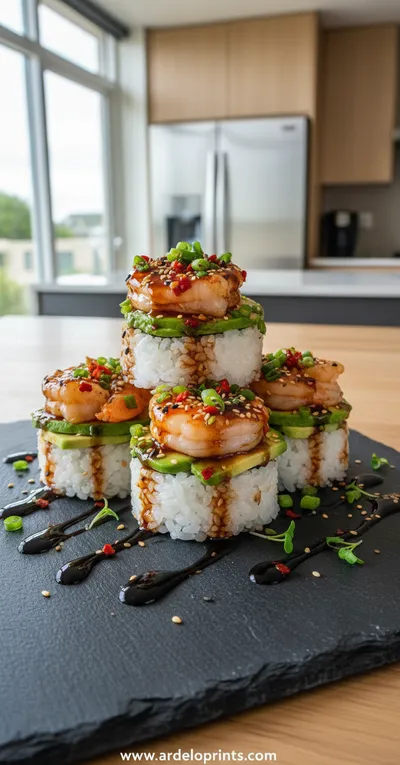 International_Cuisine
Spicy Shrimp Sushi Stacks
A fresh, vibrant bite combining seasoned shrimp, rice, and crisp toppings.

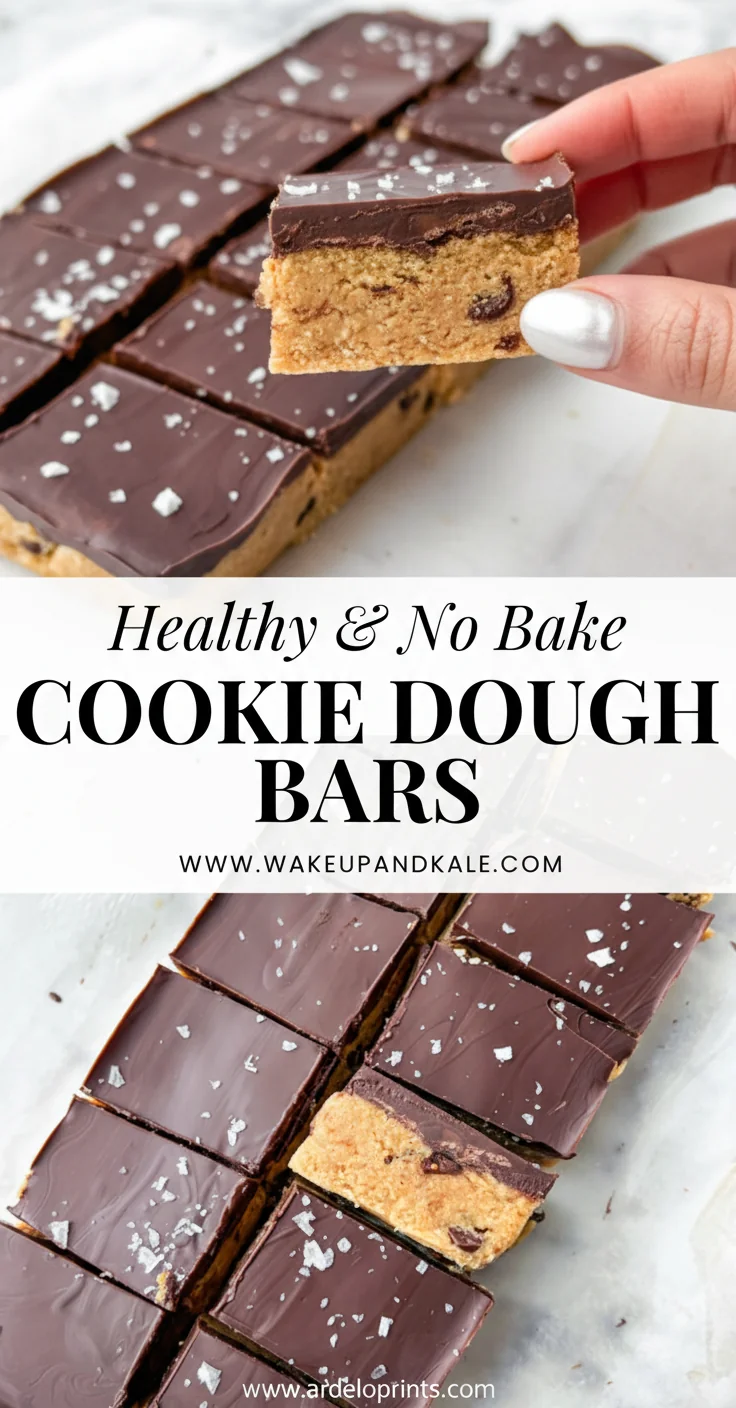
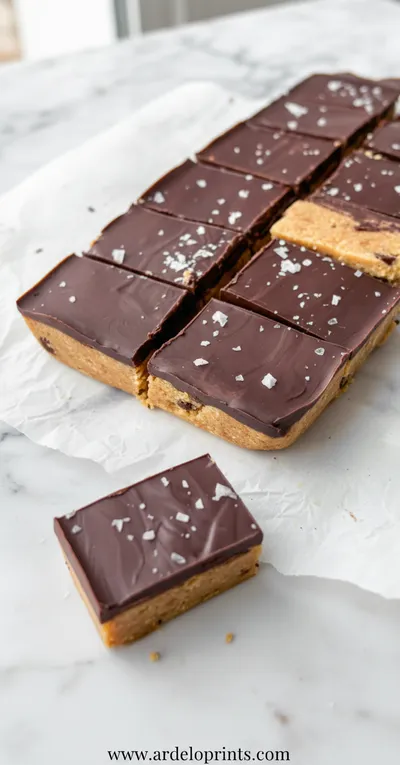
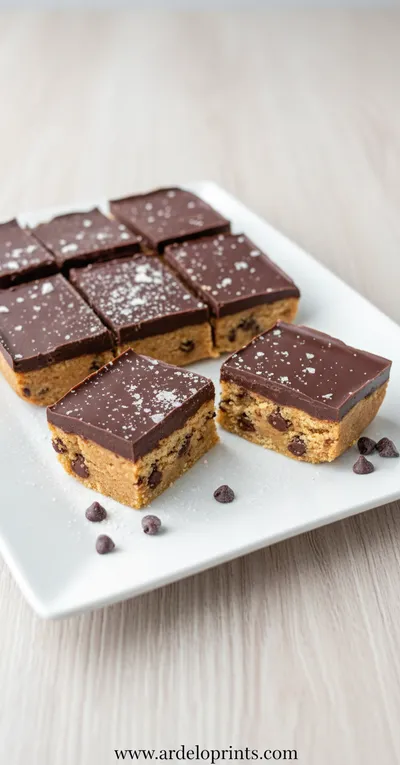
Healthy No Bake Cookie Dough Bars Recipe
These gluten-free, vegan healthy no bake cookie dough bars are the perfect little treat when you're craving something sweet but want to keep it wholesome. Honestly, they come together in minutes and taste just like the real thing.
Timing
Prep Time
15 Minutes
Cook Time
0 Minutes
Total Time
2 Hours 15 Minutes
Recipe Details
Ingredients
Main Dough Ingredients
-
01
2 cups almond flour
-
02
1/4 cup coconut oil, softened
-
03
1/3 cup maple syrup
-
04
1 teaspoon vanilla extract
-
05
1/4 teaspoon sea salt
Add-Ins
-
01
1/3 cup dairy-free chocolate chips
-
02
2 tablespoons chopped walnuts (optional)
Instructions
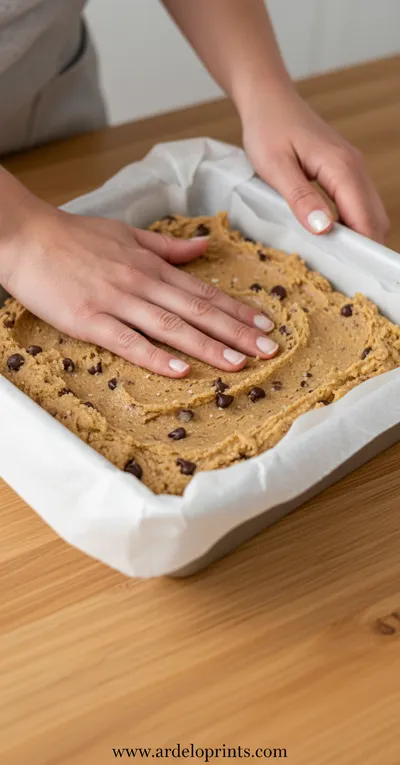
Line an 8x8 inch baking pan with parchment paper, leaving some overhang on the sides for easy removal. This little trick saves so much frustration later, trust me.
In a medium bowl, whisk together the almond flour and sea salt. Make sure there are no lumps - I like to sift it through my fingers to break up any clumps.
In a separate bowl, mix the softened coconut oil, maple syrup, and vanilla extract until well combined. It should look like a smooth, pale mixture that smells absolutely heavenly.
Pour the wet ingredients into the dry ingredients and mix with a spatula until a dough forms. It'll be a bit crumbly at first but will come together as you work it. Use your hands if needed - feels just like play dough.
Fold in the chocolate chips and optional walnuts until evenly distributed. Be gentle so you don't smash the chips - we want those lovely whole pieces throughout.
Transfer the dough to your prepared pan and press firmly into an even layer. Use the bottom of a measuring cup to get it nice and compact - this prevents crumbly bars later.
Chill in the refrigerator for at least 2 hours, or until firm. I sometimes score the top with a knife before chilling to make cutting easier later.
Remove from pan using the parchment paper handles and cut into 12 bars. They're perfect for spooky treats or any occasion really.
Notes & Tips
-
1
For a firmer bar, you can freeze for 30 minutes before cutting
-
2
Store between layers of parchment paper to prevent sticking
-
3
These taste best when chilled but can be served at room temperature for a softer texture
-
4
Double the recipe for a crowd - they disappear quickly!
Tools You'll Need
-
8x8 inch baking pan
-
Parchment paper
-
Mixing bowls
-
Whisk
-
Spatula
-
Measuring cups and spoons
Must-Know Tips
-
Make sure coconut oil is soft but not melted for perfect texture
-
Press dough firmly into pan to prevent crumbly bars
-
Chill completely before cutting for clean edges
-
Use high-quality vanilla - it makes a noticeable difference
Professional Secrets
-
Room temperature ingredients blend more evenly
-
Sifting almond flour creates smoother texture
-
Chilling before cutting prevents crumbling
-
Scoring before chilling makes cutting easier

Recipe by
Mason Cole“Sweet cravings are my specialty! I turn sugar, chocolate, and imagination into pure dessert magic.” 🍰✨
Get Delicious Recipes Weekly
Join 25,000+ home cooks getting our best recipes straight to their inbox.
Free forever • No spam • Unsubscribe anytime