In the early 1900s, when electricity was a luxury for many households, families relied on no‑cook recipes to feed children during school days. The concept of a portable, energy‑free snack dates back to those simple, resourceful times. Today, with busy schedules, we echo that ingenuity by making no‑bake granola bars that feel like a nostalgic bite of history, yet fit seamlessly into modern life.
Why You'll Love It
-
- No oven needed, perfect for any kitchen
-
- Sweet, salty, and nutty balance
-
- Keeps well in the fridge for a week
-
- Customizable with your favorite add‑ins
“These bars are my go‑to afternoon pick‑me‑up—soft enough to chew, sweet enough to satisfy.”
Essential Ingredient Guide
- Rolled oats: Choose thick‑cut oats for the best texture; they hold the bar together.
- Honey: A natural binder that adds gentle sweetness and gloss.
- Nut butter: Provides richness and helps the bar stay cohesive.
- Mixed nuts & seeds: Adds crunch and heart‑healthy fats; toast lightly for extra aroma.
- Dried fruit: A splash of chewiness and natural sugar; optional based on taste.
- Vanilla extract: Just a dash deepens the flavor without overpowering.
 Breakfast
Best Pancakes From Scratch
A step‑by‑step guide to the fluffiest, most comforting pancakes you can create at home, using just pantry staples.
Complete Cooking Process
-
Ingredient Readiness:
Measure oats, nuts, and dried fruit; warm the honey and nut butter together so they blend smoothly.
-
Flavor Development:
Stir in vanilla and a pinch of sea salt; this is where the sweet‑salty harmony forms.
-
Texture Control:
Fold in the crunchy nuts and chewy dried fruit, ensuring even distribution.
-
Finishing Touches:
Press the mixture firmly into a lined pan, smooth the top, and chill until set.
-
Serving Timing:
Slice into bars after at least 30 minutes of cooling; serve plain or with a splash of milk.
-
Use a piece of parchment paper to press the mixture—prevents sticking.
-
If the mix feels dry, add a teaspoon more honey.
-
For extra flavor, toast the nuts lightly before mixing.
-
Store bars in an airtight container; they stay fresh up to 7 days.
Pro Tips
Well, those little adjustments can turn a good bar into a great one. I’ve found that letting the bars rest a bit after chilling lets the flavors settle, just like a quiet moment after a long day. So take your time, enjoy the process, and remember—there’s no rush in a kitchen built on love.
 Snacks
Chocolate Coconut Energy Balls Recipe
Healthy no-bake snacks combining rich chocolate flavor with coconut goodness for quick energy boosts.
The essence of the dish:
The bars are built on a foundation of hearty oats, warmed honey, and creamy nut butter, creating a chewy‑yet‑crunchy bite that feels both satisfying and comforting.
A fun fact or historical angle:
Before modern appliances, schools often served "no‑cook" granola‑type snacks, because they could be prepared ahead and handed out without a stove.
Flavor or sensory focus:
You’ll notice the first gentle snap of toasted oats, followed by the buttery smoothness and a whisper of dried fruit sweetness.
You Must Know
-
All ingredients should be at room temperature
-
Press the mixture firmly to avoid crumbling
-
Cool completely before cutting
Frequently Asked Questions
→ Can I use maple syrup instead of honey?
Yes, substitute maple syrup in equal amounts; it adds a slightly earthy sweetness.
→ What if I’m allergic to nuts?
Swap the nut butter with sunflower seed butter and omit the nuts; the bars will still hold together.
→ How long can I store the bars?
Keep them in an airtight container in the refrigerator for up to a week.
→ Can I freeze them?
Absolutely—wrap individually in parchment and freeze for up to 3 months; thaw at room temperature.
→ Do I need to toast the oats?
Not required, but a quick toast in a dry pan adds extra depth.
→ Can I add protein powder?
Mix in a scoop of vanilla whey or plant‑based protein; reduce honey slightly to keep texture right.
Nutrition Facts
per serving
210
Calories
5g
Protein
24g
Carbs
11g
Fat
Taste Profile
A balanced sweet‑and‑nutty bite with subtle salt.
Ingredient Substitutions
Don't have an ingredient? Try these alternatives
Works well for nut‑free diets; keep the same amount.
Use a 1:1 swap; the bars will be slightly less viscous.
Recipe Variations
Try these delicious twists on the original
Spicy Version
Add ½ tsp cayenne pepper and a drizzle of honey for a sweet‑heat kick.
Mediterranean Style
Mix in chopped dried apricots, pistachios, and a sprinkle of cinnamon.
Common Mistakes to Avoid
Learn from others' mistakes for perfect results
- Over‑heating the honey mixture, which can give a bitter taste.
- Not pressing the mixture firmly, resulting in crumbly bars.
- Cutting the bars before they are fully chilled, causing uneven pieces.
Meal Prep & Storage
Make Ahead Tips
You can prepare the bars up to three days ahead; keep them covered in the fridge and they’ll stay fresh and delicious.
Leftover Ideas
Reheat gently in the microwave for 15 seconds if you prefer a softer texture, or enjoy cold straight from the fridge.
Perfect Pairings
Serve this with...
Cooking Timeline
Gather and measure all ingredients; line pan with parchment.
Warm honey and almond butter; stir in vanilla and salt.
Combine dry ingredients; pour binder over and mix thoroughly.
Press mixture into pan, smooth top, and chill.
Allow bars to set in refrigerator; then cut and serve.
 Snacks
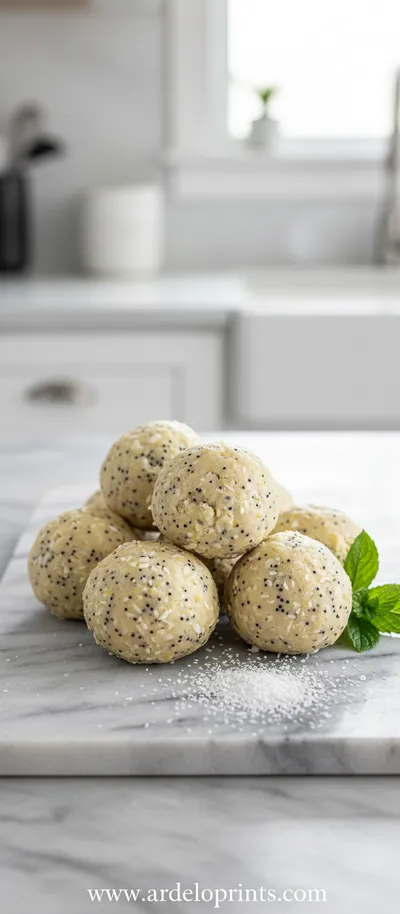
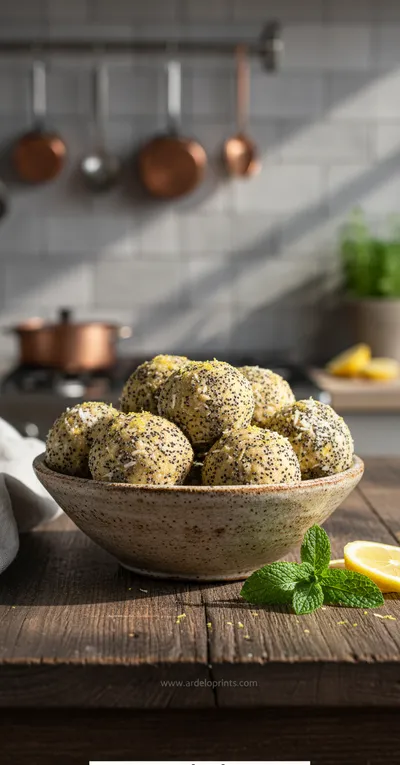
No-Bake Lemon Poppyseed Protein Balls Recipe
A healthy, energy-boosting snack that's quick to make and perfect for any time of day.
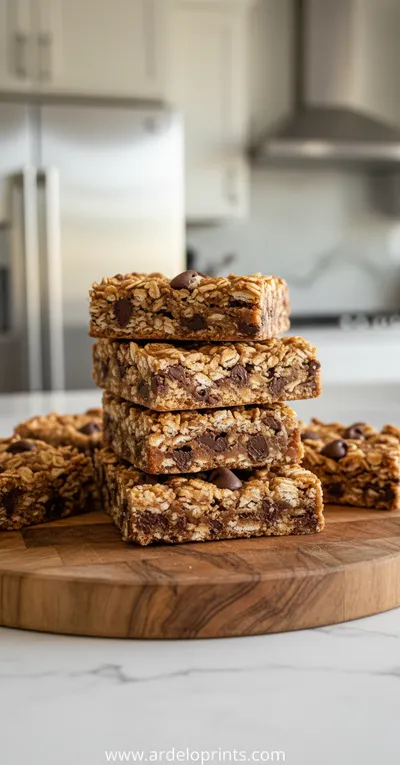
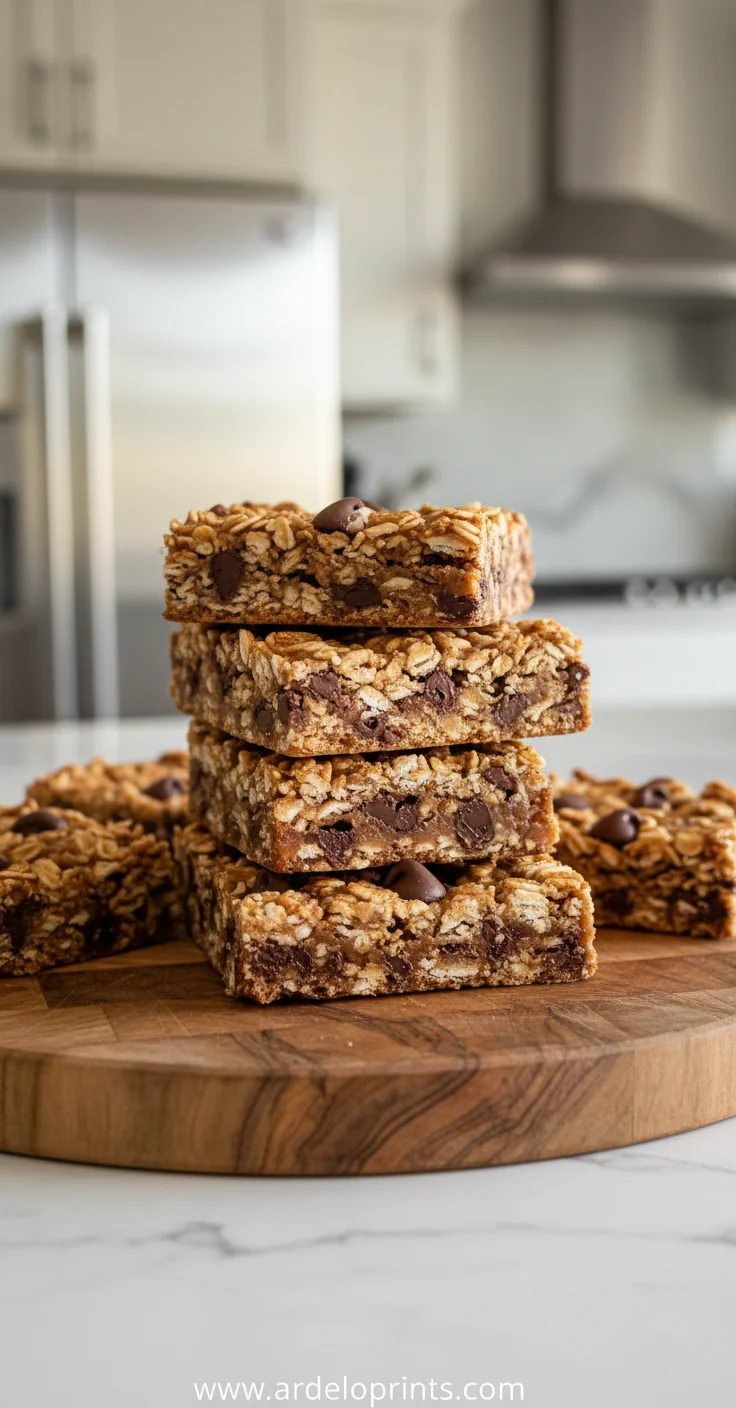
Homemade No Bake Granola Bars
Enjoy quick, crunchy Homemade No Bake Granola Bars—perfect for a healthy snack any time of day. These bars bring warmth of the kitchen without turning on the oven, and they are as easy as whisking honey into oats.
Timing
Prep Time
15 Minutes
Cook Time
0 Minutes
Total Time
45 Minutes
Recipe Details
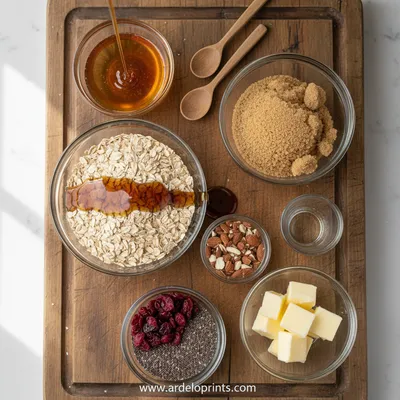
Ingredients
Base
-
01
2 cups rolled oats
-
02
1/2 cup mixed nuts, roughly chopped
-
03
1/4 cup seeds (sunflower, pumpkin)
-
04
1/3 cup dried fruit (cranberries, raisins)
Binder
-
01
1/2 cup honey
-
02
1/4 cup almond butter (or any nut butter)
-
03
1 tsp vanilla extract
-
04
1/4 tsp sea salt
Instructions
In a small saucepan over low heat, gently warm the honey and almond butter together, stirring until smooth; this takes about 2 minutes.
Remove from heat, stir in vanilla extract and sea salt, then let the mixture cool just a touch—so it’s warm but not hot.
In a large bowl, combine rolled oats, chopped nuts, seeds, and dried fruit. Pour the warm binder over the dry ingredients and fold until everything is evenly coated.
Line an 8×8 inch pan with parchment paper. Transfer the mixture onto the pan, pressing firmly with the back of a spoon or your hands to create an even layer.
Refrigerate for at least 30 minutes, then lift the parchment and cut into 12 bars.
Store bars in an airtight container in the fridge; enjoy anytime you crave a quick, wholesome bite.
Notes & Tips
-
1
If the mixture feels too dry, add an extra tablespoon of honey.
-
2
For extra flavor, sprinkle a pinch of cinnamon into the dry ingredients.
-
3
Press firmly; a compact bar holds together better when you bite into it.
 Snacks
Lemon Bliss Balls: Healthy Energy Protein Snacks
Tangy, no-bake lemon energy balls with poppy seeds, perfect for a quick and healthy snack.
Tools You'll Need
-
Medium saucepan
-
Mixing bowl
-
Spatula or spoon
-
8×8 inch baking pan
-
Parchment paper
-
Sharp knife
Must-Know Tips
-
Don’t overheat the honey‑butter combo; gentle warmth preserves flavor.
-
Press the mixture tightly to avoid crumbling later.
-
Let the bars chill fully before cutting for clean edges.
Professional Secrets
-
Room temperature nuts blend more evenly with the binder.
-
A light toast of oats and nuts before mixing deepens aroma.
-
Using a silicone mat instead of parchment can make lifting easier.

Recipe by
Lily_HarperFrom crispy bites to soft nibbles, I’m all about snack-time happiness made simple and delicious.
Get Delicious Recipes Weekly
Join 25,000+ home cooks getting our best recipes straight to their inbox.
Free forever • No spam • Unsubscribe anytime