
I remember one year, my little niece came to me, eyes wide with excitement, asking for 'something really spooky' for her school party. I wanted to do more than just green cupcakes, you know? So, I started playing around with classic Rice Krispies Treats, thinking about how I could mold them. And then, it hit me – brains! We had so much fun in the kitchen, giggling as we squished and shaped these little 'brains.' The best part was seeing her friends' reactions – a mix of hesitant curiosity and then pure delight when they realized how yummy they were. It’s those simple, shared moments in the kitchen that I truly cherish.
Why You'll Love This Recipe
-
So incredibly simple, even little hands can help shape them!
-
A fun, spooky twist on a classic, beloved treat.
-
No baking required – perfect for a quick Halloween project.
-
Customizable with different food colorings and decorations.
-
Always a crowd-pleaser at parties, both kids and adults love them.
-
Makes for fantastic, memorable Halloween photos!
My kids absolutely adored making these! They looked so fantastically gruesome and tasted incredible. Such a clever, easy Halloween treat. It's definitely going to be a yearly tradition in our house now!
Essential Ingredient Guide
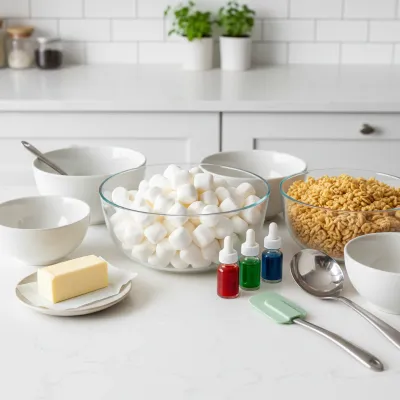
- Mini Marshmallows: Fresh mini marshmallows are key! They melt more evenly and quickly than large ones, creating that perfectly gooey, chewy texture we all love. Make sure your bag isn't stale.
- Unsalted Butter: Butter adds richness and helps prevent sticking. While unsalted is typical for baking, a pinch of salt can actually enhance the flavor profile here. Honestly, either works beautifully.
- Rice Krispies Cereal: This is the classic crunch element! Any puffed rice cereal will work, but for that true nostalgic feel and texture, the original Kellogg's Rice Krispies are the way to go. Make sure it's fresh for maximum crispness!
- Red Gel Food Coloring: Gel food coloring gives you the most vibrant and concentrated color without adding extra liquid, which is important for maintaining the texture. A little goes a long way, so add gradually until you get that perfectly eerie pink or red hue.
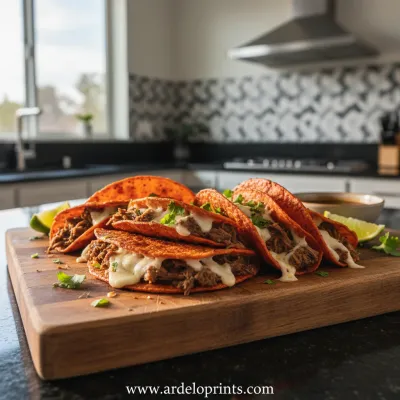
Birria Tacos: Easy & Flavorful Recipe
Tender, slow-braised beef tacos pan-fried to perfection with a rich, savory consomé for dipping.
Complete Cooking Process
-
Melt and Mix:
-
Start by melting the butter in a large pot over low heat. It’s important to go slow here; we don't want it to burn, just get nice and liquidy.
-
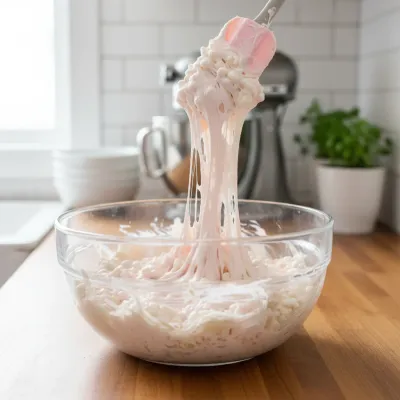
Once the butter is melted, toss in all those lovely mini marshmallows. Stir them constantly until they've transformed into a smooth, gooey, ethereal puddle. Oh, the scent alone is heavenly!
-
Take it off the heat and quickly stir in your vanilla extract – that little hint of warmth makes all the difference. Now for the magic: add your red gel food coloring. Drop by drop, mixing well, until you achieve that perfect, slightly unsettling, brain-like pink or red. It's so fun to watch the color bloom!
-
-
Combine and Shape:
-
Pour your Rice Krispies cereal into the colored marshmallow mix. Grab a buttered spatula and fold, fold, fold! You want every single piece of cereal coated in that sticky, colorful goodness. Work quickly, hon, because this mixture starts to set up fast.
-
Now for the truly creative part! Lightly butter your hands – trust me, this is crucial for not getting totally stuck. Scoop out portions of the mixture, about 1/2 cup each, and gently, with a sculptor's touch, mold them into oblong, brain-like shapes. Use your thumb to create a deep indentation down the middle. Don't worry about perfection; 'brains' are wonderfully lumpy and unique!
-
Place your freshly molded 'brains' onto a buttered or parchment-lined baking sheet. Let them rest, allowing them to cool and firm up a bit at room temperature. This usually takes about 30 minutes to an hour.
-
-
Finishing Touches:
-
Once your brains are firm, if you're feeling extra ghoulish, grab some more red gel food coloring or a tube of edible glitter gel. With a small, clean paintbrush or even a toothpick, you can dab and drizzle 'blood' into the crevices and along the center indentation. It's the little details, you know?
-
Arrange your spooky creations on a platter. Maybe add some plastic spiders or cobwebs for extra flair. These are just begging to be displayed and devoured at your Halloween party!
-
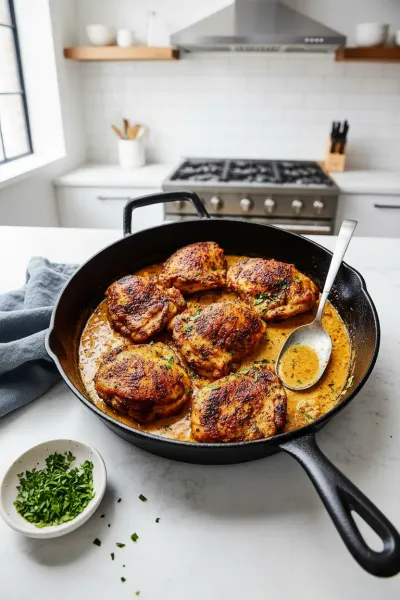
Easy Skillet Chicken Thighs Recipe
Garlic cream sauce skillet chicken thighs for a delicious and simple weeknight dinner.
Frequently Asked Questions
→ Can I use large marshmallows instead of mini?
Yes, you can! You'll need about 40 large marshmallows to equal 10 ounces. Just be aware they might take a little longer to melt, so keep that heat low and stir consistently.
→ How do I make the brain shape realistic?
The key is to work quickly while the mixture is warm. Once you form an oval, use your buttered thumb or the side of a spatula to press a distinct groove down the center. You can also gently pinch and squeeze the sides to create a few more organic 'folds'.
→ Can I prepare these ahead of time?
Absolutely! These Rice Krispies treats are great for making a day or two in advance. Just store them in an airtight container at room temperature. They'll stay fresh and chewy for a few days.
→ What if my mixture is too sticky to handle?
This happens sometimes! The trick is to grease your hands really well with butter or cooking spray before you start shaping. If it's still too sticky, you can let the mixture cool for an extra 5-10 minutes (but not too long, or it will become too stiff).
→ Are there any dietary variations I can try?
For a gluten-free version, make sure to use certified gluten-free rice cereal, as not all brands are. For a dairy-free option, you can substitute vegan butter and vegan marshmallows, though the texture might be slightly different.
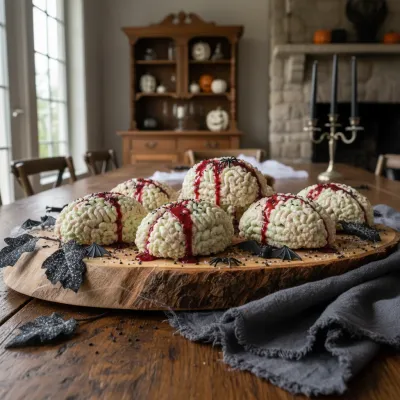
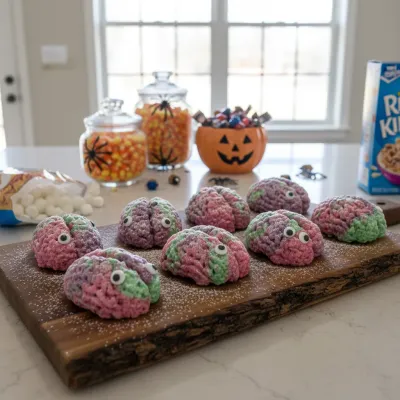
Marshmallow Rice Krispies Halloween Brains
These Marshmallow Rice Krispies Halloween Brains are such a deliciously spooky treat, perfect for adding a touch of playful ghoulishness to your Halloween gatherings or parties! They're surprisingly simple to make, and honestly, so much fun to shape.
Timing
Prep Time
20 minutes
Cook Time
5 minutes
Total Time
25 minutes
Recipe Details
Ingredients
Main Ingredients
-
01
1/4 cup (4 tablespoons) unsalted butter
-
02
10 oz (about 6 cups) mini marshmallows
-
03
1 teaspoon vanilla extract
-
04
6 cups Rice Krispies cereal
-
05
Red gel food coloring (a few drops, or more for desired intensity)
For Decoration (Optional)
-
01
Extra red gel food coloring or edible red glitter gel
Instructions
Prepare your workspace: Lightly grease a large baking sheet with butter or cooking spray, or line it with parchment paper. This will be where your 'brains' will set.
Melt the butter: In a large saucepan or pot, melt the butter over low heat. Be careful not to brown it too much, though a little browning can add a nice nutty flavor!
Add marshmallows: Add the mini marshmallows to the melted butter. Stir continuously until the marshmallows are completely melted and smooth. This takes a few minutes, so be patient.
Color and flavor: Remove the pot from the heat. Stir in the vanilla extract. Now, add a few drops of red gel food coloring. Start with a little, stir it in completely, and then add more until you reach a spooky, brain-like pink or red color. You want it vibrant!
Mix in cereal: Quickly add the Rice Krispies cereal to the marshmallow mixture. Using a buttered spatula or wooden spoon, gently fold and stir until the cereal is evenly coated. Don't overmix, or the treats can become tough.
Shape the brains: Lightly butter your hands (or spray with cooking spray). While the mixture is still warm and pliable, scoop out about 1/2 cup of the cereal mixture. Gently mold it into an oval or oblong shape, then use your thumb or the side of your hand to create a subtle indentation down the middle, mimicking the look of a brain. Place each shaped 'brain' onto your prepared baking sheet.
Let them set: Allow the marshmallow brains to cool completely at room temperature, which usually takes about 30-60 minutes. They'll firm up as they cool.
Decorate (optional): For an extra gruesome touch, use a clean, small paintbrush or a toothpick to drizzle or dot extra red food coloring or edible red glitter gel onto the indentations or crevices of the 'brains' to simulate blood. Serve immediately and enjoy the spooky fun!
Notes & Tips
-
1
Try making mini brains for bite-sized fun!
-
2
Experiment with green food coloring for alien brains, or purple for monster brains.
-
3
For an extra layer of decadence, drizzle melted white or dark chocolate over the cooled brains.
-
4
A light dusting of edible glitter before the 'blood' detailing can add a sparkly, eerie effect.
-
5
These are fantastic for school parties or classroom treats, just make sure to confirm allergy guidelines first.
Easy Slow Cooker Pot Roast
The ultimate set-it-and-forget-it meal. Tender beef and hearty vegetables simmered to perfection in the slow cooker.
Tools You'll Need
-
Large saucepan or pot
-
Large mixing bowl
-
Spatula (preferably buttered or greased)
-
Measuring cups and spoons
-
Baking sheet
-
Parchment paper or cooking spray
-
Small paintbrush (for optional decoration, clean and food-safe)
Must-Know Tips
-
Work quickly once the cereal is mixed in, as the mixture sets fast.
-
Butter your hands generously before shaping to prevent sticking.
-
Use gel food coloring for vibrant color without adding extra liquid.
-
Don't compress the treats too much when shaping, or they'll be hard.
-
For easier cleanup, spray your pot and spatula with non-stick spray before you start.
Professional Secrets
-
A tiny pinch of salt (seriously, just a pinch!) added with the butter can actually enhance the sweetness and depth of flavor.
-
For a truly creepy effect, mix a minuscule amount of black gel food coloring with your red for a darker, more 'realistic' blood drizzle.
-
Brown your butter slightly before adding marshmallows for a delicious, nutty undertone. This adds a gourmet touch!
-
Chill the shaped brains in the fridge for about 10-15 minutes before decorating; it makes them firmer and easier to handle for precise 'blood' application.
-
If you want them extra glossy, brush a very thin layer of clear edible glaze (like piping gel) over the finished brains before applying the red detailing.

Recipe by
Mason Cole“Sweet cravings are my specialty! I turn sugar, chocolate, and imagination into pure dessert magic.” 🍰✨
Get Delicious Recipes Weekly
Join 25,000+ home cooks getting our best recipes straight to their inbox.
Free forever • No spam • Unsubscribe anytime