
I remember seeing a similar idea years ago in a little boutique bakery window, and I just fell in love. I thought, 'Oh, I have to try that at home!' The first time, well, it was a bit messy, I'll admit. Chocolate everywhere! But that’s part of the fun, right? After a few tries, I found the perfect balance of melted chocolate and those adorable little green stems. Now, they're a staple for our fall get-togethers, especially around Halloween. They always bring a smile, and the kids just adore them. They remind me of those sweet, imperfect moments that make life so rich.
Why You'll Adore These Pumpkin Patch Strawberries
-
They're absolutely adorable and perfect for fall festivities.
-
So easy to make, even if you're not a seasoned baker.
-
A no-bake treat that’s ready in no time, honestly.
-
A wonderful, fresh alternative to heavy fall desserts.
-
Kids and adults alike are charmed by their playful look.
-
They add a pop of vibrant color to any dessert spread.
My goodness, these are just the sweetest! I brought them to our family picnic, and they were gone in minutes. Everyone, young and old, was just enchanted by how cute they were. And they taste even better than they look!
Essential Ingredient Guide
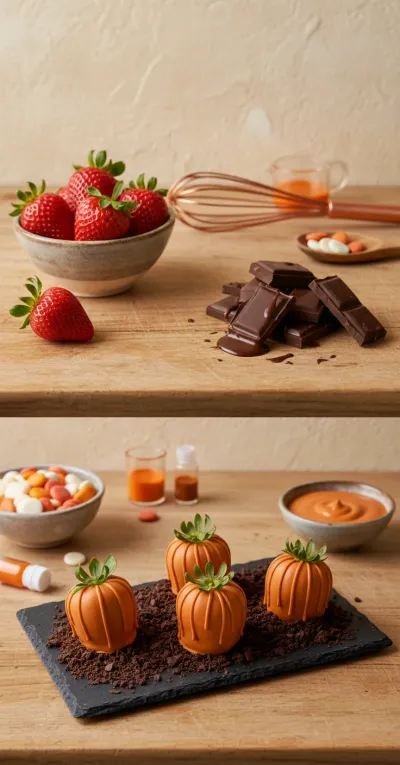
- Fresh Strawberries: Choose large, firm strawberries with their green stems intact. The stems act as a natural 'handle' for dipping and look like the pumpkin's stem. Make sure they are super dry before dipping!
- Orange Candy Melts: These are ideal for a vibrant, smooth orange coating. They melt beautifully and set quickly. If you can't find them, white chocolate mixed with oil-based orange food coloring works too, but avoid water-based coloring, it'll seize your chocolate, oops!
- Dark Chocolate: A small amount of melted dark chocolate creates those distinct pumpkin ridges. You can use chocolate chips, a bar, or dark candy melts. Precision isn't key here; a little rustic charm is lovely!
- Green Candy Melts or Icing: This is totally optional but adds that extra touch of cuteness for the leaves or vines. A little tube of green decorating icing works wonders if you're not keen on melting more candy.

Birria Tacos: Easy & Flavorful Recipe
Tender, slow-braised beef tacos pan-fried to perfection with a rich, savory consomé for dipping.
Complete Cooking Process
-
Strawberry Prep is Key:
-
Select your prettiest, largest strawberries, making sure the green stems are still attached. These are your little pumpkin hats!
-
Wash them gently under cool water. Oh, and pat, pat, pat them bone dry with paper towels. Seriously, this step is non-negotiable for smooth chocolate.
-
Line a baking sheet with parchment paper or wax paper. This is where your beautiful pumpkins will rest and set.
-
-
Melt and Dip the Orange Layer:
-
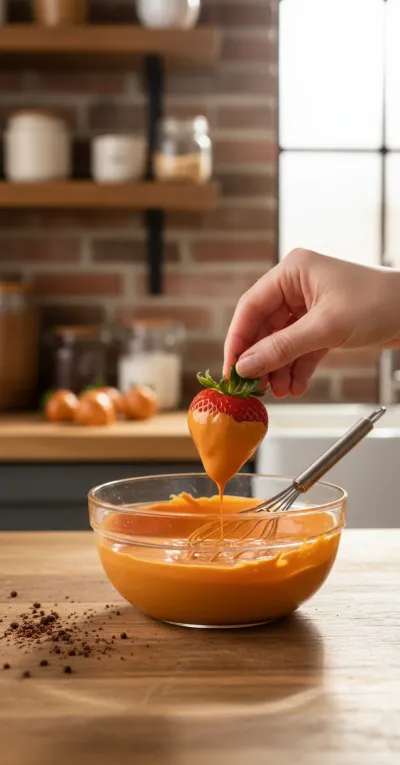
Place your orange candy melts (or colored white chocolate) into a microwave-safe bowl. Start with 30 seconds, then stir. Repeat in 15-second bursts, stirring until it's perfectly smooth and liquid. Don't rush it, darling.
-
Take a strawberry by its stem and dip it into the melted orange chocolate. Swirl it around, leaving a little bit of the green stem peeking out at the top. Give it a gentle tap on the edge of the bowl to let excess chocolate drip off.
-
Carefully place each dipped strawberry onto your prepared baking sheet.
-
-
Add Those Pumpkin Details:
-
While the orange chocolate is still wet (this is important!), melt your dark chocolate. Again, short bursts in the microwave work best. Transfer it to a small piping bag or a Ziploc bag with a tiny corner snipped off.
-
Pipe thin, vertical lines from the top to the bottom of each orange strawberry. These are the sweet, characteristic ridges of your little pumpkins.
-
If you're using green candy melts or icing, now's the time to add those tiny, charming leaves or curly vines near the stem. It's the detail that truly makes them special.
-
-
Set and Serve:
-
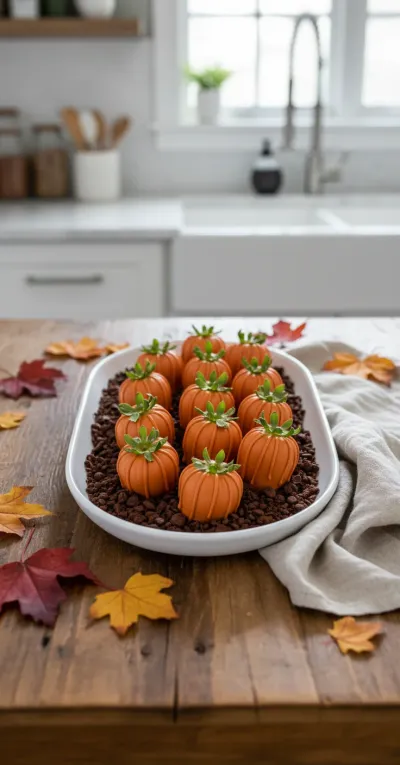
Once all your strawberries are dipped and decorated, let them sit at room temperature for about 30 minutes to fully set. If you're eager, a quick 10-15 minutes in the fridge will do the trick.
-
Arrange them on a beautiful platter. Look at them, aren't they just delightful? So ready for your fall table!
-
Serve immediately and watch them bring smiles to everyone's faces. Enjoy the simple joy!
-

Easy Skillet Chicken Thighs Recipe
Garlic cream sauce skillet chicken thighs for a delicious and simple weeknight dinner.
Your Pumpkin Patch Strawberry Questions Answered
→ Can I use regular chocolate instead of candy melts?
You absolutely can! If using white chocolate for the orange, you'll need oil-based food coloring to get that vibrant pumpkin hue without seizing the chocolate. For the dark lines, any good quality chocolate will work. Just make sure to temper it properly or use a bit of coconut oil to ensure a smooth, shiny finish that sets well.
→ How do I make sure the chocolate doesn't seize?
Ah, the dreaded seized chocolate! The trick is to ensure everything is completely dry—strawberries, bowls, spatulas. Also, avoid overheating the chocolate; melt it slowly and gently. If you're coloring white chocolate, always use oil-based food coloring, never water-based.
→ Can these be made ahead of time?
Yes, you can make these a day in advance! Store them in a single layer in an airtight container in the refrigerator. Just be aware that condensation can sometimes form, making the chocolate a little sticky, so it's best to enjoy them within 24 hours for optimal freshness and appearance.
→ What if my strawberries aren't firm?
Try to pick the firmest, freshest strawberries you can find. Softer ones can release more moisture and make dipping a bit tricky. If yours are a little soft, just be extra gentle when handling them after washing and drying.
→ Any tips for getting those thin pumpkin lines?
For those delicate lines, a small piping bag with a tiny hole snipped at the end is perfect. Or, a Ziploc bag with just the tiniest corner cut off works wonders. Practice on a piece of parchment first to get a feel for the pressure, sweetie. Don't worry about perfection; rustic is charming!
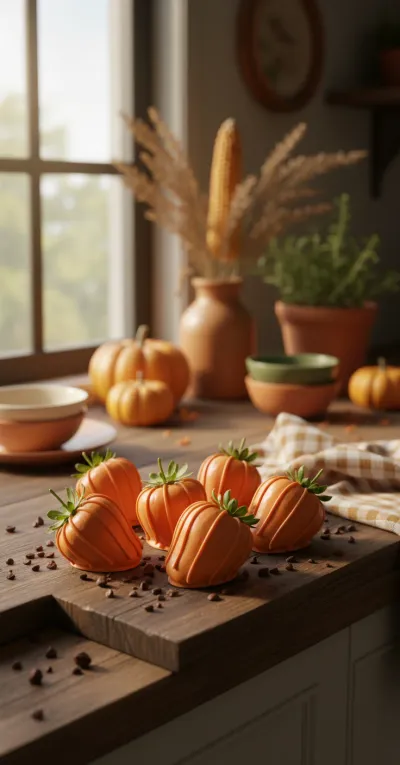
Pumpkin Patch Strawberries: Fall Treat
Pumpkin patch strawberries are chocolate-covered strawberries decorated like little pumpkins! Perfect for fall gatherings and Halloween parties.
Timing
Prep Time
20 minutes
Cook Time
5 minutes
Total Time
25 minutes
Recipe Details
Ingredients
For the Strawberries
-
01
1 lb fresh strawberries, large and firm, with stems intact
-
02
10 oz orange candy melts or white chocolate colored with orange food coloring
-
03
2 oz dark chocolate or chocolate candy melts, for pumpkin lines
-
04
Green candy melts or green icing, for stems and leaves (optional)
Instructions
Gently wash the strawberries and pat them completely dry with paper towels. This is crucial, hon! Any water will make the chocolate seize. Leave the stems on; they'll be your 'pumpkin' tops and handles.
Melt the orange candy melts (or white chocolate with orange coloring) in a microwave-safe bowl. Heat in 30-second intervals, stirring well after each, until smooth and creamy. Be careful not to overheat it.
Holding each strawberry by its green stem, dip it into the melted orange chocolate, swirling to coat almost entirely. Let any excess chocolate drip off. Place the dipped strawberries on a parchment-lined baking sheet.
While the orange chocolate is still wet, melt the dark chocolate. You can use a piping bag with a tiny snipped corner or a small Ziploc bag for this. Pipe thin, vertical lines around each orange strawberry, creating the classic pumpkin ridges.
If you're feeling extra fancy, melt a tiny bit of green candy melts or use green icing. With a toothpick or small piping tip, add a little green 'leaf' or 'vine' detail near the stem of each pumpkin strawberry. This really makes them pop!
Let the strawberries set completely at room temperature for about 30 minutes, or pop them in the refrigerator for 10-15 minutes to speed things up. Arrange them on a pretty platter and watch them disappear!
Notes & Tips
-
1
If you don't have green candy melts, a tiny bit of green icing gel from a tube works perfectly for the stems/vines.
-
2
For a more rustic look, you can just drizzle the dark chocolate over the orange-dipped strawberries.
-
3
Use a deep, narrow bowl for melting chocolate; it makes dipping the strawberries much easier.
-
4
Try sprinkling a pinch of flaky sea salt on the dark chocolate lines before they set for a delightful salty-sweet contrast.

Easy Slow Cooker Pot Roast
The ultimate set-it-and-forget-it meal. Tender beef and hearty vegetables simmered to perfection in the slow cooker.
Tools You'll Need
-
Microwave-safe bowls
-
Parchment paper or wax paper
-
Baking sheet
-
Small piping bag or Ziploc bag
-
Spoon or spatula for stirring chocolate
-
Paper towels
Must-Know Tips
-
Always, always pat your strawberries completely dry. This is the golden rule for chocolate dipping!
-
Melt chocolate slowly in short bursts to prevent burning or seizing.
-
Dip the strawberries into the orange chocolate first, then pipe the dark chocolate lines while the orange is still slightly wet for best adhesion.
-
For clean lines, use a piping bag with a small tip or a Ziploc bag with a tiny corner snipped.
-
Let them set fully before stacking or serving to avoid smudges.
Professional Secrets
-
To achieve a super smooth, glossy finish on your chocolate, temper it properly if using high-quality couverture chocolate. Candy melts, thankfully, are much more forgiving!
-
Add a tiny drop of vegetable shortening or coconut oil to your melted candy melts if they seem too thick; it helps achieve a smoother coating.
-
For extra stability, insert a small wooden skewer into the stem end of each strawberry before dipping, especially if serving a crowd or outdoors.
-
Consider adding a tiny sprinkle of gold or copper edible glitter dust to the finished pumpkins for a magical, enchanted look.
-
Instead of piping, you can use a small fork or a thin skewer dipped in dark chocolate to drizzle the lines for a more organic, whimsical feel.

Recipe by
Sofia Marin“Dinner is where stories are shared and flavors shine. I craft comforting recipes perfect for family nights.” 🍷🍲
Get Delicious Recipes Weekly
Join 25,000+ home cooks getting our best recipes straight to their inbox.
Free forever • No spam • Unsubscribe anytime