Cheesecake, with roots tracing back to ancient Greece, was once considered a luxury for royalty, while the taco, a humble Mexican street staple, has traveled the world on bustling carts. The marriage of these two icons creates a dessert that feels both familiar and surprising. In the early 1900s, street vendors in California began experimenting with sweet fillings inside corn shells, paving the way for modern sweet tacos. Today, that playful spirit lives on in desserts like this, and you can even pair it with a hearty beef birria taco for a contrast of flavors.
Why You'll Love It
-
- A fresh twist on classic cheesecake
-
- Fun, hand‑held presentation
-
- No baking required, just a quick chill
-
- Bright strawberry flavor that feels seasonal
These cheesecake tacos are a surprise hit at every gathering—my guests can’t believe it’s a dessert.
Essential Ingredient Guide
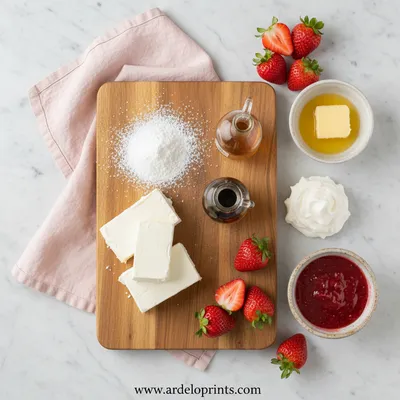
- Cream cheese: Choose full‑fat cream cheese for a silky texture; let it soften at room temperature before mixing.
- Fresh strawberries: Select ripe, deep‑red berries; slice them just before assembling to keep the juices bright.
- Taco shells: Prefer small, hard corn taco shells; toast them lightly for extra crunch.
- Vanilla extract: A dash of pure vanilla adds depth without overpowering the fruit.
- Lemon juice: A splash balances the sweetness and keeps the cheese filling from sinking.
- Powdered sugar: Adds a subtle sweetness; sift it to avoid lumps in the filling.
 International_Cuisine
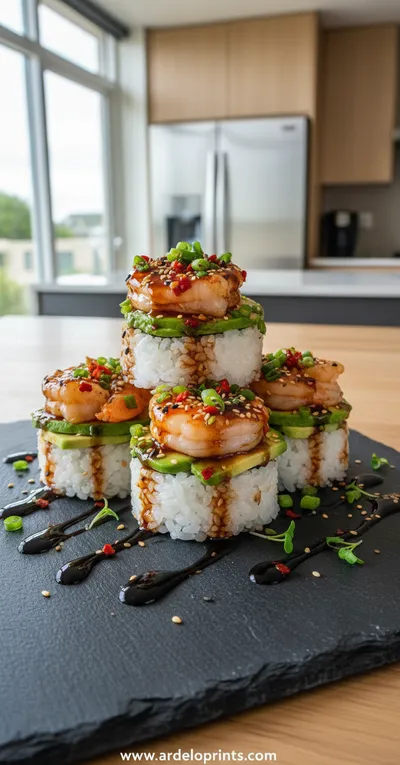
Spicy Shrimp Sushi Stacks
A fresh, vibrant bite combining seasoned shrimp, rice, and crisp toppings.
Complete Cooking Process
-
Ingredient Readiness:
Soften the cream cheese, wash and slice strawberries, and toast taco shells until fragrant.
-
Flavor Development:
Blend cheese with vanilla, lemon, and sugar, then fold in strawberry pieces for a burst of flavor.
-
Texture Control:
Chill the filling just enough to set, while keeping shells crisp for a satisfying bite.
-
Finishing Touches:
Spoon the cheesecake mixture into each shell, top with extra strawberry slices, and drizzle a hint of honey if desired.
-
Serving Timing:
Serve immediately after assembly, or let guests build their own tacos at the table for added fun.
-
If shells get soggy, give them a quick second toast right before serving.
-
Use a piping bag for a cleaner fill and a more elegant look.
-
Add a pinch of sea salt to the filling to enhance the sweet‑sour balance.
Pro Tips
I’ve learned that a tiny sprinkle of salt can make the strawberries sing, and a quick extra toast brings the shells back to that perfect crackle. It’s those little adjustments that turn a good dessert into something memorable. Take a breath, enjoy the process, and let the kitchen fill with that gentle strawberry scent.
 Snacks
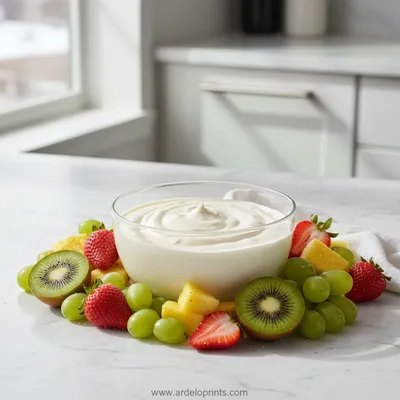
Easy Fruit Dip Recipe
Creamy, easy fruit dip for fresh fruit, perfect for any snack or dessert.
The essence of the dish:
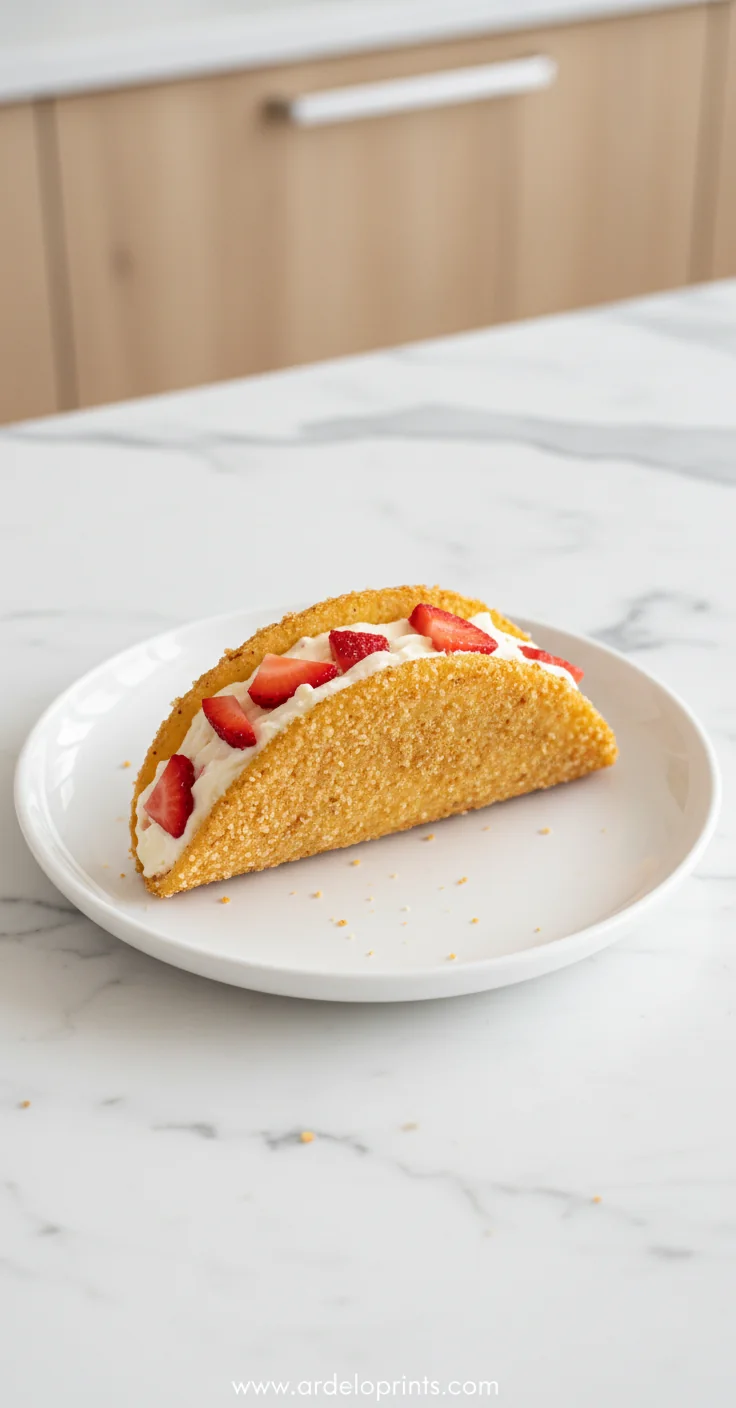
Crisp corn shells act as edible bowls for a light, airy cheesecake that’s sweetened just enough to let the strawberries shine. The contrast of textures—crunch, cream, and juicy fruit—creates a moment of surprise in every bite.
A fun fact or historical angle:
The concept of dessert tacos dates back to the early 20th‑century Mexican‑American street fairs, where vendors experimented with candy fillings inside corn shells. Today, this tradition lives on in modern kitchens, and you can even pair it with a savory chicken tacos for a playful contrast.
Flavor or sensory focus:
Expect the buttery aroma of a toasted shell, the cool silk of cream cheese, and the bright tang of strawberries. A whisper of vanilla and lemon ties everything together, while a light dusting of powdered sugar adds a gentle sparkle.
You Must Know
-
Work quickly to keep shells from softening
-
Chill the filling just enough to hold shape
-
Serve immediately for maximum crunch
Frequently Asked Questions
→ Can I use a flour tortilla instead of corn shells?
Yes, a lightly toasted flour tortilla works, but it will be softer; keep an eye on moisture so the shell stays crisp.
→ How long can the tacos sit before serving?
Ideally serve within an hour; after that the shells may soften from the filling’s moisture.
→ Is there a vegan alternative?
Swap cream cheese for a dairy‑free alternative and use coconut‑based sweeteners; choose vegan taco shells.
→ Can I add a chocolate drizzle?
A thin line of melted dark chocolate adds depth without overwhelming the fruit’s freshness.
→ Do I need to bake the tacos?
No baking required; only a quick toast for the shells and a chill for the filling.
→ What’s the best way to store leftovers?
Keep the filling in an airtight container in the fridge and store shells separately to retain crunch.
Nutrition Facts
per serving
250
Calories
5g
Protein
18g
Carbs
18g
Fat
Taste Profile
A harmonious blend of sweet berries and creamy cheese with a buttery crunch
Ingredient Substitutions
Don't have an ingredient? Try these alternatives
Blend tofu with a bit of lemon juice for tang; adjust sweetness accordingly.
Use honey sparingly; it adds moisture, so slightly reduce lemon juice.
Recipe Variations
Try these delicious twists on the original
Spicy Version
Add a pinch of cayenne pepper to the filling and garnish with a slice of jalapeño for a subtle kick.
Mediterranean Style
Mix in crumbled feta and chopped mint, then top with thinly sliced figs instead of strawberries.
Common Mistakes to Avoid
Learn from others' mistakes for perfect results
- Over‑toasting shells until they become brittle.
- Mixing the filling while the cream cheese is still cold, leading to lumps.
- Leaving the assembled tacos too long before serving, causing soggy shells.
Meal Prep & Storage
Make Ahead Tips
You can whip the cheesecake filling a day ahead and keep it refrigerated; just toast the shells right before serving.
Leftover Ideas
Reheat the shells briefly in a dry skillet, then add fresh filling to avoid sogginess.
Perfect Pairings
Serve this with...
Cooking Timeline
Gather and prep all ingredients; soften cheese, wash and slice strawberries.
Toast taco shells in skillet until golden and fragrant.
Blend cheese, sugar, vanilla, and lemon; fold in strawberries.
Assemble tacos, garnish, and serve immediately.
 Desserts
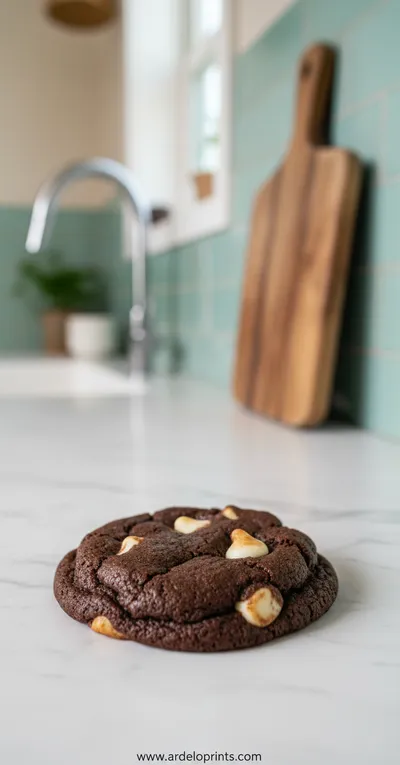
Inside Out Chocolate Chip Cookies
Chewy cookies with crisp edges and a melt‑in‑your‑mouth center.

Strawberry Crunch Cheesecake Tacos
Indulge in sweet Strawberry Crunch Cheesecake Tacos—crisp shells filled with creamy cheesecake and fresh strawberries for a delightful treat.
Timing
Prep Time
20 Minutes
Cook Time
10 Minutes
Total Time
30 Minutes
Recipe Details
Ingredients
Taco Shells
-
01
6 small corn taco shells
-
02
1 tsp olive oil
-
03
Pinch of sea salt
Cheesecake Filling
-
01
8 oz full‑fat cream cheese, softened
-
02
2 tbsp powdered sugar
-
03
1 tsp vanilla extract
-
04
1 tsp fresh lemon juice
-
05
1 cup fresh strawberries, sliced
-
06
Optional: drizzle of honey
Instructions
Preheat a dry skillet over medium heat, brush each taco shell lightly with olive oil, and toast for about 30 seconds per side until golden and fragrant.
In a mixing bowl, beat the softened cream cheese until smooth, then add powdered sugar, vanilla, and lemon juice, mixing until creamy.
Gently fold the sliced strawberries into the cheese mixture, reserving a few slices for garnish.
Spoon the cheesecake filling into each toasted shell, spreading evenly and topping with the reserved strawberry slices.
If desired, drizzle a thin line of honey or melted dark chocolate over the top and serve immediately.
Notes & Tips
-
1
For extra crunch, add a sprinkle of toasted coconut flakes on the garnish.
-
2
If the filling feels too soft, chill it for 10 minutes before assembling.
-
3
Use a piping bag for a cleaner presentation and less mess.
 Desserts
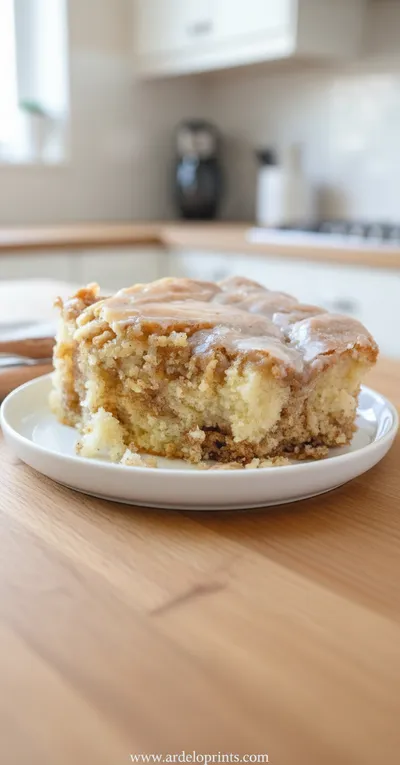
Cinnamon Roll Cake Recipe
Fluffy cinnamon roll cake with caramelized swirl, ideal for breakfast or snack.
Tools You'll Need
-
Skillet
-
Mixing bowl
-
Hand mixer or whisk
-
Spatula
-
Piping bag (optional)
-
Serving platter
Must-Know Tips
-
Do not over‑mix the cream cheese; keep it light.
-
Toast shells just until fragrant to avoid bitterness.
-
Serve immediately to preserve the shell’s crunch.
Professional Secrets
-
Room temperature cream cheese integrates smoothly, preventing lumps.
-
A quick splash of lemon juice brightens the sweet cheese base.
-
A light toast adds a toasted, nutty aroma that elevates the dessert.

Recipe by
Mason Cole“Sweet cravings are my specialty! I turn sugar, chocolate, and imagination into pure dessert magic.” 🍰✨
Get Delicious Recipes Weekly
Join 25,000+ home cooks getting our best recipes straight to their inbox.
Free forever • No spam • Unsubscribe anytime