
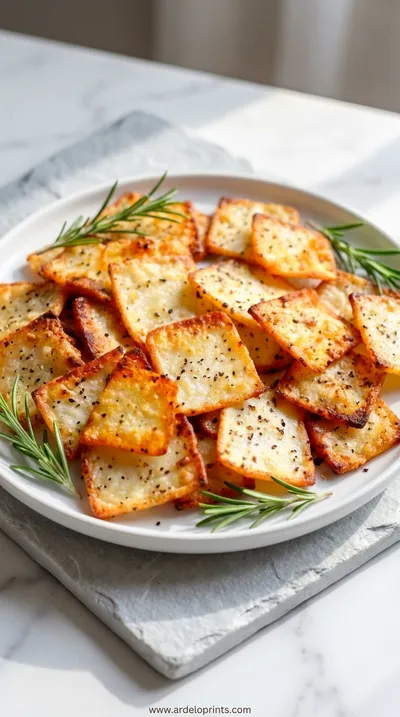
I remember the first time I made these. It was a rainy Tuesday, one of those gray, quiet afternoons where you just want something comforting. I'd seen the idea floating around and was, I'll admit, very skeptical. I had a tub of cottage cheese in the fridge, and I thought, 'Well, why not?' I spread it out on the parchment paper, feeling a little silly, sprinkled it with everything bagel seasoning, and slid it into the oven. I kept peeking through the oven door, watching the little white mounds slowly flatten, sizzle, and turn golden at the edges.
When I pulled them out, the air smelled like a fancy bakery. I let them cool, and the first bite was a revelation—that 'snap!' was so loud and satisfying. It was salty, savory, and so incredibly light. I sat there at my kitchen counter, with the rain tapping on the window, just munching on these impossibly crispy chips. It felt like such a small, perfect moment of discovery. It’s funny how sometimes the simplest experiments, the ones you don’t expect much from, turn into the most cherished little rituals. Now, making them feels like a quiet meditation.
Why You'll Adore These Chips
-
Just Two Ingredients - I mean, it barely feels like a recipe. All you need is cottage cheese and your favorite seasoning. It's the essence of simplicity in the kitchen, which, as a designer, I truly appreciate. There's no complicated process, just a moment of quiet preparation for a truly rewarding, crunchy snack.
-
A Protein Powerhouse - It's so lovely when a snack you crave is also genuinely good for you. Each little chip is packed with protein, making it a wonderful part of a healthy eating lifestyle. Unlike regular chips that can leave you feeling sluggish, these feel nourishing and satisfying. They're a smart choice, much like my favorite egg white bites.
-
Incredibly Crispy Texture - The crunch is honestly the best part. It's not a heavy, dense crunch, but a light, airy, delicate snap that shatters when you bite into it. It’s so satisfying to listen to! They are perfect for dipping, but honestly, I love eating them all on their own just to appreciate that perfect texture.
-
Endlessly Customizable - This is just a starting point. Think of the cottage cheese as a blank canvas for whatever flavors you're in the mood for. Smoked paprika, a little garlic powder, some dried herbs like rosemary or thyme... you can create a different chip for every day of the week. It’s a fun way to play with your spice cabinet.
I never thought cottage cheese could be this addictive! They're so light and crispy, my whole family loves them.
Essential Ingredient Guide
- Full-Fat Cottage Cheese: For this recipe, I really prefer using a full-fat, small-curd cottage cheese. The extra fat content seems to help the chips become more flavorful and golden, and they crisp up beautifully without becoming too dry. Look for one that isn't too watery; if yours has a lot of liquid, you might want to strain it just a little bit so the cheese spreads nicely instead of creating puddles. The creaminess of the full-fat version just creates a richer, more satisfying chip in the end.
- Everything Bagel Seasoning: Oh, this is where the magic really happens. Everything Bagel Seasoning is my go-to because it's a perfect, ready-made blend of salty, savory, and textural elements. The combination of sesame seeds, poppy seeds, dried garlic, onion, and coarse salt is just divine. Be generous with it! You want to see the seasoning covering the surface of your little cheese dollops. Of course, you can use any seasoning you love, but this one is a classic for a reason.
 Snacks
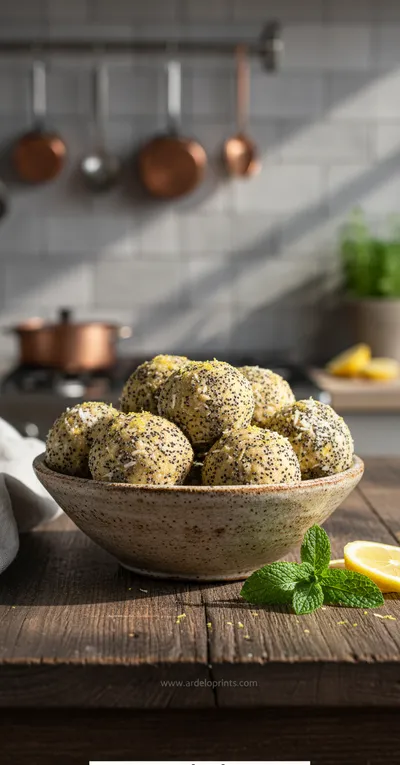
Lemon Bliss Balls: Healthy Energy Protein Snacks
Tangy, no-bake lemon energy balls with poppy seeds, perfect for a quick and healthy snack.
Complete Cooking Process
-
The Gentle Spread:
The most important part of this whole process is how you prepare the cottage cheese on the baking sheet. You’re not just plopping it down; you’re creating the delicate structure of your future chip. I like to take small spoonfuls and arrange them a couple of inches apart on the parchment paper. Then, using the back of the spoon, I gently swirl and press each dollop into a thin, round-ish shape. You’re aiming for a layer that’s almost translucent in spots but still connected. This thinness is what allows the moisture to bake out and create that incredible crispiness. It’s a slow, thoughtful step that makes all the difference.
-
The Patient Bake:
Once your little cheese discs are seasoned, they go into the oven for a patient bake. This isn't a high-heat, super-fast process. A moderate oven allows the cheese to slowly dehydrate and toast. You'll see the edges start to turn a beautiful golden brown first—that's your cue that they're almost ready. It's tempting to pull them out early, but you have to wait for the centers to look dry and firm. The transformation is so lovely to watch, as they go from soft and white to crisp and golden.
-
The Cooling Snap:
This step is just as crucial as the baking. When the chips first come out of the oven, they might still have a tiny bit of softness or flexibility in the very center. Don't worry! As they sit on the hot baking sheet for a few minutes and then transfer to a cooling rack, they will continue to crisp up to perfection. The circulating air helps wick away that last bit of steam. The sound they make when you finally lift one off the rack and it snaps cleanly in two… ugh, it’s just the best. It’s the final signal that your delicious, healthy snack is ready.
-
Don't skip the parchment paper. The cheese will stick terribly to a bare pan or even foil.
-
Thinner is always better for crispiness. Try to make the layers as even as you can.
-
Every oven is different. Start checking on them around the 20-minute mark to prevent burning.
-
Let them cool completely! This is when they get their signature crunch.
Pro Tips for Perfect Chips
Following these little details will really elevate your chip game. It’s the difference between a good snack and a truly amazing one.
 Appetizers
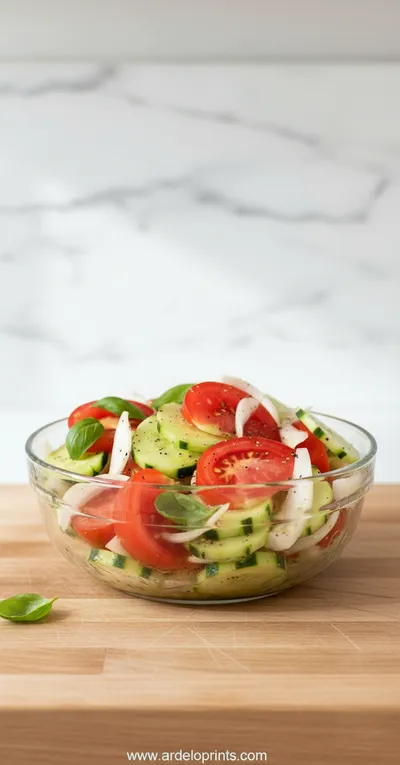
Tomato Cucumber and Onion Salad
A bright, garden‑fresh salad with tomatoes, cucumbers, onions, and a simple vinaigrette.
Frequently Asked Questions
→ Can I use low-fat or fat-free cottage cheese?
You absolutely can, but the texture and flavor might be slightly different. I've found that full-fat cottage cheese yields a richer, more golden, and slightly more pliable chip, while low-fat versions can sometimes be a bit drier or more brittle. They will still get crispy and be delicious, so feel free to use what you have on hand or what fits your dietary needs best. Just keep an eye on them in the oven as they might cook a little faster.
→ How do I store these cottage cheese chips?
Honestly, they are best enjoyed the day they are made, right after they've cooled, to get that maximum crispiness. However, if you have leftovers, you can store them in an airtight container at room temperature for a day or two. If they lose a bit of their crunch, you can try reviving them in a toaster oven or an air fryer for just a minute or two to bring back that delightful snap.
→ Why didn't my chips get crispy?
Oh, this is a common issue and it usually comes down to one of two things: thickness or baking time. If the cottage cheese was spread too thickly on the parchment paper, it will be very difficult for all the moisture to evaporate, leaving you with a chewy center. The other possibility is that they simply needed more time in the oven. Every oven runs a little differently, so don't be afraid to leave them in for a few extra minutes until they are truly golden brown and appear dry.
→ Can I make these in an air fryer?
Yes, an air fryer works wonderfully for this! You'll need to place a small piece of parchment paper in the air fryer basket. Spread your cottage cheese just as you would for the oven method, making sure not to overcrowd the basket. You'll likely need to work in batches. Air fry them at around 350°F (175°C) for about 8-12 minutes, checking frequently until they are golden and crisp. They cook much faster in the air fryer, so keep a close watch.
→ What are some other seasoning ideas besides Everything Bagel?
The possibilities are truly endless, which is so fun! For a smoky flavor, try smoked paprika with a pinch of garlic powder and onion powder. For an Italian-inspired chip, a sprinkle of dried oregano and basil with some parmesan cheese mixed in is divine. A little ranch seasoning powder is also delicious. You could even go a sweet route with a sprinkle of cinnamon, though I much prefer a savory snack like my stuffed peppers.
→ Are these chips genuinely healthy?
Yes, I really consider them to be a wonderfully healthy snack option. They are essentially just baked cheese, so you're getting a huge dose of protein with very few carbs, which is fantastic for keeping you full and satisfied. They are naturally gluten-free and a great choice if you're looking for low-carb or keto-friendly bedtime snacks. Compared to traditional potato chips, they are a nutritional powerhouse.
→ Does the type of curd (small or large) matter?
I personally prefer using small curd cottage cheese because I find it easier to spread into thin, uniform circles. The smaller curds break down more easily and create a more consistent, wafer-like chip. Large curd will still work, but you might need to spend a little more time with the back of your spoon pressing and spreading to get that super thin layer that is essential for crispiness. The flavor will be just as lovely, though!
Nutrition Facts
per serving
120
Calories
14g
Protein
3g
Carbs
6g
Fat
Taste Profile
Savory, toasty, and cheesy with a prominent salty kick from the seasoning.
Ingredient Substitutions
Don't have an ingredient? Try these alternatives
You can use ricotta, but it has a higher moisture content. I would recommend straining it well and pressing out some liquid first. The flavor will be milder and the texture slightly different, but still delicious.
Feel free to make your own! A simple mix of flaky sea salt, garlic powder, onion powder, and maybe some paprika or dried dill works wonderfully. It's a great way to use spices you already have.
Recipe Variations
Try these delicious twists on the original
Spicy Nacho Version
Mix a teaspoon of taco seasoning and a pinch of cayenne pepper into the cottage cheese before spreading it out. After baking, they are delicious dipped in salsa and sour cream.
Cheesy Italian Herb Version
Stir a tablespoon of grated Parmesan cheese and a teaspoon of dried Italian herbs (like oregano and basil) into the cottage cheese. These have a lovely, aromatic flavor reminiscent of a cheese crisp.
Common Mistakes to Avoid
Learn from others' mistakes for perfect results
- Not spreading the cheese thin enough, which results in a chewy, not crispy, texture.
- Removing them from the oven too early. They need to be truly golden brown to be crisp.
- Trying to move them before they have cooled. They are very fragile when hot and will crisp up as they cool.
- Overcrowding the pan, which can cause them to steam rather than bake and toast.
Meal Prep & Storage
Make Ahead Tips
This recipe is truly best made and served fresh, as the crispy texture is the main star. You can't really prep the components ahead of time, but the good news is that it only takes about 5 minutes of hands-on effort to get them ready for the oven, so it's very easy to make them on a whim when a craving strikes.
Leftover Ideas
Leftover chips are perfect for adding a bit of crunch to your next meal. Crumble them over a salad instead of croutons for a gluten-free, high-protein alternative. They are also fantastic sprinkled over creamy tomato soup or chili. If I'm looking for a different kind of protein-rich treat, I might make my chocolate protein fluff instead.
Perfect Pairings
Serve this with...
Cooking Timeline
Preheat the oven to 375°F and line a baking sheet with parchment paper.
Dollop and spread the cottage cheese into thin rounds on the parchment paper and sprinkle with seasoning.
Bake in the oven, rotating the pan halfway through, until the edges are golden brown.
Remove from the oven and let cool completely on the pan to allow them to crisp up fully.
 Desserts
Fudgy Chewy Browkies Recipe
A moist, ultra‑rich brownie‑like treat that’s both fudgy and chewy, ideal for any dessert lover.

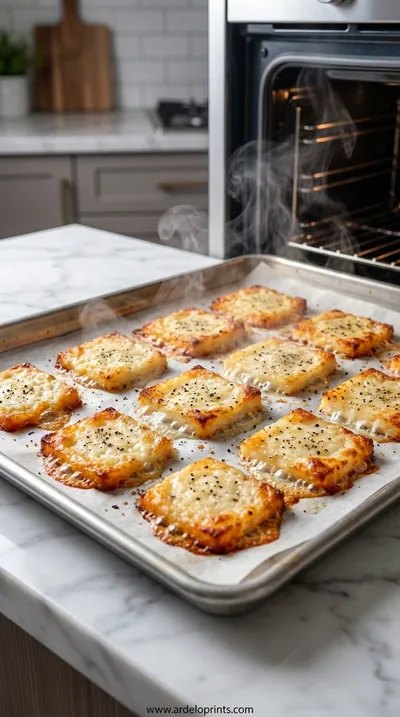
Cottage Cheese Chips: Healthy & Easy Homemade Recipe
Make crispy cottage cheese chips with this simple recipe - a healthy, protein-packed snack perfect for any time.
Timing
Prep Time
5 Minutes
Cook Time
25 Minutes
Total Time
30 Minutes
Recipe Details
Ingredients
For the Chips
-
01
1 cup full-fat cottage cheese
-
02
1-2 tablespoons Everything Bagel Seasoning (or to taste)
Instructions
First, let's create our calm little workspace. Begin by preheating your oven to a nice, moderate 375°F (190°C). This temperature is perfect for slowly drawing out the moisture without burning the delicate cheese. Then, take out your favorite heavy baking sheet and line it with a sheet of parchment paper. This is truly non-negotiable; the parchment ensures your beautiful chips will lift off effortlessly once they're baked, so don’t be tempted to skip it. It makes the whole process so much more graceful and cleanup is a breeze.
Now for the meditative part. Take heaping teaspoon-sized dollops of the cottage cheese and place them onto your prepared parchment paper, leaving at least 2 inches of space between each one so they have room to spread and crisp up. Using the back of your spoon, gently press down and spread each dollop into a very thin, circular shape, about 2-3 inches in diameter. The thinner you can get them without creating holes, the crispier your final chip will be. Take your time with this; it’s a quiet, lovely process.
This is where we add the personality. Sprinkle your seasoning generously over each of the cheese rounds. I love using Everything Bagel seasoning for that perfect salty, savory crunch, but feel free to use whatever your heart desires. Don't be shy here; you want a nice, even layer of seasoning on each chip. This is what will create that beautiful, speckled appearance and ensure every single bite is packed with flavor. It’s the finishing touch that really makes them special.
Gently slide the baking sheet into your preheated oven. Let them bake for about 20-25 minutes. You'll want to watch for the edges to become a deep golden brown and the centers to look dry and firm. Once they look perfectly toasted, carefully remove the pan from the oven and let the chips cool directly on the baking sheet for at least 5-10 minutes. This is a crucial step where they'll firm up and get that final, signature snap. Once cooled, gently peel them off the parchment and enjoy that incredible crunch.
Notes & Tips
-
1
Every oven is a little different, so I recommend starting to check on your chips around the 20-minute mark. They can go from perfectly golden to a little too dark very quickly at the end, so keep a watchful eye.
-
2
For the absolute crispiest results, make sure you spread the cottage cheese as thinly and evenly as possible. Any thicker spots will remain chewy, so it's worth taking an extra minute to get them nice and even.
-
3
While they are best eaten fresh, you can store any leftovers. Just make sure they are completely cool before placing them in an airtight container. If they soften up a bit, a minute in the toaster oven can bring them right back to life.
Tools You'll Need
-
Baking Sheet: A good, sturdy baking sheet is essential. I prefer the heavy-duty kind because they distribute heat so evenly, which is key for getting all the chips to brown at the same rate. It’s like a reliable, quiet friend in the kitchen.
-
Parchment Paper: This is your absolute best friend for this recipe. It creates a non-stick surface that the cheese will release from perfectly. There's nothing sadder than a beautiful chip that's stuck to the pan, and parchment paper prevents that heartache.
-
Offset Spatula or Spoon: While a simple spoon works just fine for spreading the cheese, a small offset spatula can feel like a lovely little luxury. It allows you to get the cheese layer incredibly thin and even with a simple, elegant sweep of the wrist. It’s a tool that just feels good to use.
Must-Know Tips
-
Embrace the Space - Don't overcrowd the baking sheet. Giving each chip enough room to breathe allows the hot air to circulate all around it, which is essential for uniform drying and crisping.
-
Listen for the Snap - The true test of a perfect chip is the sound. If you let them cool completely and they still bend instead of snap, they likely needed a few more minutes in the oven. Patience is key.
-
Season Before Baking - Always add your seasonings before the chips go into the oven. The moisture from the cottage cheese helps the spices adhere beautifully, baking the flavor right into the chip.
Professional Secrets
-
Strain if Necessary - If your brand of cottage cheese seems particularly wet or watery, strain off some of the excess liquid whey through a fine-mesh sieve. This will give you a thicker base to work with and help the chips crisp up more effectively.
-
Rotate the Pan - Most ovens have hot spots. For perfectly even color across all your chips, rotate your baking sheet halfway through the baking time. It’s a small step that makes a big difference in the final result.
-
Cool on a Wire Rack - For maximum crispiness, after letting them cool for a few minutes on the pan, transfer the chips to a wire cooling rack. This allows air to circulate underneath, preventing any steam from getting trapped and softening the bottoms.

Recipe by
Lily_HarperFrom crispy bites to soft nibbles, I’m all about snack-time happiness made simple and delicious.
Get Delicious Recipes Weekly
Join 25,000+ home cooks getting our best recipes straight to their inbox.
Free forever • No spam • Unsubscribe anytime