I remember the first time I made these, my kids were still small enough that their hands got completely covered in cinnamon sugar. We had just come back from a pumpkin patch, our boots were still muddy by the door, and the whole house already smelled like autumn. I wanted to capture that feeling in a treat. We weren't aiming for perfection; some pumpkins were lopsided, others had a little filling peeking out, but honestly, that was the charm. They were our lumpy, bumpy, wonderful little creations. Now, even when I make them by myself, the smell of them baking takes me right back to that afternoon. I've tweaked this recipe over the years, but the heart of it remains the same: it’s about making something warm and lovely to share. It's less about a perfect pastry and more about the sweet, simple comfort of the season.
Why You'll Adore These Little Pumpkins
-
Perfectly Festive: I mean, look at them! They are just the cutest little things to bring to a potluck or to have on your Thanksgiving dessert table. They bring an instant smile to everyone’s face because they’re so playful and charming.
-
Incredibly Simple: This is my favorite kind of recipe—one that looks impressive but is secretly so, so easy. Refrigerated crescent dough is a wonderful shortcut that lets you skip the intimidating parts of pastry and get right to the fun of filling and shaping. It's almost foolproof, I promise.
-
The Dreamiest Filling: Oh, the filling. It’s this perfect balance of tangy, rich cream cheese and warmly spiced pumpkin puree. It’s sweet but not too sweet, creamy, and tastes exactly like how a cozy sweater feels. It reminds me a bit of the filling in my favorite cinnamon roll muffins.
-
A Fun Kitchen Project: This is such a lovely recipe to make with others, especially little ones. The process of tying the twine and creating the pumpkin shape is tactile and fun. It embraces imperfection, which is a design philosophy I love in the kitchen.
'I made these for a fall party and everyone went crazy for them! So cute and unbelievably delicious.'
Essential Ingredient Guide
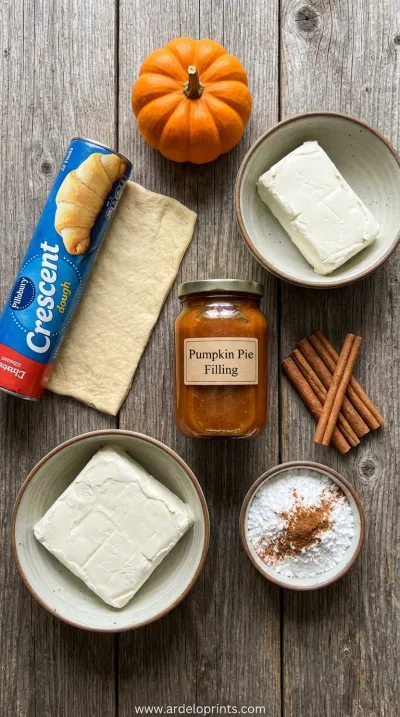
- Refrigerated Crescent Roll Dough: This is our magical shortcut. You can find it in the refrigerated section of almost any grocery store. The key is to keep it cold until you’re ready to use it; warm dough gets sticky and hard to handle. Work quickly once you unroll it for the best, flakiest results. It’s the buttery, light foundation that makes these pumpkins so delightful.
- Full-Fat Cream Cheese: Please, use the full-fat block cream cheese for this, not the kind in a tub. It has a much firmer texture and less water content, which means your filling will be thick and creamy, not runny. Letting it soften to room temperature is non-negotiable! It’s the only way to get a perfectly smooth, lump-free filling when you mix everything together.
- 100% Pure Pumpkin Puree: Make sure you grab the can that says '100% pure pumpkin' and not 'pumpkin pie filling.' The pie filling is already sweetened and spiced, and we want to control that ourselves. The pure puree gives us that authentic, earthy pumpkin flavor that pairs so beautifully with the cream cheese and our own blend of warm spices. It's the heart of our fall flavor.
 Desserts
Cinnamon Roll Cake Recipe
Fluffy cinnamon roll cake with caramelized swirl, ideal for breakfast or snack.
Complete Cooking Process
-
Creating the Creamy Filling:
The first step is always the most grounding, I find. It's where the aromas start to build. You'll take your softened cream cheese—and really, let it get soft, it makes all the difference—and beat it until it's perfectly smooth and creamy in a medium bowl. Then, you'll fold in the pumpkin puree, the sugar, and those beautiful, warm spices. I love watching the color change from pure white to a soft, gentle orange. The smell of cinnamon, nutmeg, and ginger starts to fill the air, and that’s when it really starts to feel like fall in my kitchen.
-
Filling and Shaping the Dough:
Now for the hands-on part that feels like a little art project. You’ll unroll your chilled crescent dough and separate it into triangles. I like to gently press the seams of two triangles together to form a rectangle; it gives you a bit more surface area to work with. A small spoonful of that lovely filling goes right in the center. Then you gather the edges up and pinch them together tightly to form a little ball. Sealing it well is key, so none of that delicious filling escapes while baking. Take your time with this part; it's a quiet, meditative process.
-
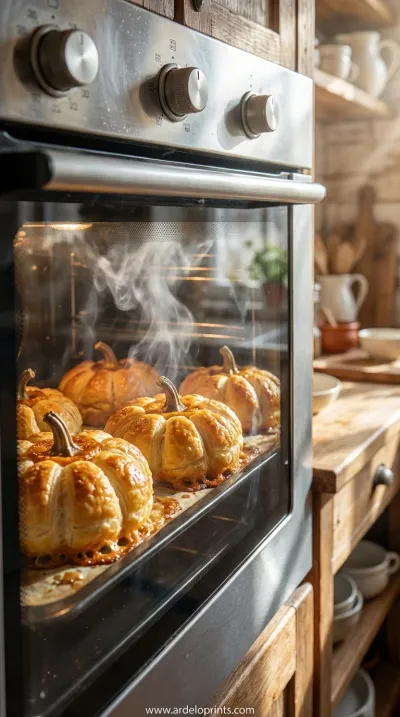
Tying and Baking the Pumpkins:
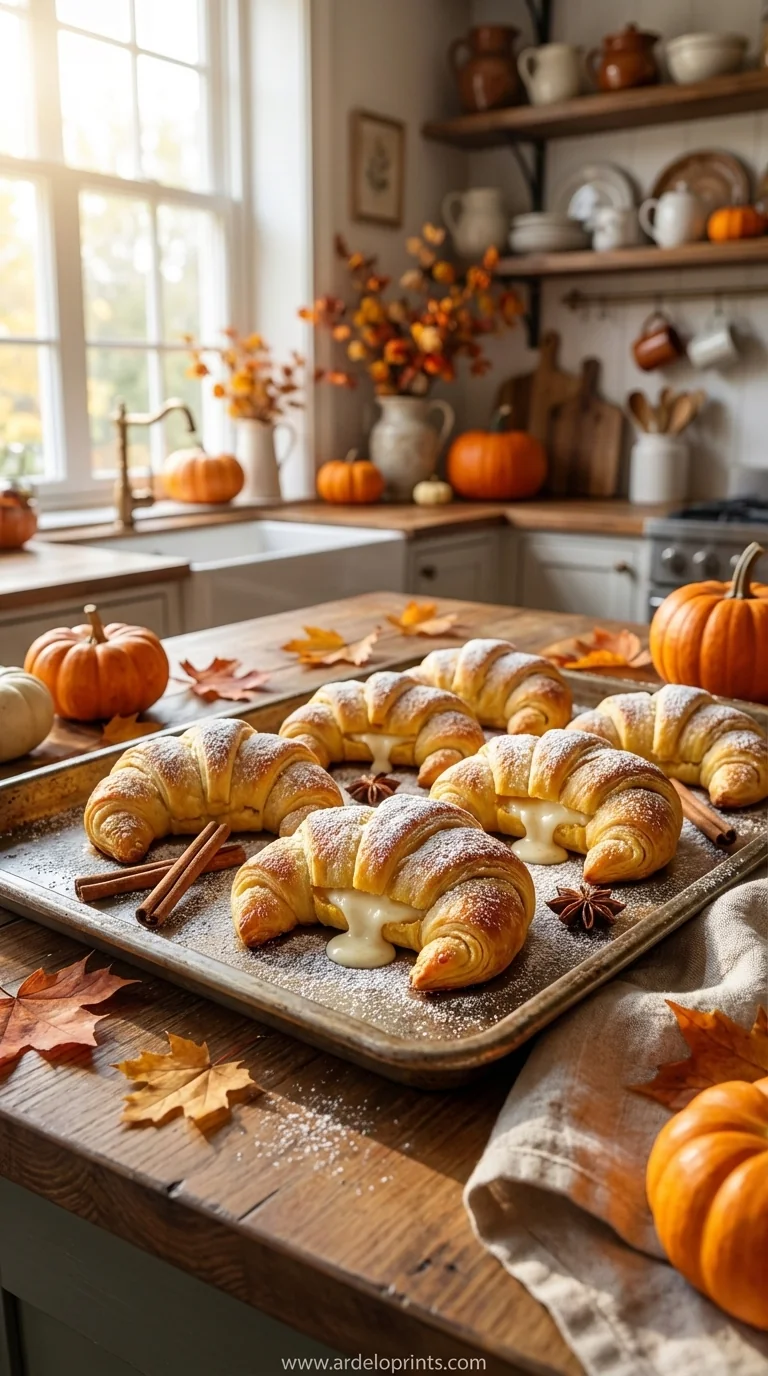
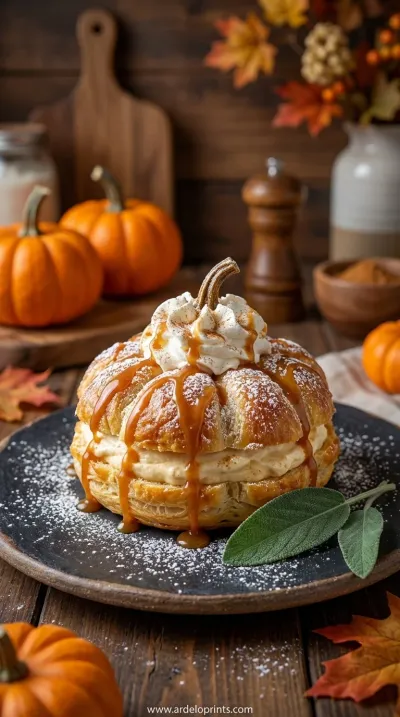
This is where the magic happens! You’ll use kitchen twine to create the pumpkin shape. It’s just a matter of wrapping it around your little dough ball to create those classic pumpkin ridges. Don't tie it too tightly, as the dough needs room to puff up in the oven. A little brush of egg wash gives them a beautiful, glossy shine, and a sprinkle of cinnamon sugar adds a lovely, crunchy crust. Watching them bake is my favorite part—they transform from pale little bundles into golden, puffy, perfect pumpkins.
-
Don't overfill the dough. It's so tempting, I know, but about a tablespoon is perfect. Too much filling will ooze out during baking.
-
Oil your kitchen twine! A little dip in some neutral cooking oil will prevent it from sticking to the dough after baking, making removal a breeze.
-
Work in batches if your kitchen is warm. Keep the dough you're not actively working with in the fridge to ensure it stays easy to handle.
Pro Tips for Perfect Pumpkins
These little details make the whole process smoother and more enjoyable, so you can just relax and have fun with it.
 Desserts
Easy Ice Cream Sandwich Cake
Cool, creamy ice cream sandwich cake that's simple, fun, and perfect for any sweet craving.
Frequently Asked Questions
→ Can I make these ahead of time?
You can definitely prepare parts ahead! I recommend making the filling and storing it in an airtight container in the fridge for up to two days. However, I’d wait to assemble and bake the pumpkins until you’re ready to serve them. They are just so wonderfully soft and warm straight from the oven, and the texture is at its absolute best. Reheating them is possible, but they lose a bit of that fresh-baked magic.
→ My filling keeps leaking out when I bake them. What am I doing wrong?
Oh, that’s a common little hiccup! It usually comes down to one of two things. First, make sure you're not overfilling them—a small spoonful is all you need. Second, be really diligent about pinching all the seams of the dough together to create a tight seal. If there are any little gaps, that creamy filling will find its way out. Also, using full-fat, block-style cream cheese helps ensure the filling is thick enough to stay put.
→ How do I remove the twine without ruining the pumpkin shape?
This is a great question! The trick is to be gentle. First, make sure you greased the twine before wrapping the dough; it makes a huge difference. Once the pumpkins are baked and have cooled for a few minutes, use a small, sharp pair of scissors to carefully snip the twine at the top and bottom. Then, you can gently pull the pieces out from the grooves. Don't yank them! A slow, careful touch is all you need to preserve their cute shape.
→ Could I make a savory version of these?
What a fantastic idea! I love that. Yes, absolutely. You could fill them with a mixture of cream cheese, chives, garlic, and maybe some finely chopped turkey ham. They would make for wonderful little appetizers for a party. The shaping technique works just as well for savory fillings. I imagine something like the filling from my stuffed peppers would be amazing in these.
→ Can I use pumpkin pie spice instead of the individual spices?
Of course! That's a great way to simplify things even further. If you have a jar of pumpkin pie spice you love, just use about 1 to 1 1/2 teaspoons of it in place of the cinnamon, ginger, nutmeg, and allspice. I sometimes do this when I'm in a hurry. The beauty of this recipe is its flexibility, so feel free to make it your own. Taste the filling before you use it and adjust if you want a little more spice.
Nutrition Facts
per serving
180
Calories
3g
Protein
20g
Carbs
10g
Fat
Taste Profile
A perfect balance of sweet, spiced pumpkin and tangy cream cheese in a buttery pastry.
Ingredient Substitutions
Don't have an ingredient? Try these alternatives
Mascarpone will result in a richer, slightly sweeter filling, while Neufchâtel is a bit lower in fat and has a similar tang. Both should be softened and used in the same quantity.
Using brown sugar will add a lovely molasses note to the filling. If using maple syrup, you may want to reduce the amount slightly and be aware that the filling might be a little looser.
Recipe Variations
Try these delicious twists on the original
Chocolate Chip Delight
For a more decadent twist, fold a handful of mini chocolate chips into the cream cheese and pumpkin filling. The warmth of the spices with the melted chocolate is absolutely heavenly.
Savory Herb and Cheese
For a savory version, omit the sugar and spices from the filling. Instead, mix the cream cheese and pumpkin with salt, pepper, a clove of minced garlic, and some finely chopped fresh herbs like sage or thyme. These would make perfect little appetizers.
Common Mistakes to Avoid
Learn from others' mistakes for perfect results
- Using cold cream cheese, which results in a lumpy filling.
- Overfilling the dough, which causes the filling to leak during baking.
- Tying the twine too tightly, which constricts the dough and prevents it from puffing up properly.
- Forgetting to grease the twine, making it difficult to remove without damaging the pastry.
- Not sealing the dough seams completely, creating an escape route for the delicious filling.
Meal Prep & Storage
Make Ahead Tips
The pumpkin cream cheese filling can be prepared up to 2 days in advance and stored in an airtight container in the refrigerator. This can be a real time-saver! I don't recommend assembling the pumpkins until just before baking, as the dough can become soggy if it sits with the filling for too long. Having the filling ready to go makes the final assembly feel quick and effortless.
Leftover Ideas
Leftover crescent pumpkins are a wonderful breakfast treat the next day. I like to warm one up gently in the toaster oven for a few minutes; it revives the pastry and makes the filling creamy again. You can also enjoy them at room temperature. They pack well in lunchboxes for a special surprise. I wouldn’t recommend microwaving them, as it can make the dough tough.
Perfect Pairings
Serve this with...
Cooking Timeline
Preheat the oven and line your baking sheet. Beat the cream cheese until smooth.
Mix the remaining filling ingredients together until smooth and combined.
Prepare the crescent dough, fill each square, and shape them into sealed balls.
Wrap each ball with twine to create the pumpkin shape and arrange on the baking sheet.
Brush with egg wash, sprinkle with sugar, and bake until golden brown. Let cool slightly before serving.

Crescent Pumpkins: Cream Cheese & Pumpkin Filling
Crescent pumpkins filled with cream cheese and pumpkin pie filling. A festive treat for fall gatherings and desserts!
Timing
Prep Time
25 Minutes
Cook Time
15 Minutes
Total Time
40 Minutes
Recipe Details
Ingredients
For the Pumpkin Cream Cheese Filling
-
01
4 oz full-fat block cream cheese, softened to room temperature
-
02
1/3 cup pure pumpkin puree
-
03
1/4 cup granulated sugar
-
04
1/2 tsp ground cinnamon
-
05
1/4 tsp ground ginger
-
06
1/8 tsp ground nutmeg
-
07
A pinch of ground allspice
-
08
1/2 tsp vanilla extract
For the Pumpkin Pastries
-
01
1 (8 oz) can refrigerated crescent roll dough
-
02
1 large egg, beaten (for egg wash)
-
03
1 tbsp coarse sugar, for sprinkling (like turbinado)
-
04
8 pecan halves or small pretzel pieces for the 'stems'
Instructions
First, let’s get the oven ready and make that beautiful filling. Preheat your oven to 375°F (190°C) and line a baking sheet with parchment paper; it makes cleanup a dream. In a medium bowl, take your softened cream cheese and beat it with an electric mixer, or a whisk and some determination, until it's completely smooth and creamy. You don't want any lumps! Then, gently fold in the pumpkin puree, granulated sugar, all those lovely spices, and the vanilla extract. Mix until everything is just combined into a smooth, pale orange cloud of deliciousness. Set it aside for a moment while you get the dough ready.
Now for the dough. Open your can of crescent rolls—I still jump every single time it pops, haha—and unroll the dough onto a lightly floured surface. You'll see it’s perforated into 8 triangles. We want to make 4 rectangles, so gently press the seams of two triangles together to form one rectangle. You’ll do this for all 8 triangles, ending up with 4 rectangles. Cut each rectangle in half crosswise, so you now have 8 little squares. This gives us a better shape for our pumpkins than the original triangles.
This is the fun, creative part! Spoon about a tablespoon of your pumpkin filling into the center of each dough square. Don't be tempted to add too much more, or it will spill out during baking. Now, carefully bring the four corners of the dough square up to the center and pinch them together tightly. Then bring up the remaining edges and pinch everything together to form a sealed little ball. Roll it gently between your palms to smooth it out. Take a piece of kitchen twine (about 12 inches long, and lightly oiled!) and wrap it around the ball to create 4-5 segments, just like a real pumpkin. Tie it at the top, but not too tightly! The dough needs space to grow.
Place your little twine-wrapped pumpkins on the prepared baking sheet. In a small bowl, whisk the egg with a splash of water to create an egg wash. Gently brush this all over the surface of each pumpkin; this will give them a gorgeous golden-brown color and a lovely sheen. For a little extra sparkle and crunch, sprinkle them with some coarse sugar. Bake for 12-15 minutes, or until they are puffed up and a beautiful deep golden brown. The whole kitchen will smell absolutely divine. Let them cool on the baking sheet for about 10 minutes before carefully snipping and removing the twine and adding a little pecan or pretzel stem.
Notes & Tips
-
1
Ensuring your cream cheese is truly at room temperature is the most important step for a smooth filling. I usually take mine out of the fridge an hour or two before I start. If you're in a pinch, you can unwrap it and microwave it in 10-second intervals, but be very careful not to melt it.
-
2
The egg wash is optional but highly recommended. It’s what gives the pumpkins that professional-looking, glossy finish. If you don't have an egg, you can brush them with a little milk or melted butter instead for a similar, though slightly less shiny, result.
-
3
These little guys are best served warm, but they are still delicious at room temperature. The warmth just makes the filling extra gooey and the pastry super soft. If you want to reheat them, a few minutes in a toaster oven or air fryer works wonders to crisp them back up.
 Desserts
Strawberry Puff Pastry Danishes Recipe
Flaky puff pastry filled with sweet strawberry filling, perfect for a special breakfast or dessert.
Tools You'll Need
-
Baking Sheet: A standard half-sheet pan is perfect for this. Lining it with parchment paper is a non-negotiable for me—it prevents sticking and makes cleanup incredibly easy.
-
Electric Hand Mixer: While you can definitely mix the filling by hand with a whisk, a hand mixer makes getting the cream cheese perfectly smooth and lump-free an absolute breeze. It's one of my most-used kitchen gadgets.
-
Kitchen Twine: This is essential for creating that adorable pumpkin shape. Make sure it's 100% cotton and oven-safe. A little coating of oil on the twine will save you a headache when it's time to remove it.
-
Pastry Brush: A small silicone or natural bristle pastry brush is what you'll need to apply the egg wash evenly without deflating your little pumpkins. It's all about that gentle touch.
Must-Know Tips
-
Chill Your Dough: Always work with cold crescent dough. If it starts to feel warm and sticky while you're shaping the pumpkins, just pop the whole baking sheet into the fridge for 10 minutes to let it firm up again.
-
Seal the Seams Tightly: This is the key to preventing leaks. After you pinch the dough together around the filling, give it a little twist and press to make sure it’s completely sealed before you roll it into a ball.
-
Cool Before Twine Removal: Wait at least 10 minutes for the pumpkins to cool and set before you try to remove the twine. If they're too hot and soft, you risk squishing them as you pull the strings out.
Professional Secrets
-
A Touch of Vanilla: Don't skip the vanilla extract in the filling. It might seem like a small amount, but it really elevates the other flavors and adds a beautiful, aromatic depth that balances the spices.
-
Coarse Sugar for Texture: Using a coarse sugar like turbinado or demerara for sprinkling on top before baking adds more than just sparkle. It creates a delightful, slightly crunchy texture on the crust that contrasts beautifully with the soft dough and creamy filling.
-
The 'Stem' Detail: Adding the little pecan or pretzel stem at the end is the final touch that takes these from cute to utterly charming. It’s a small detail, but in design and in baking, it's the little details that make all the difference.

Recipe by
Mason Cole“Sweet cravings are my specialty! I turn sugar, chocolate, and imagination into pure dessert magic.” 🍰✨
Get Delicious Recipes Weekly
Join 25,000+ home cooks getting our best recipes straight to their inbox.
Free forever • No spam • Unsubscribe anytime