The concept of protein-enriched desserts gained popularity in the early 2000s as fitness culture embraced the idea that healthy eating didn't have to mean deprivation. Cheesecake itself dates back to ancient Greece, where athletes would eat cheese cakes for sustained energy before competitions. This modern twist combines nutritional science with classic dessert appeal, creating a treat that honors tradition while meeting contemporary health goals. The individual jar presentation makes it perfect for portion control and on-the-go enjoyment.
Why You'll Love It
-
No baking required - just mix and chill
-
Perfect portion control in individual jars
-
Packed with protein to keep you full and satisfied
-
Endless flavor variations to keep it interesting
"I never thought healthy could taste this good! My whole family asks for these weekly."
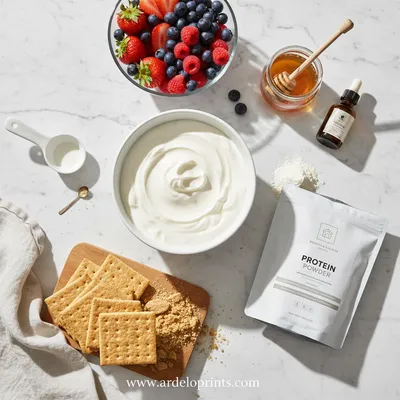
Essential Ingredient Guide
- Greek yogurt: Provides the creamy base and majority of the protein. Use full-fat for richest flavor or non-fat for lowest calories. Honestly, I like the balance of 2% myself.
- Protein powder: Vanilla or unflavored works best. The quality really matters here - a good one blends smoothly without that chalky texture some can have.
- Cream cheese: Just a bit gives that authentic cheesecake richness. Let it soften at room temperature so it blends smoothly without lumps.
- Honey or maple syrup: Natural sweeteners that complement the tanginess. I often use honey for its floral notes, but maple gives a lovely depth too.
- Graham crackers: The classic cheesecake crust. Crush them fine but not powder - you want a little texture. Look, you could use digestive biscuits too if you prefer.
- Fresh berries: The bright acidity cuts through the richness beautifully. Raspberries or strawberries work wonderfully, but blueberries are my personal favorite for their sweet-tart balance.
 Desserts
Cinnamon Roll Cake Recipe
Fluffy cinnamon roll cake with caramelized swirl, ideal for breakfast or snack.
Complete Cooking Process
-
Ingredient Readiness:
All your dairy should be at room temperature to blend smoothly without lumps. The cream cheese especially needs to be soft enough to whip easily.
-
Flavor Development:
The flavors meld and deepen as the cheesecake chills. The tanginess from the yogurt becomes more pronounced, while the sweetness balances out overnight.
-
Texture Control:
Chilling time is crucial for that firm-yet-creamy cheesecake texture. Don't rush it - at least 4 hours, but overnight is truly best.
-
Finishing Touches:
Add fresh fruit and crust just before serving to maintain texture contrast. The crunchy base against the smooth filling is part of the magic.
-
Serving Timing:
These are perfect make-ahead desserts for special occasions or busy weeks. They keep well for 3-4 days, making them ideal for meal prep.
-
Whip the cream cheese alone first for smoothest texture
-
Taste as you sweeten - protein powders vary in sweetness
-
Chill your mixing bowl for fluffier results
-
Layer ingredients gently to maintain distinct textures
Pro Tips
You know, the first time I made these, I was worried they'd be too healthy-tasting, but honestly, they surprised me. The combination of the tangy yogurt with the rich cream cheese creates something that feels truly indulgent. I mean, when my husband didn't even realize they were high protein until I told him, I knew I had a winner. The key is taking your time with the mixing - don't rush it. Let the ingredients really get to know each other, you know? And the chilling part - well, that's when the magic happens. The flavors settle in and become something greater than the sum of their parts.
 Desserts
Easy Ice Cream Sandwich Cake
Cool, creamy ice cream sandwich cake that's simple, fun, and perfect for any sweet craving.
The essence of the dish:
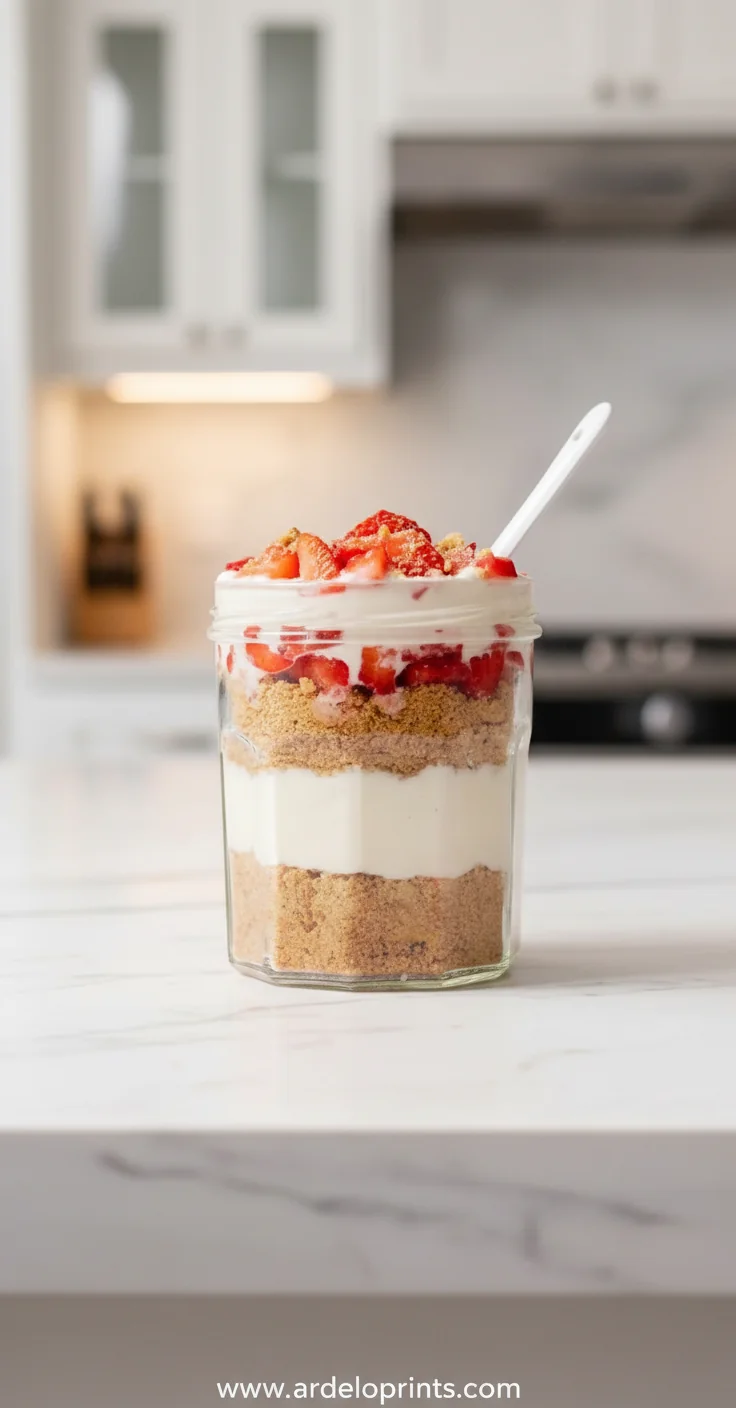
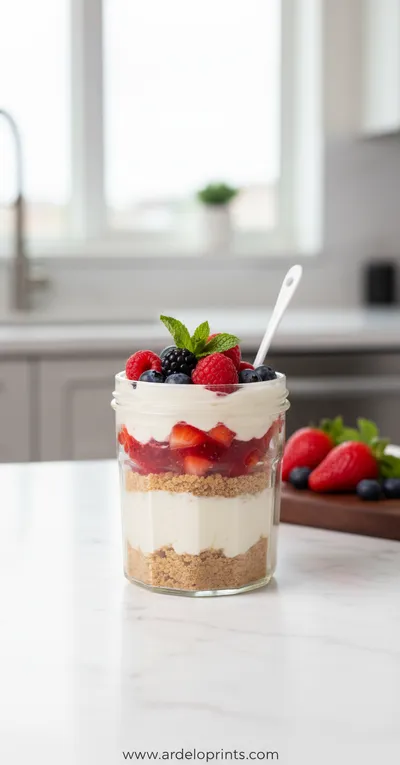
These cheesecake jars capture the luxurious creaminess of traditional cheesecake while being nourishing enough to enjoy any time of day. They're portion-perfect little packages of comfort.
A fun fact or historical angle:
Individual dessert jars became popular during the Great Depression when households focused on making small luxuries feel special. These modern versions continue that tradition of making everyday moments feel celebratory.
Flavor or sensory focus:
The first taste is cool creaminess followed by the crisp crust, then the burst of fresh fruit. It's a textural journey that satisfies both sweet tooth and nutritional needs.
You Must Know
-
Don't skip the chilling time - it's essential for texture
-
Quality protein powder makes all the difference
-
Layer gently to maintain visual appeal
-
Fresh fruit topping adds brightness and nutrition
Frequently Asked Questions
→ Can I use a different protein powder?
Absolutely. Vanilla or unflavored work best, but chocolate or fruity flavors can create fun variations. Just adjust sweetener accordingly as some are sweeter than others.
→ How long do these keep in the refrigerator?
They'll stay fresh for 3-4 days. The crust may soften slightly after day 2, but they're still delicious.
→ Can I make these vegan?
Yes! Use vegan cream cheese and plant-based protein powder. Coconut yogurt works well too, though the flavor will be different.
→ What if I don't have jars?
Any small containers work - ramekins, cups, even mason jars. The key is having individual portions ready to go.
→ Can I freeze these cheesecake jars?
I don't recommend it - the texture changes when thawed. They're best fresh from the refrigerator.
→ What other toppings work well?
Try lemon zest, dark chocolate shavings, chopped nuts, or even a swirl of chocolate sauce for variety. The possibilities are endless!
Nutrition Facts
per serving
245
Calories
15g
Protein
22g
Carbs
12g
Fat
Taste Profile
Creamy and slightly tangy with balanced sweetness
Ingredient Substitutions
Don't have an ingredient? Try these alternatives
Will make it dairy-free but will change the flavor profile significantly
Adjust sweetness accordingly as some crackers are less sweet
Recipe Variations
Try these delicious twists on the original
Chocolate Protein Version
Use chocolate protein powder and add cocoa powder to the filling. Top with chocolate shavings for a decadent twist.
Lemon Berry Style
Add lemon zest to the filling and use lemon juice in the crust. Perfect for spring and summer gatherings.
Common Mistakes to Avoid
Learn from others' mistakes for perfect results
- Using cold cream cheese - causes lumpy filling
- Skipping chilling time - results in runny texture
- Overmixing crust - loses desirable texture
- Adding toppings too early - they can make the crust soggy
Meal Prep & Storage
Make Ahead Tips
These are perfect make-ahead desserts! Prepare up to 3 days in advance and keep refrigerated. Add toppings just before serving.
Leftover Ideas
Store covered in refrigerator for 3-4 days. The crust will soften but remains tasty. Not recommended for freezing.
Perfect Pairings
Serve this with...
Cooking Timeline
Prepare crust mixture and press into jars
Mix filling ingredients until smooth and creamy
Layer filling over crust and smooth tops
Chill thoroughly to set texture and develop flavors
Add fresh toppings and serve chilled

High Protein Cheesecake Jars Recipe
Make these delicious high protein cheesecake jars for a healthy and satisfying dessert or snack option that feels indulgent but fuels your body right. Honestly, they're so creamy and satisfying.
Timing
Prep Time
20 Minutes
Cook Time
0 Minutes
Total Time
4 Hours 20 Minutes
Recipe Details
Ingredients
Crust
-
01
1 cup graham cracker crumbs (about 8 full sheets)
-
02
3 tablespoons melted coconut oil or butter
-
03
1 tablespoon honey or maple syrup
Cheesecake Filling
-
01
1 ½ cups plain Greek yogurt (full fat or 2%)
-
02
4 ounces cream cheese, softened
-
03
½ cup vanilla protein powder
-
04
¼ cup honey or maple syrup
-
05
1 teaspoon vanilla extract
-
06
Pinch of salt
Toppings
-
01
1 cup fresh berries (raspberries, strawberries, or blueberries)
-
02
Fresh mint leaves for garnish (optional)
Instructions
In a medium bowl, mix graham cracker crumbs with melted coconut oil and honey until it resembles wet sand. Honestly, the smell takes me back to making pie crust with my grandma every time.
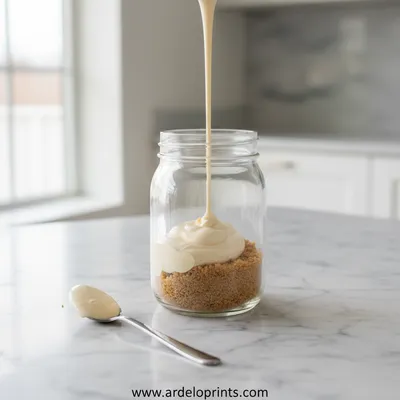
In another bowl, beat the softened cream cheese until smooth and creamy. This is important - no lumps! Then blend in the Greek yogurt, protein powder, honey, vanilla, and salt until perfectly smooth.
Divide the crust mixture evenly among 6 small jars or containers, pressing down gently. Spoon the cheesecake filling over the crust, smoothing the tops. Well, I like to tap them lightly on the counter to settle everything.
Cover and refrigerate for at least 4 hours, but overnight is truly best. The flavors need time to marry and the texture needs to set up properly.
Just before serving, top with fresh berries and a mint leaf if using. These are perfect for special occasions or as a healthy snack any day of the week.
Notes & Tips
-
1
Make sure all ingredients are at room temperature for smoothest blending
-
2
Taste the filling before sweetening - protein powders vary in sweetness
-
3
Chill your mixing bowl for fluffier results
-
4
These keep well for 3-4 days in the refrigerator
 Snacks
Chocolate Coconut Energy Balls Recipe
Healthy no-bake snacks combining rich chocolate flavor with coconut goodness for quick energy boosts.
Tools You'll Need
-
6 small jars or ramekins (8oz each)
-
Mixing bowls
-
Electric mixer or whisk
-
Measuring cups and spoons
-
Spatula
Must-Know Tips
-
Don't overmix the crust - you want some texture
-
Let cream cheese soften completely for lump-free filling
-
Chill thoroughly for best texture - patience pays off
-
Add toppings just before serving for freshest presentation
Professional Secrets
-
Chilled bowl = fluffier filling
-
Whip cream cheese alone first for smoothest base
-
Layer ingredients gently to maintain visual appeal
-
Taste as you go - adjustments are easy early on

Recipe by
Mason Cole“Sweet cravings are my specialty! I turn sugar, chocolate, and imagination into pure dessert magic.” 🍰✨
Get Delicious Recipes Weekly
Join 25,000+ home cooks getting our best recipes straight to their inbox.
Free forever • No spam • Unsubscribe anytime