
The origins of Oreo balls trace back to the early 2000s when home cooks discovered that crushed Oreos mixed with cream cheese created a remarkably smooth, truffle-like consistency. This no-bake phenomenon quickly spread through community cookbooks and potluck gatherings, becoming a staple for busy families who wanted impressive desserts without the fuss. The recipe's beauty lies in its simplicity - transforming everyday ingredients into elegant treats that feel special yet require no special skills or equipment.
Why You'll Love It
-
Only 3 main ingredients needed
-
No baking required - perfect for hot days
-
Customizable with different coatings and decorations
-
Makes enough to share with a crowd
-
Kids can help with every step of the process
-
Freezer-friendly for make-ahead convenience
"I've made these for every school event this year - the kids go crazy for them! So easy and always a hit."
Essential Ingredient Guide
- Oreo cookies: The whole cookie gets crushed - cream filling and all. This gives the balls their distinctive Oreo flavor and helps bind everything together. I like using the regular kind, but you could experiment with different flavors too.
- Cream cheese: Full-fat cream cheese works best here - it makes the mixture creamy and helps it hold its shape when chilled. Make sure it's softened to room temperature so it blends smoothly with the cookie crumbs.
- Chocolate coating: I prefer semi-sweet chocolate for balancing the sweetness, but you could use white chocolate or dark chocolate depending on your taste. The chocolate creates a beautiful shell that contrasts with the creamy center.
- Vanilla extract: Just a teaspoon enhances all the other flavors and gives that homemade taste. You could skip it if you don't have any, but it really does make a difference.
- Sprinkles or toppings: These are completely optional but add such a festive touch. I keep different colors on hand for various holidays - they make the balls look so special.
- Coconut oil: A tiny bit added to the melting chocolate helps it coat smoothly and gives a beautiful glossy finish to your finished treats.
 Snacks
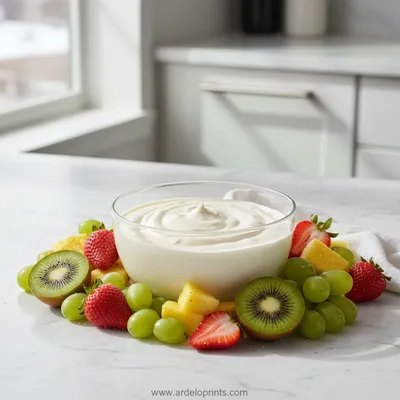
Easy Fruit Dip Recipe
Creamy, easy fruit dip for fresh fruit, perfect for any snack or dessert.
Complete Cooking Process
-
Ingredient Readiness:
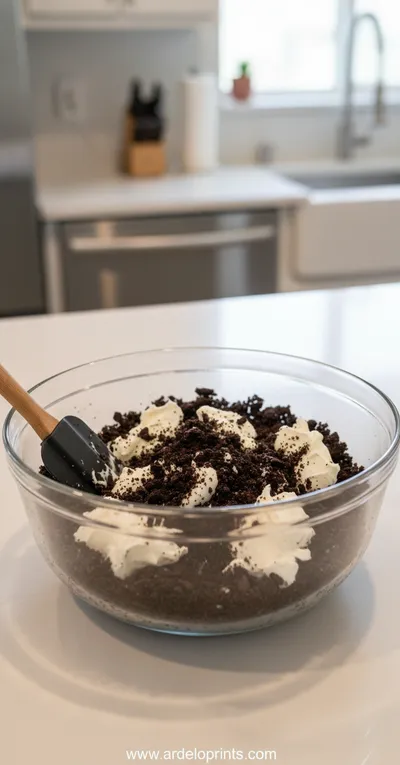
The cream cheese needs to be softened properly - take it out about an hour before you start. The cookies should be crushed finely but still have some texture. I find putting them in a zip-top bag and rolling with a rolling pin works perfectly.
-
Flavor Development:
The magic happens when the cookie crumbs and cream cheese mix together. The Oreo cream filling melds with the cheese, creating this rich, harmonious flavor that's both familiar and new. Letting the mixture chill allows these flavors to really settle in together.
-
Texture Control:
Chilling is crucial here - it firms up the mixture so you can roll neat balls. The second chill after coating sets the chocolate shell properly. If you skip these steps, you'll have a mess rather than tidy little treats.
-
Finishing Touches:
The chocolate coating should be just warm enough to dip smoothly but not so hot that it melts the chilled centers. Working quickly but carefully gives you the prettiest results. Adding sprinkles right after dipping ensures they stick properly.
-
Serving Timing:
These are best served chilled but not ice-cold. Take them out of the fridge about 15 minutes before serving so the centers soften slightly. The contrast between the crisp chocolate shell and creamy interior is what makes them so delightful.
-
Use a cookie scoop for evenly sized balls
-
Chill your hands before rolling to prevent sticking
-
Melt chocolate in short bursts, stirring frequently
-
Keep unused mixture chilled while working in batches
-
Line baking sheets with parchment for easy cleanup
-
Store layers separated by wax paper in containers
Pro Tips
You know, the first time I made these, I was worried they'd be too complicated. But honestly, they're one of the easiest things in my recipe box. The key is just taking your time with each step and not rushing the chilling process.
I've found that making these with kids is actually really fun - they love crushing the cookies and rolling the balls. It's one of those recipes that feels like a craft project rather than cooking. And the payoff? Well, seeing their faces when they bite into that first one... that's worth everything.
 Desserts
Inside Out Chocolate Chip Cookies
Chewy cookies with crisp edges and a melt‑in‑your‑mouth center.
The essence of the dish
What makes these special is howordinary ingredients transform into something that feels fancy. The combination of crunchy cookie, creamy filling, and smooth chocolate coating creates this perfect little package of joy. They're like truffles but approachable - no one feels intimidated by an Oreo ball.
A fun fact or historical angle
Oreo balls became particularly popular as a holiday treat, especially around Halloween when their round shape and dark color make them perfect for creating spooky decorations. Their versatility has made them a favorite for everything from birthday parties to seasonal gatherings where easy, crowd-pleasing treats are essential.
Flavor or sensory focus
When you bite into one, you'll first notice the crisp snap of the chocolate shell giving way to the soft, cool center. The Oreo flavor comes through strongly but smoothed out by the cream cheese. It's rich without being overwhelming - the kind of treat where one satisfies but you'll probably reach for another anyway.
You Must Know
-
Don't overprocess the cookies - some texture is good
-
Chill thoroughly between steps - patience pays off
-
Use high-quality chocolate for the best flavor and texture
-
Work with small batches to keep everything cool
-
Let coated balls set completely before storing
Frequently Asked Questions
→ Can I use reduced-fat cream cheese?
You can, but the texture might be slightly less creamy. Full-fat cream cheese gives the best results because it has the right fat content to bind everything together properly and create that luscious mouthfeel.
→ How long do Oreo balls keep?
They'll stay fresh in the refrigerator for about a week. You can also freeze them for up to 3 months. Just make sure they're in an airtight container with layers separated by wax paper.
→ Can I make these without a food processor?
Absolutely! Place the cookies in a zip-top bag and crush them with a rolling pin or heavy pan. It might take a bit more effort, but you'll get the same result. Kids actually love helping with this method.
→ What's the best way to melt the chocolate?
I prefer the double boiler method - a heatproof bowl set over a pot of simmering water. But the microwave works fine too - just do it in 30-second bursts, stirring each time to prevent burning.
→ Can I use different types of cookies?
Yes! This method works with many sandwich cookies. I've had great success with golden Oreos and mint-filled chocolate cookies. The ratio might need slight adjustment depending on the cookie size.
→ Why are my Oreo balls too soft?
They might need more chilling time, or your cream cheese could have been too warm. Make sure everything is properly chilled before rolling, and don't skip the freezer step before coating.
Nutrition Facts
per serving
120
Calories
2g
Protein
14g
Carbs
7g
Fat
Taste Profile
Rich chocolate flavor balanced by creamy sweetness
Ingredient Substitutions
Don't have an ingredient? Try these alternatives
Creates an even richer, creamier texture with slightly sweeter flavor
Adjusts sweetness level and creates different flavor profiles
Any chocolate sandwich cookie will work, adjusting the flavor accordingly
Recipe Variations
Try these delicious twists on the original
Peppermint Version
Add 1/2 teaspoon peppermint extract to the mixture and crush candy canes for topping
Cookie Dough Style
Use golden Oreos and add mini chocolate chips to the mixture
Birthday Cake
Use birthday cake Oreos and rainbow sprinkles mixed into the coating
Common Mistakes to Avoid
Learn from others' mistakes for perfect results
- Using cold cream cheese that doesn't blend smoothly
- Skipping chilling steps leading to messy balls
- Overheating chocolate causing it to seize
- Rolling balls too large making them hard to coat
- Not tapping off excess chocolate creating thick coating
Meal Prep & Storage
Make Ahead Tips
You can make the mixture up to 2 days ahead and keep refrigerated until ready to roll and coat. The finished balls keep well for several days, making them perfect for holiday preparation when you need to have treats ready for guests or parties.
Leftover Ideas
Store leftovers in the refrigerator. They actually improve in texture after the first day as the flavors meld. Bring to cool room temperature for 10 minutes before serving leftovers.
Perfect Pairings
Serve this with...
Cooking Timeline
Crush cookies and mix with cream cheese and vanilla
Chill mixture in refrigerator until firm
Roll mixture into balls and freeze briefly
Melt chocolate and coat chilled balls
Chill finished balls until chocolate sets completely
 Desserts
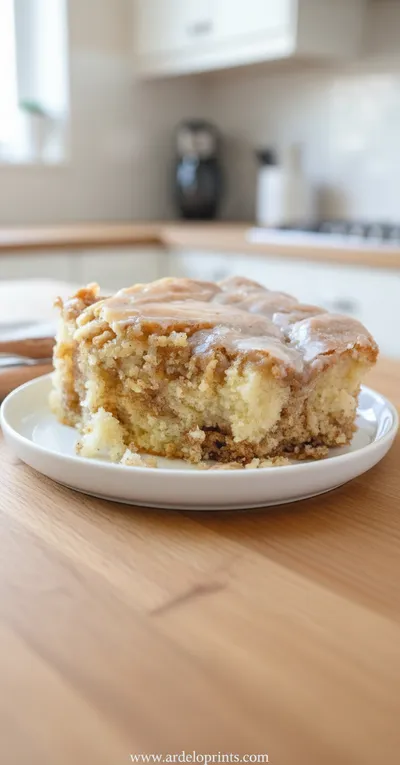
Cinnamon Roll Cake Recipe
Fluffy cinnamon roll cake with caramelized swirl, ideal for breakfast or snack.

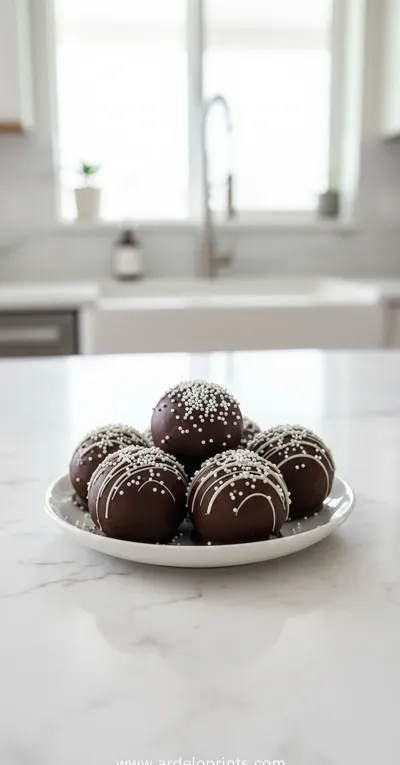
Oreo Balls Recipe - Easy No-Bake Dessert
Learn how to make delicious Oreo balls with cream cheese - a simple no-bake treat perfect for snacks or bake sales. These rich, chocolatey bites come together with just a few ingredients and minimal effort.
Timing
Prep Time
30 Minutes
Cook Time
0 Minutes
Total Time
2 Hours 30 Minutes
Recipe Details
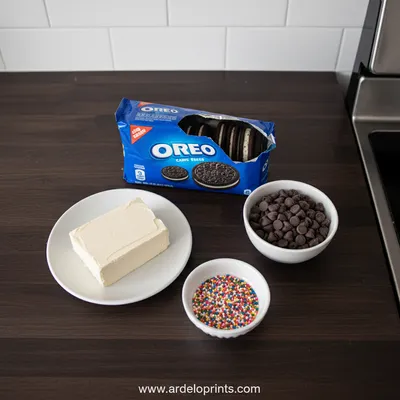
Ingredients
Main Mixture
-
01
1 package (14.3 oz) Oreo cookies
-
02
8 oz cream cheese, softened
-
03
1 teaspoon vanilla extract
Chocolate Coating
-
01
16 oz semi-sweet chocolate chips
-
02
1 tablespoon coconut oil
-
03
Sprinkles or crushed cookies for decorating
Instructions
Place the whole Oreo cookies (creme filling included) in a food processor. Pulse until you have fine crumbs with a bit of texture. If you don't have a processor, put cookies in a zip-top bag and crush with a rolling pin until finely crushed.
In a large bowl, combine the cookie crumbs with softened cream cheese and vanilla extract. Mix until well combined and uniform. The mixture will be thick and hold together when pressed.
Cover the mixture and refrigerate for at least 1 hour, or until firm enough to handle. This chilling step is crucial for making the balls easier to roll.
Using a small cookie scoop or tablespoon, portion the mixture and roll into 1-inch balls. Place them on a parchment-lined baking sheet as you work.
Freeze the rolled balls for 15-20 minutes until very firm. This prevents them from falling apart during the coating process and helps the chocolate set properly.
Melt the chocolate chips with coconut oil using a double boiler or microwave. If microwaving, do it in 30-second intervals, stirring between each until smooth and fully melted.
Using a fork or dipping tool, dip each chilled ball into the melted chocolate, allowing excess to drip off. Return to the parchment-lined sheet.
Immediately add sprinkles or decorative touches before the chocolate sets. refrigerate for at least 30 minutes until the chocolate is firm. Store in an airtight container in the refrigerator.
Notes & Tips
-
1
For neater balls, chill your hands before rolling the mixture
-
2
If the chocolate starts to thicken while dipping, gently reheat it
-
3
These can be made up to 3 days ahead and stored in the refrigerator
-
4
For a decorative touch, drizzle with white chocolate after the main coating sets
-
5
Let sit at room temperature for 10-15 minutes before serving for best texture
 Desserts
Easy Ice Cream Sandwich Cake
Cool, creamy ice cream sandwich cake that's simple, fun, and perfect for any sweet craving.
Tools You'll Need
-
Food processor or zip-top bag and rolling pin
-
Mixing bowls
-
Measuring spoons
-
Baking sheets
-
Parchment paper
-
Double boiler or microwave-safe bowl
-
Fork or dipping tools
-
Cookie scoop (optional but helpful)
Must-Know Tips
-
Don't skip the chilling steps - they're essential for success
-
Use room temperature cream cheese for smooth blending
-
Work in small batches to keep mixture cool
-
Tap off excess chocolate gently for even coating
-
Store with wax paper between layers to prevent sticking
Professional Secrets
-
A small amount of coconut oil in the chocolate ensures smooth coating
-
Chilling tools makes handling the mixture easier
-
Rotate baking sheets in freezer for even chilling
-
Test one ball's firmness before dipping the whole batch

Recipe by
Mason Cole“Sweet cravings are my specialty! I turn sugar, chocolate, and imagination into pure dessert magic.” 🍰✨
Get Delicious Recipes Weekly
Join 25,000+ home cooks getting our best recipes straight to their inbox.
Free forever • No spam • Unsubscribe anytime