
I remember the first time I really got banana bread. It was in my grandmother’s kitchen, a cozy little room where the windows were always a bit steamy from something simmering on the stove. She never used a written recipe; it was all feel and memory. She’d let me mash the bananas with a fork, and the sweet, fruity smell would just take over. For years, I tried to recreate her loaf, but mine always came out a little too dry or a little too dense. It wasn't until I stopped trying to be perfect and just focused on the feeling of it—the slow process, the simple ingredients—that I landed on this version. It’s a little different from hers, but it carries the same spirit. I think of it as my own little tribute to her kitchen, a slice of nostalgia that I can bake whenever I miss her. Sometimes I still feel like I’m chasing the world's best loaf, but this one feels pretty close to my heart.
Now, my kitchen looks different, a bit more modern, but the feeling is the same when this bread is in the oven. The whole house gets quiet, wrapped in that incredible aroma. My kids will wander in, drawn by the smell, and I see the same look on their faces that I must have had on mine. It's funny how a simple loaf of bread can connect generations. It's not as dramatic as, say, a spooky Halloween bread, but it has its own quiet power. It’s proof that the simplest things are often the most meaningful. This recipe is more than just instructions; it’s a story, a memory, and a feeling of pure, unadulterated comfort.
Why You'll Adore This Banana Bread
-
Unbelievably Moist Crumb: This isn't just a claim; it's a promise. Thanks to the perfect ratio of bananas, melted butter, and brown sugar, every single slice is incredibly tender and stays moist for days. It has that soft, dense-but-not-heavy texture that just melts in your mouth, making it the ultimate comfort food. You will feel bliss with every bite.
-
One-Bowl Simplicity: I designed this recipe for ease and grace, because baking should be relaxing, not stressful. You literally only need one bowl to mix everything together, which means cleanup is an absolute breeze. It’s the perfect recipe for a spontaneous baking urge when you just want a delicious reward with minimal fuss.
-
The Most Heavenly Aroma: Wow, the smell. As this bread bakes, your home will be filled with the most incredible aroma of sweet bananas, warm vanilla, and caramelized sugar. It’s a scent that instantly makes a house feel like a home, cozy and inviting. It's honestly half the reason I love making it so much.
-
Perfectly Forgiving & Customizable: This recipe is so wonderfully adaptable. Didn’t measure the flour perfectly? Oops, it's okay. Want to add chocolate chips, walnuts, or a sprinkle of cinnamon? Go for it! It's a sturdy, reliable base that welcomes your creative touches, making it your own personal masterpiece every time.
This is the only banana bread recipe I'll ever use. It's perfectly moist and so, so comforting.
Essential Ingredient Guide
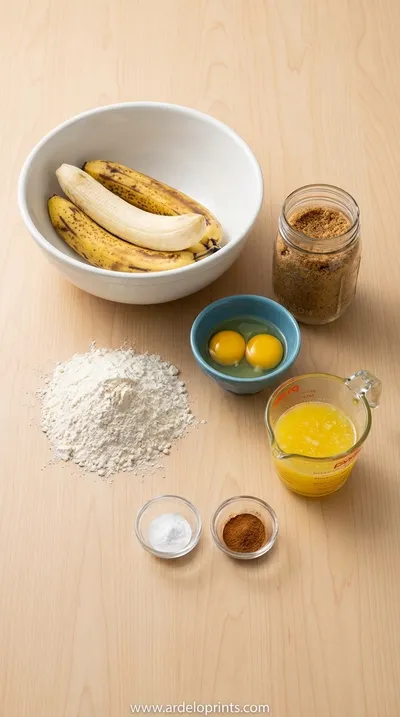
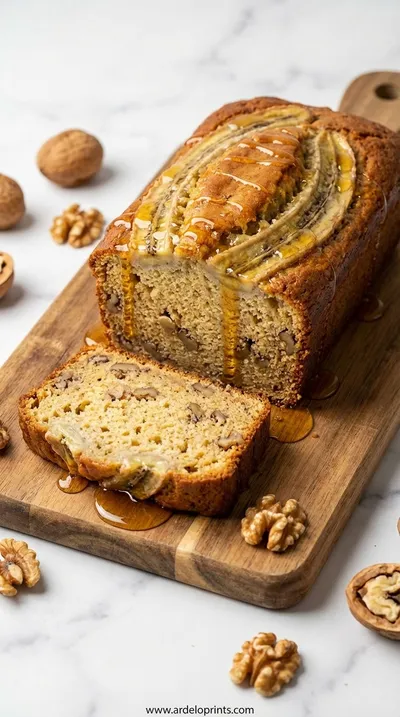
- Overripe Bananas: Honestly, this is the most important part. You need bananas that are well past their prime for eating—the ones with deep yellow peels covered in brown and black spots. These bananas are much sweeter because their starches have converted to sugar, and they're softer, making them easier to mash into a smooth puree. This natural sweetness and moisture are the foundation of a truly great banana bread, so be patient and let them ripen fully!
- Melted Butter: While some recipes call for softened butter, I much prefer using melted butter in this one. It coats the flour more gently, which helps prevent over-developing the gluten, resulting in a wonderfully tender and soft crumb rather than a tough one. Plus, it adds a beautiful, rich flavor that complements the bananas perfectly. Just let it cool slightly before mixing it with the eggs so you don't accidentally scramble them.
- Brown Sugar: I use light brown sugar here for that lovely, subtle molasses flavor and extra moisture. The molasses content in brown sugar makes the bread so soft and keeps it from drying out. You can use dark brown sugar if you want an even deeper, more caramel-like flavor, which is also delicious. It really contributes to the dense, moist texture we're aiming for.
Complete Cooking Process
-
The Gentle Preparation:
This is the calm, quiet part of the process. I love gathering everything first, arranging the bowls and ingredients on the counter. It feels like setting a stage. You'll start by preheating your oven, which is like a gentle promise of the warmth to come. Mashing the bananas is so satisfying; use a fork and just press down until they’re mostly smooth but still have a few small lumps for texture. This isn’t about perfection, it’s about creating a rustic, homemade feel. Then, you’ll melt the butter and let it cool a bit—a perfect moment to take a deep breath.
-
The Magic of Mixing & Baking:
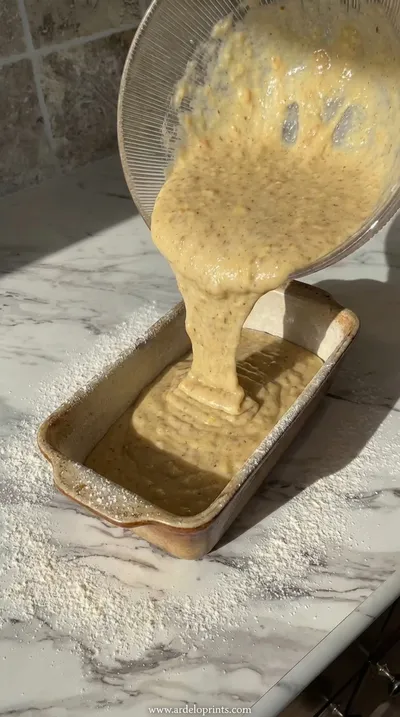
Now for the fun part. In your one big bowl, you’ll whisk together the mashed bananas, melted butter, sugar, egg, and vanilla. It’s a beautiful, fragrant mixture. Then you gently fold in the dry ingredients. The key word here is gently. Overmixing is the enemy of a tender crumb, so just mix until you don't see any more dry streaks of flour. Pouring the thick, luscious batter into the prepared loaf pan feels so promising. Then, into the oven it goes, and the real magic begins as the heat transforms it into a golden, fragrant loaf.
-
The Art of Patience (Cooling):
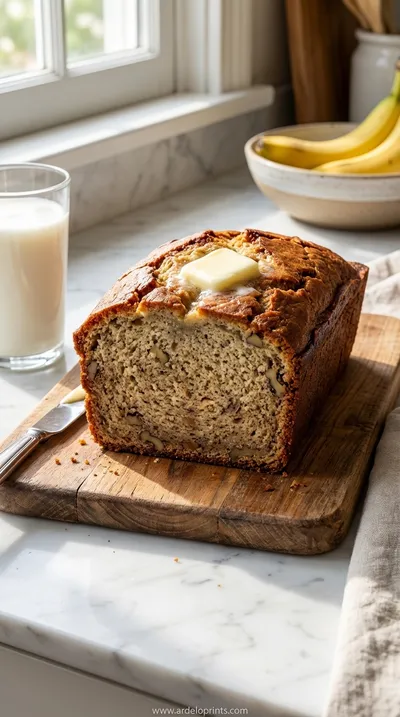
Ugh, this is the hardest part for me! The bread comes out of the oven looking absolutely glorious, with a beautifully domed, cracked top, and it smells divine. But you have to let it cool in the pan for a little while. This step is so important because it allows the bread to set up, making it easier to remove without it falling apart. After about 10-15 minutes, you can carefully turn it out onto a wire rack to cool completely. That first slice, when it’s still just a little warm… wow, it’s pure heaven.
-
Don't overmix the batter! A few lumps are perfectly fine and actually desirable. Mix just until the flour disappears.
-
Check for doneness with a wooden skewer. If it comes out clean or with a few moist crumbs attached, it’s ready.
-
Let the bread cool completely before slicing for the cleanest cuts. I know it's hard, but it's worth the wait!
Pro Tips for a Perfect Loaf
Following these little tips really makes a difference in achieving that perfect texture.
 International_Cuisine
Spicy Shrimp Sushi Stacks
A fresh, vibrant bite combining seasoned shrimp, rice, and crisp toppings.
A Note on Ingredients
Using ingredients at room temperature, especially the egg, helps the batter come together more smoothly and evenly. It might seem like a small detail, but these little things contribute to the final texture of the bread. It allows the butter to emulsify properly with the other ingredients, creating a more uniform and tender crumb. It’s just one of those quiet little secrets that professional bakers know and home cooks can easily adopt for better results.
Frequently Asked Questions
→ Can I use frozen bananas for this recipe?
Absolutely! Using frozen bananas is a fantastic way to make sure you always have ripe ones on hand. Just be sure to thaw them completely at room temperature first. They will release a lot of liquid as they thaw—don't discard it! That liquid is full of banana flavor and sugar, so just mash the bananas right in their juices and add the whole mixture to the bowl. Your bread will be just as moist and delicious.
→ How do I know for sure when my banana bread is done baking?
The visual cues are a golden-brown top and edges that are pulling away slightly from the sides of the pan. But the most reliable method is the toothpick test. Insert a wooden skewer or a toothpick into the center of the loaf. If it comes out clean with no wet batter, it's done. A few moist crumbs clinging to it are fine, but you don't want to see any raw batter. Ovens can vary, so start checking about 5-10 minutes before the recipe says it should be done.
→ Can I add mix-ins like nuts or chocolate chips?
Yes, please do! This recipe is a perfect canvas for additions. About a cup of chopped walnuts, pecans, or chocolate chips would be wonderful. To prevent them from sinking to the bottom, I like to toss them in a tablespoon of flour before gently folding them into the batter at the very end. You could also add a swirl of Nutella or a sprinkle of cinnamon and sugar on top before baking.
→ How can I make this banana bread gluten-free?
You can definitely adapt this for a gluten-free diet. I've had good success using a high-quality, measure-for-measure gluten-free flour blend that contains xanthan gum. Simply substitute it 1:1 for the all-purpose flour. The texture might be slightly different, a little denser, but it will still be incredibly moist and flavorful. Just be sure to let the loaf cool completely before slicing, as gluten-free baked goods can be a bit more delicate when warm.
→ Why did my banana bread sink in the middle?
Oh, the dreaded sink! This usually happens for a few key reasons. The most common culprit is underbaking—the center wasn't fully set when you took it out of the oven. Another reason could be overmixing the batter, which develops too much gluten and creates a weak structure. It could also be from opening the oven door too frequently during baking, which causes the temperature to fluctuate. Always use the toothpick test to ensure it's cooked through!
→ Can I reduce the amount of sugar in this recipe?
You can, but it will affect the final result. Sugar does more than just sweeten the bread; it also contributes to its moistness, tenderness, and browning. If you reduce the sugar, the loaf might be a bit drier and less tender. I would recommend starting by reducing it by just a quarter cup to see how you like the texture. Using very ripe bananas will help keep it naturally sweet.
→ What's the best way to store banana bread to keep it moist?
To keep your banana bread wonderfully moist, allow it to cool completely first. Then, wrap it tightly in plastic wrap or store it in an airtight container at room temperature. It will stay fresh for about 3 to 4 days this way. I actually find the flavor deepens a bit on the second day! For a simple treat, it's one of the best desserts around.
Nutrition Facts
per serving
220
Calories
3g
Protein
33g
Carbs
9g
Fat
Taste Profile
Dominantly sweet and fruity with rich, buttery notes and a hint of warm vanilla.
Ingredient Substitutions
Don't have an ingredient? Try these alternatives
You can substitute the melted butter with an equal amount of melted coconut oil for a subtle coconut flavor, or use a neutral oil like canola. The texture will be just as moist.
Coconut sugar works well as a 1:1 substitute. Using all granulated sugar will result in a slightly less moist loaf with less caramel flavor, so a combination is a nice compromise.
For an egg-free version, Greek yogurt or applesauce can add similar moisture and binding. Using yogurt is a great idea, similar to how it works in these fluffy bagels. The texture will be a bit denser, but still delicious.
Recipe Variations
Try these delicious twists on the original
Chocolate Chip Banana Bread
For an extra-indulgent version, gently fold in 1 cup of semi-sweet chocolate chips into the batter at the end. The melted pockets of chocolate pair beautifully with the sweet banana flavor.
Nutty Banana Bread
Add a lovely crunch and toasty flavor by mixing in 3/4 cup of chopped walnuts or pecans. For even more flavor, toast the nuts in a dry skillet for a few minutes before adding them to the batter.
Cinnamon Raisin Twist
If you love the warmth of cinnamon, consider adding 1/2 cup of raisins and increasing the cinnamon to a full teaspoon. It gives the bread a flavor profile reminiscent of a comforting cinnamon raisin bread.
Common Mistakes to Avoid
Learn from others' mistakes for perfect results
- Overmixing the batter after adding flour, leading to a tough, rubbery loaf.
- Using underripe bananas, which results in a less flavorful and drier bread.
- Slicing the bread while it's too hot, causing it to crumble and have a gummy texture.
- Underbaking the loaf, which will cause the center to sink as it cools.
Meal Prep & Storage
Make Ahead Tips
This is a great recipe to prep ahead of time. You can mash the bananas and store them in an airtight container in the refrigerator for up to a day. You can also mix all the dry ingredients together and store them in a sealed container at room temperature. When you’re ready to bake, just combine the wet ingredients, then fold in your pre-mixed dry ingredients.
Leftover Ideas
Leftover banana bread is a true gift! To reheat, you can pop a slice in the toaster or a toaster oven until it's warm and the edges are slightly crispy. You can also warm it in the microwave for about 15-20 seconds for a softer texture. Leftover slices are also amazing when used to make French toast for a truly indulgent breakfast.
Perfect Pairings
Serve this with...
Cooking Timeline
Preheat oven and prepare loaf pan. Gather and measure all ingredients.
Mash bananas and whisk together all wet ingredients in a large bowl.
Gently fold the dry ingredients into the wet mixture until just combined. Pour into loaf pan.
Bake for 60 minutes, or until a skewer comes out clean.
Cool in the pan for 15 minutes, then transfer to a wire rack to cool further before slicing.
Ultra Moist Banana Bread Recipe: Easy Homemade Treat
Make delicious banana bread with this simple 1-bowl recipe! Ready in just 1 hour—perfect for any occasion.
Timing
Prep Time
15 Minutes
Cook Time
60 Minutes
Total Time
1 Hour 15 Minutes
Recipe Details
Ingredients
Wet Ingredients
-
01
3 large overripe bananas, mashed
-
02
1/2 cup (113g) unsalted butter, melted and slightly cooled
-
03
3/4 cup (150g) packed light brown sugar
-
04
1 large egg, at room temperature
-
05
1 tsp pure vanilla extract
Dry Ingredients
-
01
1 1/2 cups (180g) all-purpose flour
-
02
1 tsp baking soda
-
03
1/2 tsp salt
-
04
1/2 tsp ground cinnamon (optional)
Instructions
First, let's set the mood. Preheat your oven to 350°F (175°C) and lightly grease a 9x5 inch loaf pan. I like to line mine with parchment paper, leaving a little overhang on the sides to act as handles. This makes lifting the baked loaf out so much easier later on. In a large bowl, mash your overripe bananas with a fork. I like to leave a few small lumps for texture, but you can make it as smooth as you like. This is the heart of our bread, so take a moment to enjoy that sweet, fruity smell.
Now, let’s build the flavor. Pour the slightly cooled melted butter into the bowl with the mashed bananas. Add the brown sugar, the room temperature egg, and the vanilla extract. Using a whisk, gently mix everything together until it's just combined. The batter will look glossy and smell incredible. Don't go crazy here; we're just aiming for a uniform mixture. The warmth from the butter will help dissolve the sugar, creating a really lovely, cohesive base for our bread.
It’s time for the dry ingredients to join the party. In the same bowl—yes, still just one bowl!—sprinkle the all-purpose flour, baking soda, salt, and cinnamon (if you're using it) over the wet mixture. Switch to a spatula and gently fold the dry ingredients into the wet. Be careful not to overmix! This is so important for a tender crumb. Just fold until you no longer see streaks of flour. A few little lumps in the batter are perfectly fine, I promise. This gentle folding is a key step in great baking.
Gently pour the beautiful, thick batter into your prepared loaf pan and smooth the top with your spatula. Now for the hard part: waiting. Bake for 55 to 65 minutes. The top will be a deep golden brown, and a wooden skewer inserted into the center should come out clean. Let the bread cool in the pan on a wire rack for about 15 minutes before using the parchment handles to lift it out. Allow it to cool for at least another 30 minutes before slicing. I know it's tempting, but this rest is crucial for the perfect slice!
Notes & Tips
-
1
The ripeness of your bananas really is key. The darker and spottier, the better! They provide so much natural sweetness and moisture, which is essential for the texture. If your bananas aren't quite ripe enough, you can speed up the process by baking them on a sheet pan at 300°F (150°C) for about 15-20 minutes, or until the peels turn black.
-
2
Feel free to make this recipe your own by adding about a cup of your favorite mix-ins. Chocolate chips, chopped walnuts, or pecans are classic choices. Fold them in gently at the very end with the dry ingredients. A sprinkle of coarse sugar on top before baking also adds a lovely crunchy texture.
-
3
This bread stores beautifully. Once it's completely cooled, wrap it tightly or place it in an airtight container at room temperature for up to four days. Honestly, I think the flavor gets even better on day two as everything melds together. It's truly an easy recipe to love.
 Dinner
Creamy Low Carb Chicken Casserole
Low‑carb, creamy chicken casserole that feels indulgent without the noodles.
Tools You'll Need
-
9x5 Inch Loaf Pan: This is the classic vessel for banana bread. A light-colored metal pan is my preference as it conducts heat evenly without over-browning the edges. Using parchment paper as a sling is my favorite trick for easy removal.
-
Large Mixing Bowl: The beauty of this recipe is that it all comes together in one single bowl. Choose one that's large enough to comfortably mix everything without splashing. It makes the whole process feel so much calmer and, of course, cleanup is a dream.
-
Whisk and Spatula: You'll need a whisk for combining the wet ingredients to ensure they are well emulsified. Then, switch to a flexible silicone spatula for folding in the dry ingredients. The spatula helps you scrape the bottom of the bowl and fold gently to avoid overmixing.
-
Measuring Cups and Spoons: Baking is a bit of a science, so accurate measurements are important. Having a good set of measuring cups and spoons ensures your ratios are correct, leading to a consistently delicious loaf every single time.
Must-Know Tips
-
Don't Overmix the Batter: This is the golden rule of quick breads. Once you add the flour, mix only until it's just combined. Overmixing develops gluten, which will make your banana bread tough and dense instead of soft and tender.
-
Use Room Temperature Ingredients: Especially the egg. When the egg is at room temperature, it mixes more evenly into the batter and helps create a lighter, more uniform texture. It’s a small step that makes a noticeable difference in the final crumb.
-
Let It Cool Before Slicing: I know, I know, it's so hard to wait when your kitchen smells incredible. But letting the bread cool for at least 30 minutes allows the crumb to set. Slicing it while it's piping hot can cause it to be gummy and fall apart.
Professional Secrets
-
Melted, Not Creamed, Butter: Using melted butter is a secret to an ultra-moist and tender crumb. It coats the flour proteins, inhibiting gluten formation, which results in a softer texture than the creaming method often produces.
-
A Touch of Cinnamon: Even if you think you don't like cinnamon in banana bread, just a half teaspoon adds a subtle warmth and depth of flavor that you can't quite put your finger on. It doesn't scream 'cinnamon'; it just makes the banana flavor sing.
-
The Parchment Paper Sling: Lining the pan with parchment paper so that it hangs over the two long sides is a game-changer. It allows you to lift the entire loaf out of the pan effortlessly, ensuring it doesn't break and looks beautiful.

Recipe by
Emma Fields“Mornings are my magic hour! I create easy, energizing breakfasts that turn sleepy starts into sunshine moments.” ☀️🥞
Get Delicious Recipes Weekly
Join 25,000+ home cooks getting our best recipes straight to their inbox.
Free forever • No spam • Unsubscribe anytime