The concept of a microwaved brownie gained popularity with the rise of mug cakes in the early 2000s, offering a solution for immediate dessert cravings. This protein-packed version transforms that instant gratification into a nourishing snack, blending the comfort of chocolate with the sustained energy of whole food ingredients. It’s a modern take on a classic, proving that healthy eating can be both convenient and deeply satisfying.
Why You'll Love It
-
- Incredibly fast—just two minutes from bowl to belly.
-
- Packed with protein to keep you full and satisfied.
-
- Naturally gluten-free and easily adaptable.
-
- A single-serving size means no leftovers to tempt you.
"I make this every afternoon! It totally fixes my sweet tooth without any guilt."
Essential Ingredient Guide
- Chocolate Protein Powder: This is the star, giving the brownie its structure and rich flavor. Use a good-quality powder you enjoy the taste of on its own.
- Cocoa Powder: Deepens the chocolate flavor. I use natural, unsweetened cocoa for that classic brownie taste.
- Almond Flour: It keeps the brownie tender and gives it a lovely, slightly nutty background note. It’s what makes it gluten-free.
- Maple Syrup: Just a touch for sweetness. You could use honey, but I like the subtle caramel note maple brings.
- Egg: Binds everything together and adds moisture. It makes the texture just right.
- A Pinch of Salt: Don't skip this. It makes all the chocolate flavors pop.
 Desserts
Inside Out Chocolate Chip Cookies
Chewy cookies with crisp edges and a melt‑in‑your‑mouth center.

Complete Cooking Process
-
Ingredient Readiness:
Everything gets mixed right in the mug or ramekin you'll cook it in. It’s best if the egg is at room temperature so it blends in smoothly, but honestly, I’ve used it straight from the fridge and it’s been fine.
-
Flavor Development:
The chocolate flavor deepens as it cooks. The heat wakes up the cocoa powder and melds it with the protein powder into one rich, cohesive taste.
-
Texture Control:
The key is not to overcook it. When it puffs up and looks set on top but still a bit soft in the very center, it’s done. That soft spot turns into the fudgiest part.
-
Finishing Touches:
Let it sit for a minute after it comes out of the microwave. It continues to cook a little, and it’s too hot to eat anyway. That’s when I might add a few chocolate chips on top so they get melty.
-
Serving Timing:
It’s best eaten warm, almost straight away. The texture is perfect then—warm, gooey, and comforting. If you want to get really fancy, a little scoop of vanilla frozen yogurt on top is just... wow.
-
Use a slightly larger mug than you think you need. It will rise up as it cooks.
-
Mix thoroughly but don't over-mix. Just until no dry spots remain.
-
The timing might vary by a few seconds depending on your microwave. Start with two minutes and adjust.
-
Let it rest! It’s tempting to dive in, but that minute of waiting makes all the difference.
Pro Tips
You know, I’ve made this so many times I don’t even measure precisely anymore. I just eyeball it. It’s a very forgiving recipe. Sometimes I add a splash of vanilla extract if I’m feeling fancy, or a tiny pinch of cinnamon. It’s your brownie. Make it how you like.
And honestly, it’s a great base for other ideas. I’ve stirred in a tablespoon of peanut butter, or some crushed nuts. It reminds me of those festive brownies you see around the holidays, but simplified for everyday life.
 Desserts
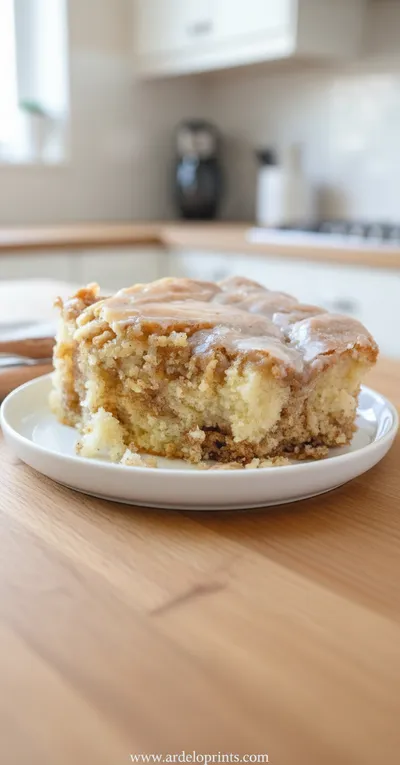
Cinnamon Roll Cake Recipe
Fluffy cinnamon roll cake with caramelized swirl, ideal for breakfast or snack.
The essence of the dish:
It’s about immediate comfort. The warmth of the mug in your hands, the deep chocolate scent steaming up, the fact that it’s just for you. It’s a small, quiet moment of indulgence.
A fun fact or historical angle:
The microwave cake became a kitchen phenomenon in the mid-2000s, a perfect match for our increasingly fast-paced lives. This is just a healthier, more modern evolution of that idea.
Flavor or sensory focus:
You’ll notice the rich, fudgy texture first. It’s not cakey. Then the deep chocolate flavor hits, followed by a satisfying feeling that this is actually good for you, unlike so many other quick treats. It’s a real spooky treat in its own wholesome way.
You Must Know
-
Do not pack the almond flour. Spoon it lightly into the measuring spoon.
-
The brownie will be very hot right out of the microwave. Be patient.
-
This is a single-serving recipe. It does not double well for a larger pan; the cooking time and texture would be off.
Frequently Asked Questions
→ Can I make this without an egg?
You can try a 'flax egg' (1 tbsp ground flax mixed with 3 tbsp water, let sit 5 min). The texture will be a bit more dense and cake-like, but it works.
→ My brownie came out dry. What happened?
It was likely overcooked. Microwaves vary in power. Try reducing the time by 15-second increments next time. Remember, it should look slightly soft in the middle when you take it out.
→ Can I use a different flour?
Yes, oat flour works well as a substitute for almond flour. Use the same amount. If you're not gluten-free, whole wheat pastry flour would probably work, but I always stick with almond.
→ Can I bake this in an oven instead?
Sure, but it defeats the 'two-minute' purpose! If you do, bake at 350°F (175°C) in a small oven-safe dish for about 12-15 minutes. It’s a fun project, like making creative cookies, but quicker.
→ How should I store leftovers?
There shouldn't be any! But if you must, cover it and store at room temperature for a few hours, or in the fridge overnight. Reheat for 20-30 seconds.
→ Can I add mix-ins?
Absolutely. A tablespoon of chocolate chips, some chopped nuts, or even a few dried cherries are lovely. Fold them in at the end. It’s as versatile as those chocolate chip cookies we all love.
Nutrition Facts
per serving
285
Calories
28g
Protein
18g
Carbs
11g
Fat
Taste Profile
Rich, deep chocolate flavor with a balanced sweetness.
Ingredient Substitutions
Don't have an ingredient? Try these alternatives
Use the same amount. Grind rolled oats into a fine powder in a blender first.
The flavor will change slightly, but it works well.
Mix 1 tbsp ground flax with 3 tbsp water, let thicken for 5 minutes before using.
Recipe Variations
Try these delicious twists on the original
Peanut Butter Swirl
Drop a teaspoon of peanut butter on top of the batter and swirl it in with a knife before microwaving.
Mint Chocolate
Add 1/8 teaspoon peppermint extract to the batter and use mint chocolate chips as your add-in.
S'mores Style
Top the cooked brownie with a few mini marshmallows and broil for 30 seconds until toasted.
Common Mistakes to Avoid
Learn from others' mistakes for perfect results
- Overcooking, which leads to a dry, rubbery texture.
- Undermixing, leaving pockets of dry powder in the finished brownie.
- Using a mug that is too small, causing the batter to overflow.
Meal Prep & Storage
Make Ahead Tips
You can mix the dry ingredients in the mug ahead of time and cover it. When ready, just add the wet ingredients and microwave. It’s a great quick project for a busy day.
Leftover Ideas
This is designed as a single serving. Leftovers are not recommended as the texture becomes rubbery upon cooling and reheating.
Perfect Pairings
Serve this with...
Cooking Timeline
Gather and measure all ingredients directly into the mug.
Mix the batter thoroughly until smooth.
Microwave on high, then let rest for 1 minute before eating.
 Desserts
Easy Ice Cream Sandwich Cake
Cool, creamy ice cream sandwich cake that's simple, fun, and perfect for any sweet craving.

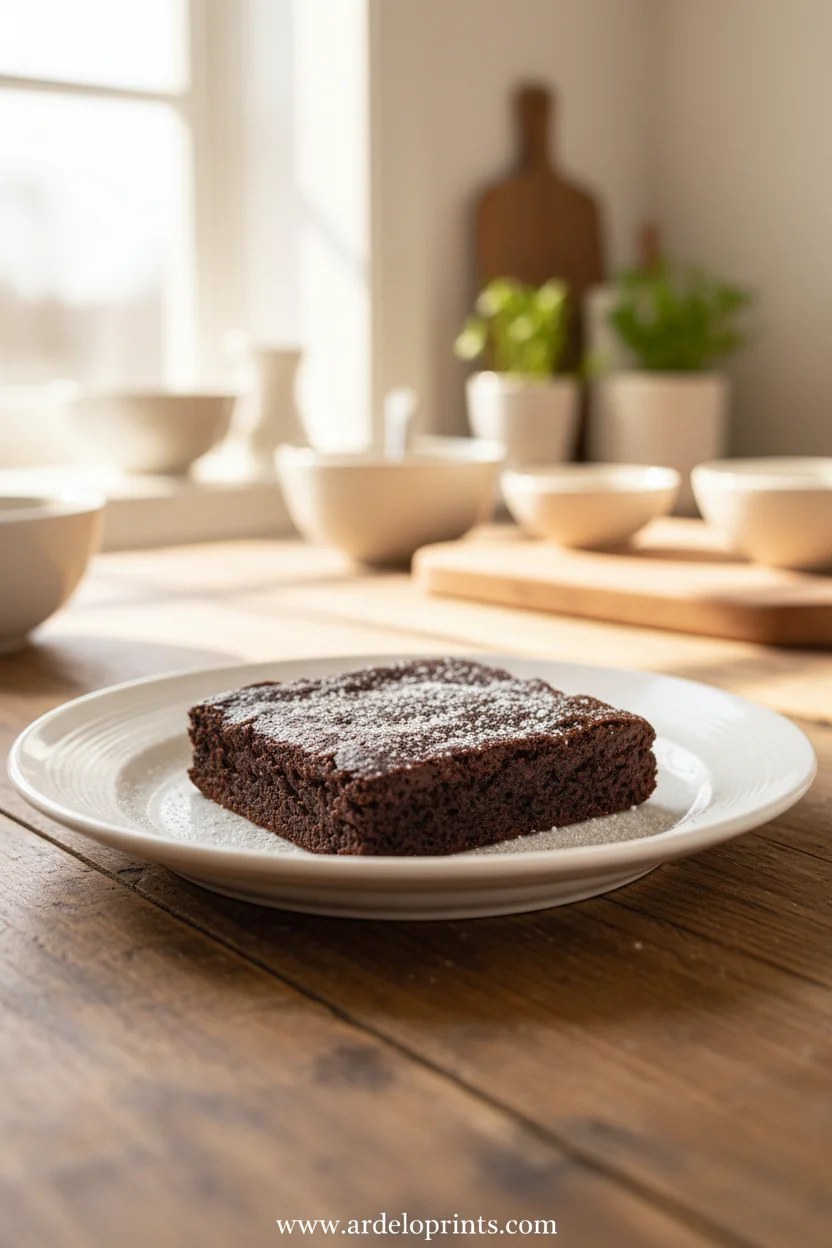
Two Minute Protein Brownie Recipe
This quick single-serve protein brownie is gluten-free and makes a healthy dessert or snack in just two minutes. It's rich, fudgy, and so satisfying.
Timing
Prep Time
2 Minutes
Cook Time
2 Minutes
Total Time
4 Minutes
Recipe Details
Ingredients
For the Brownie
-
01
3 tablespoons chocolate protein powder
-
02
1 tablespoon almond flour
-
03
1 tablespoon unsweetened cocoa powder
-
04
1 tablespoon maple syrup
-
05
1 large egg
-
06
1 tablespoon water
-
07
1/4 teaspoon vanilla extract (optional)
-
08
Pinch of salt
Optional Add-Ins
-
01
1 tablespoon dark chocolate chips
-
02
1 teaspoon chopped walnuts or pecans
Instructions
In a microwave-safe mug or small ramekin (at least 8-10 oz capacity), add the protein powder, almond flour, cocoa powder, and salt. Stir with a fork or small whisk until well combined and no lumps remain.
Add the egg, maple syrup, water, and vanilla extract (if using) to the dry ingredients. Mix vigorously until you have a smooth, thick batter. If you're using any add-ins like chocolate chips, fold them in now.
Microwave on high for about 1 minute and 30 seconds to 2 minutes. Start checking at 1 minute 30 seconds. The brownie is done when it has risen and the top looks set, but might still look a bit soft or wet in a small spot in the center. It will firm up as it rests.
Carefully remove the mug from the microwave—it will be hot. Let it rest for 1 minute before eating. Enjoy warm, directly from the mug with a spoon.
Notes & Tips
-
1
For a lighter texture, you can add 1/4 teaspoon of baking powder, but it's not necessary.
-
2
If your protein powder is very sweet, you may want to reduce the maple syrup slightly.
-
3
The mug will be extremely hot after microwaving. Always use an oven mitt or a towel to handle it.
Tools You'll Need
-
1 microwave-safe mug or ramekin (8-12 oz)
-
Fork or small whisk for mixing
-
Measuring spoons
Must-Know Tips
-
Don't skip the rest time, It allows the brownie to finish setting and cool slightly
-
Mix thoroughly, Ensure no pockets of dry powder remain for a consistent texture
-
Use a large enough mug, The brownie will puff up significantly during cooking
Professional Secrets
-
Room temperature egg, Blends more evenly into the batter for a smoother texture
-
Sift dry ingredients, Helps prevent lumps for a more professional result
-
Slightly undercook, The residual heat will finish the cooking for ultimate fudginess

Recipe by
Mason Cole“Sweet cravings are my specialty! I turn sugar, chocolate, and imagination into pure dessert magic.” 🍰✨
Get Delicious Recipes Weekly
Join 25,000+ home cooks getting our best recipes straight to their inbox.
Free forever • No spam • Unsubscribe anytime